Hey, everyone! I'm young kiwi studying in Sydney with a passion for design and media. I'm here to share my passion with you and give you access to the knowledge I have gained from years of studying at one of Australia's top universities and globally acclaimed Art and Design schools.
Roberta is one of those girls who has a magical vibe about her and, unsurprisingly, she creates the most magical artworks. In a conversation with her over last few weeks, she helped me to understand how the representation of the black female body in the visual art world is a subject of contention for her in the white Australian sphere.
Roberta photographed by Mimi Museta
Having spent the first 19 years of her life in Uganda surrounded by art made with vibrant colours and “out of the box” materials, Roberta now finds herself in Australia: a predominantly white space where her identity as a black woman is underrepresented and misrepresented in art.
“Just scrolling through the world of art on Pinterest sometimes, you have to attach “black” or “African” to find any art that black creatives would relate to. If you just search “paintings” you’re more likely to find images that relate to western ideals”
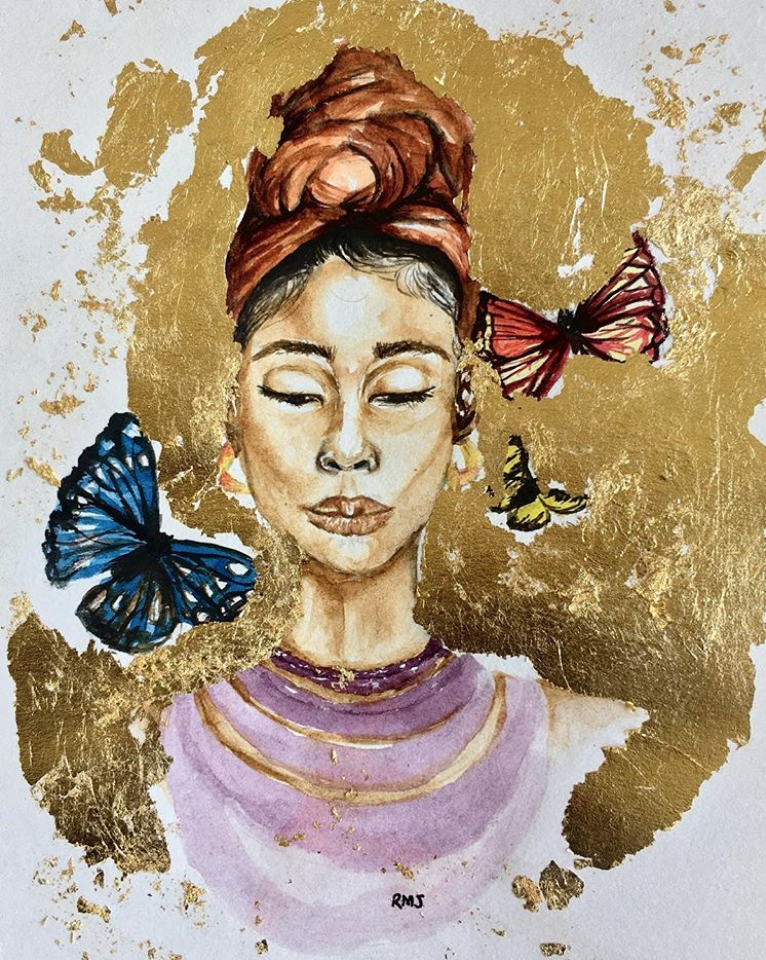
Glow | Watercolour Print with Gold Leaf
Combatting this, Roberta produces paintings of magical black girls from the internet living their best lives. She believes in the importance of carving out a space for black women in the arts that doesn’t fall exclusively on the “tribal” end of the scale.
“I’d like to show that Black women can just BE and still be enough.”
Sisterhood (Limited Edition Print)
“I prefer to focus on how best we can work towards carving out a space for us and especially by us”. The best thing that westerners can do to support this, Roberta explains, is simply to listen.
“Everyone’s story is so important and even more important that it is listened to rather than just heard. So when we see that the black voice is under represented we need to seek that out and listen to it, nurture it and let more people learn from it.”
A Queen (Limited Edition Print)
Not only is there a notable passion and intent behind Roberta’s paintings, they are just simply beautiful and you can return to them day after day to gain more joy. I have a gorgeous embroidered piece that I commissioned for my mother’s birthday a few years ago, and still it draws people to our living room to touch it and ask about it.
You can support Roberta’s work by checking out her Instagram and purchasing a piece of art from her website.
Moreover, seek out the artworks and stories produced by the people who you don’t often see represented in art in a multidimensional manner. The more variety of representations you see, the better understanding you have of the world around you.
Roberta photographed by Mimi Museta
Let me know what you’d like to read about next by leaving a comment below or chatting to me on Instagram!
Little Constellation’s resin jewellery first caught my eye in January this year… ever since then I’ve been wanting to know more about their beautiful creations.
In conversation with Maria, the Dunedin based business owner and designer of Little Constellation Jewellery, I was given insight into how she’s growing a creative commercial business and the curious combination of circumstances that bring about Maria’s creative ideas.
I wanted to know how these unique creations came to be and why now was the right time for the business to grace my Instagram feed.
Maria’s inspiration for her creations came from a combination of the long Dunedin winters and her creative tertiary education at The Otago Polytechnic School of Fashion.
“The Otago Polytechnic School of Fashion was a fantastic place to be immersed in all things fashion… the staff there taught me the tools and skills I still use to this day.”
Maria Brett
Growing up and studying in Dunedin gave Maria ample opportunity to daydream about more tropical climates during the long cold winters, which served as her inspiration for the Liquid Drops design.
Liquid Drops • “Moonlight”
Interestingly, having always been set on making a career out
of her creativity, Maria has found that becoming a mother gave her the perfect
opportunity to turn her creativity into a new business.
“When my baby was born I had endless hours awake at night allowing my mind to wander and these ideas for jewellery just kept bubbling up. Having kids and plans for more kids means I don’t want to fling myself in and out of the workforce, so it made sense to take the plunge!”
Liquid Drops • “Resort”
“I’m aware that as a business grows bigger there’s a balance between creating something you love vs creating something that you know will be commercially viable.”
Maria Brett
Maintaining this balance is important to Maria as she looks ahead to a future where she hopes to see her resin jewellery in a high-end fashion context. “To see my jewellery in high-end fashion magazines in New Zealand or abroad would be exciting, and I have a dream of seeing them on the red carpet!”
Her earrings can already be found alongside successful commercial New Zealand accessory brands such as Meadowlark and Deadly Ponies in the retail store, Belle Bird Boutique. However, her focus on creativity versus commercialisation has positioned her designs in a unique league of their own.
Up against these big brands, you can sense how much more distinctive and intrinsically handmade her earrings are in comparison. This adds huge worth to a customer who values refreshingly novel accessories that they can treasure for a long time into the future.
In a commercial landscape full of mass-produced designs, Little Constellation is striving to give buyers sustainable handmade accessories that stand out from the crowd. Maria’s growing social media presence is a testament to her ability to stay true to her unique creativity in this commercial environment.
Importantly, Maria has shown that being a stay at home mum does not put a holt on your career but can actually do the opposite, proving that the drive and clarity that comes from sleepless nights is something that is so deeply entrenched in creative minds.
If you love Maria’s jewellery as much as I do and want to support her vision for slow fashion accessories, you can follow her Instagram @littleconstellation_nz or check out her website here.
I love to upcycle hoops that I’ve had sitting idly in my jewellery box… and of course, they’re usually ones from Kmart!
There has been quite the demand for a tutorial on these boho-chic leafy hoops via my Instagram @kate_alderton_design … so here it is! My second ever tutorial for you and my very first tutorial on statement earrings.
This tutorial will be shorter than the last one, as these earrings are so simple to make and involve very few steps.
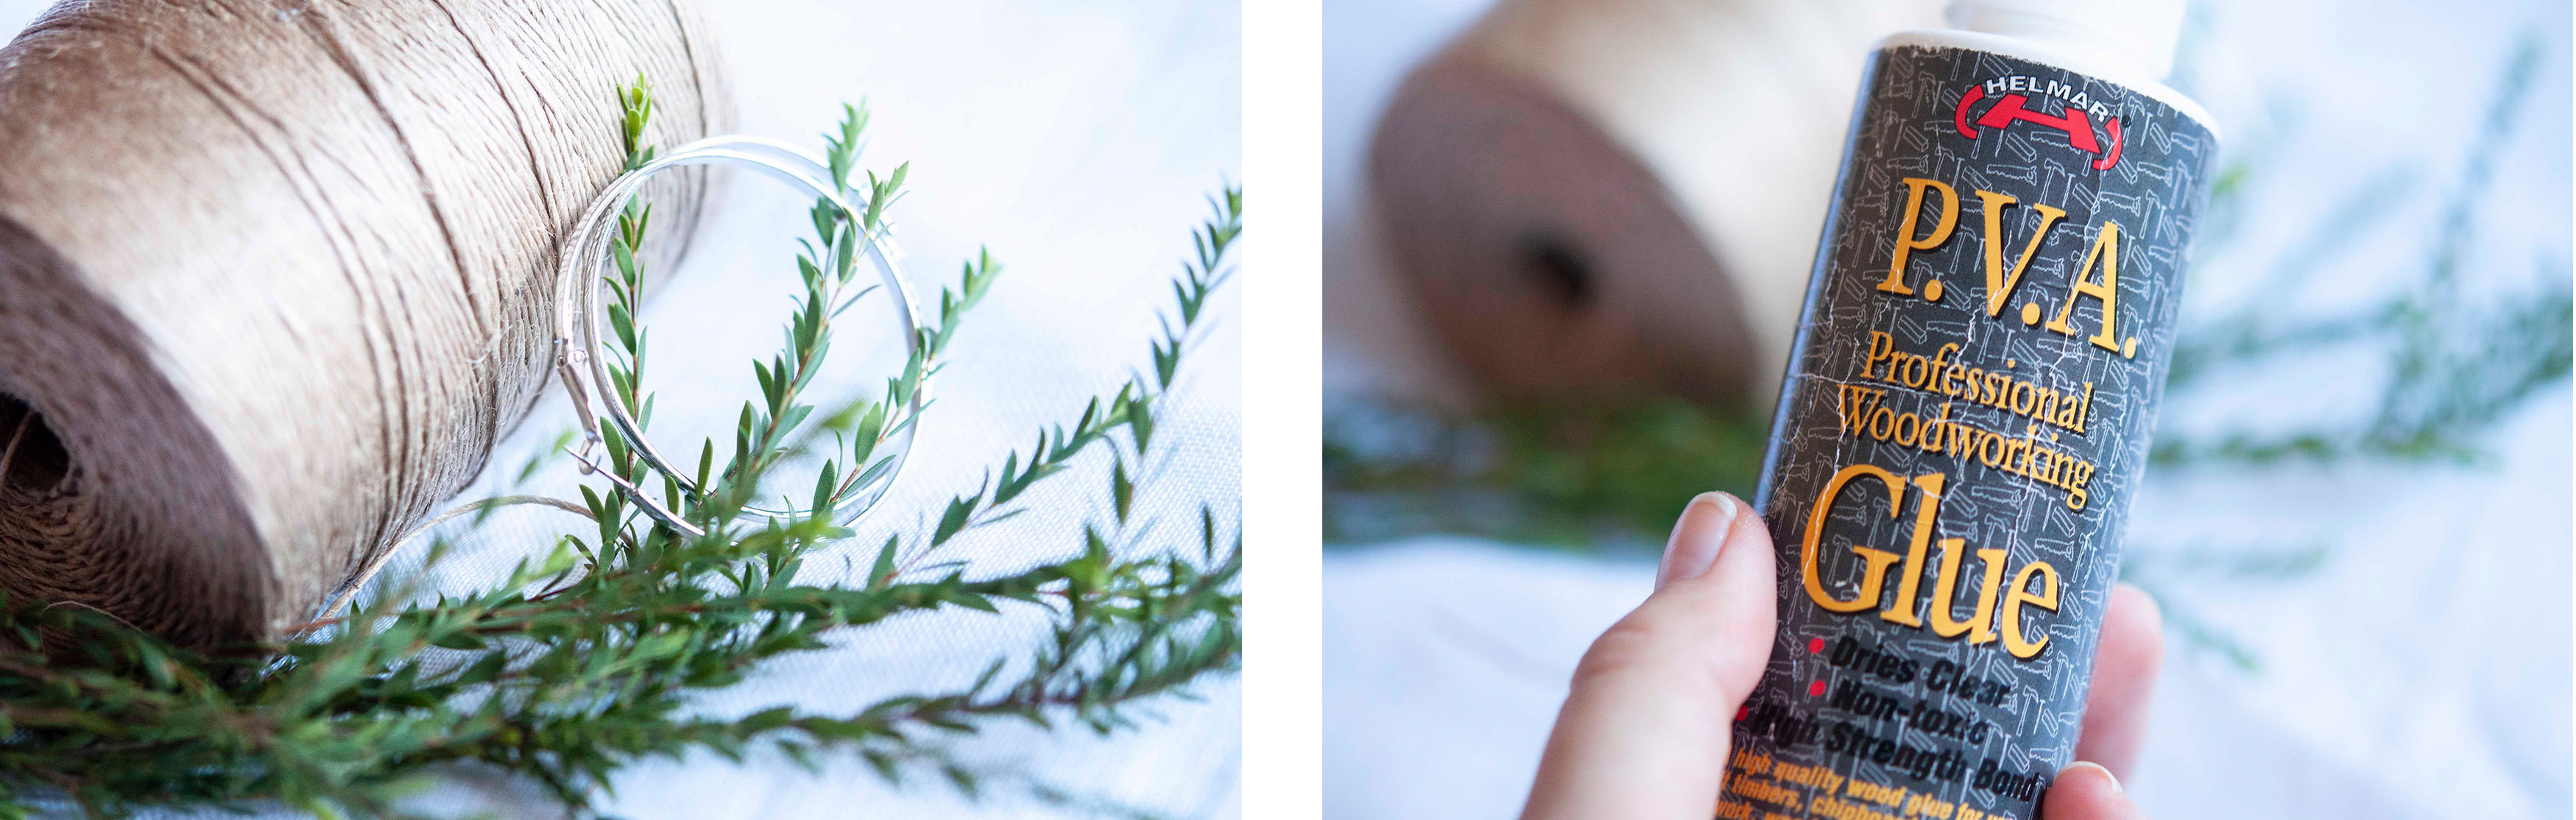
First, let’s go over what you will need for this project.
I’ve got myself some silver hoops but you can pick whatever colour and size you like (or have lying around already). You’ll then need some sturdy string – I’ve used jute string, which is my favourite because of its strength, colour and its minimal effect of the environment. You will also need a strong glue and most importantly some fresh leaves. I Like to pick a plant that has small leaves on a long stem, as this makes things far less fiddly to execute further down the line. Lastly, you will need a needle with an eye large enough for your string to thread through comfortably.
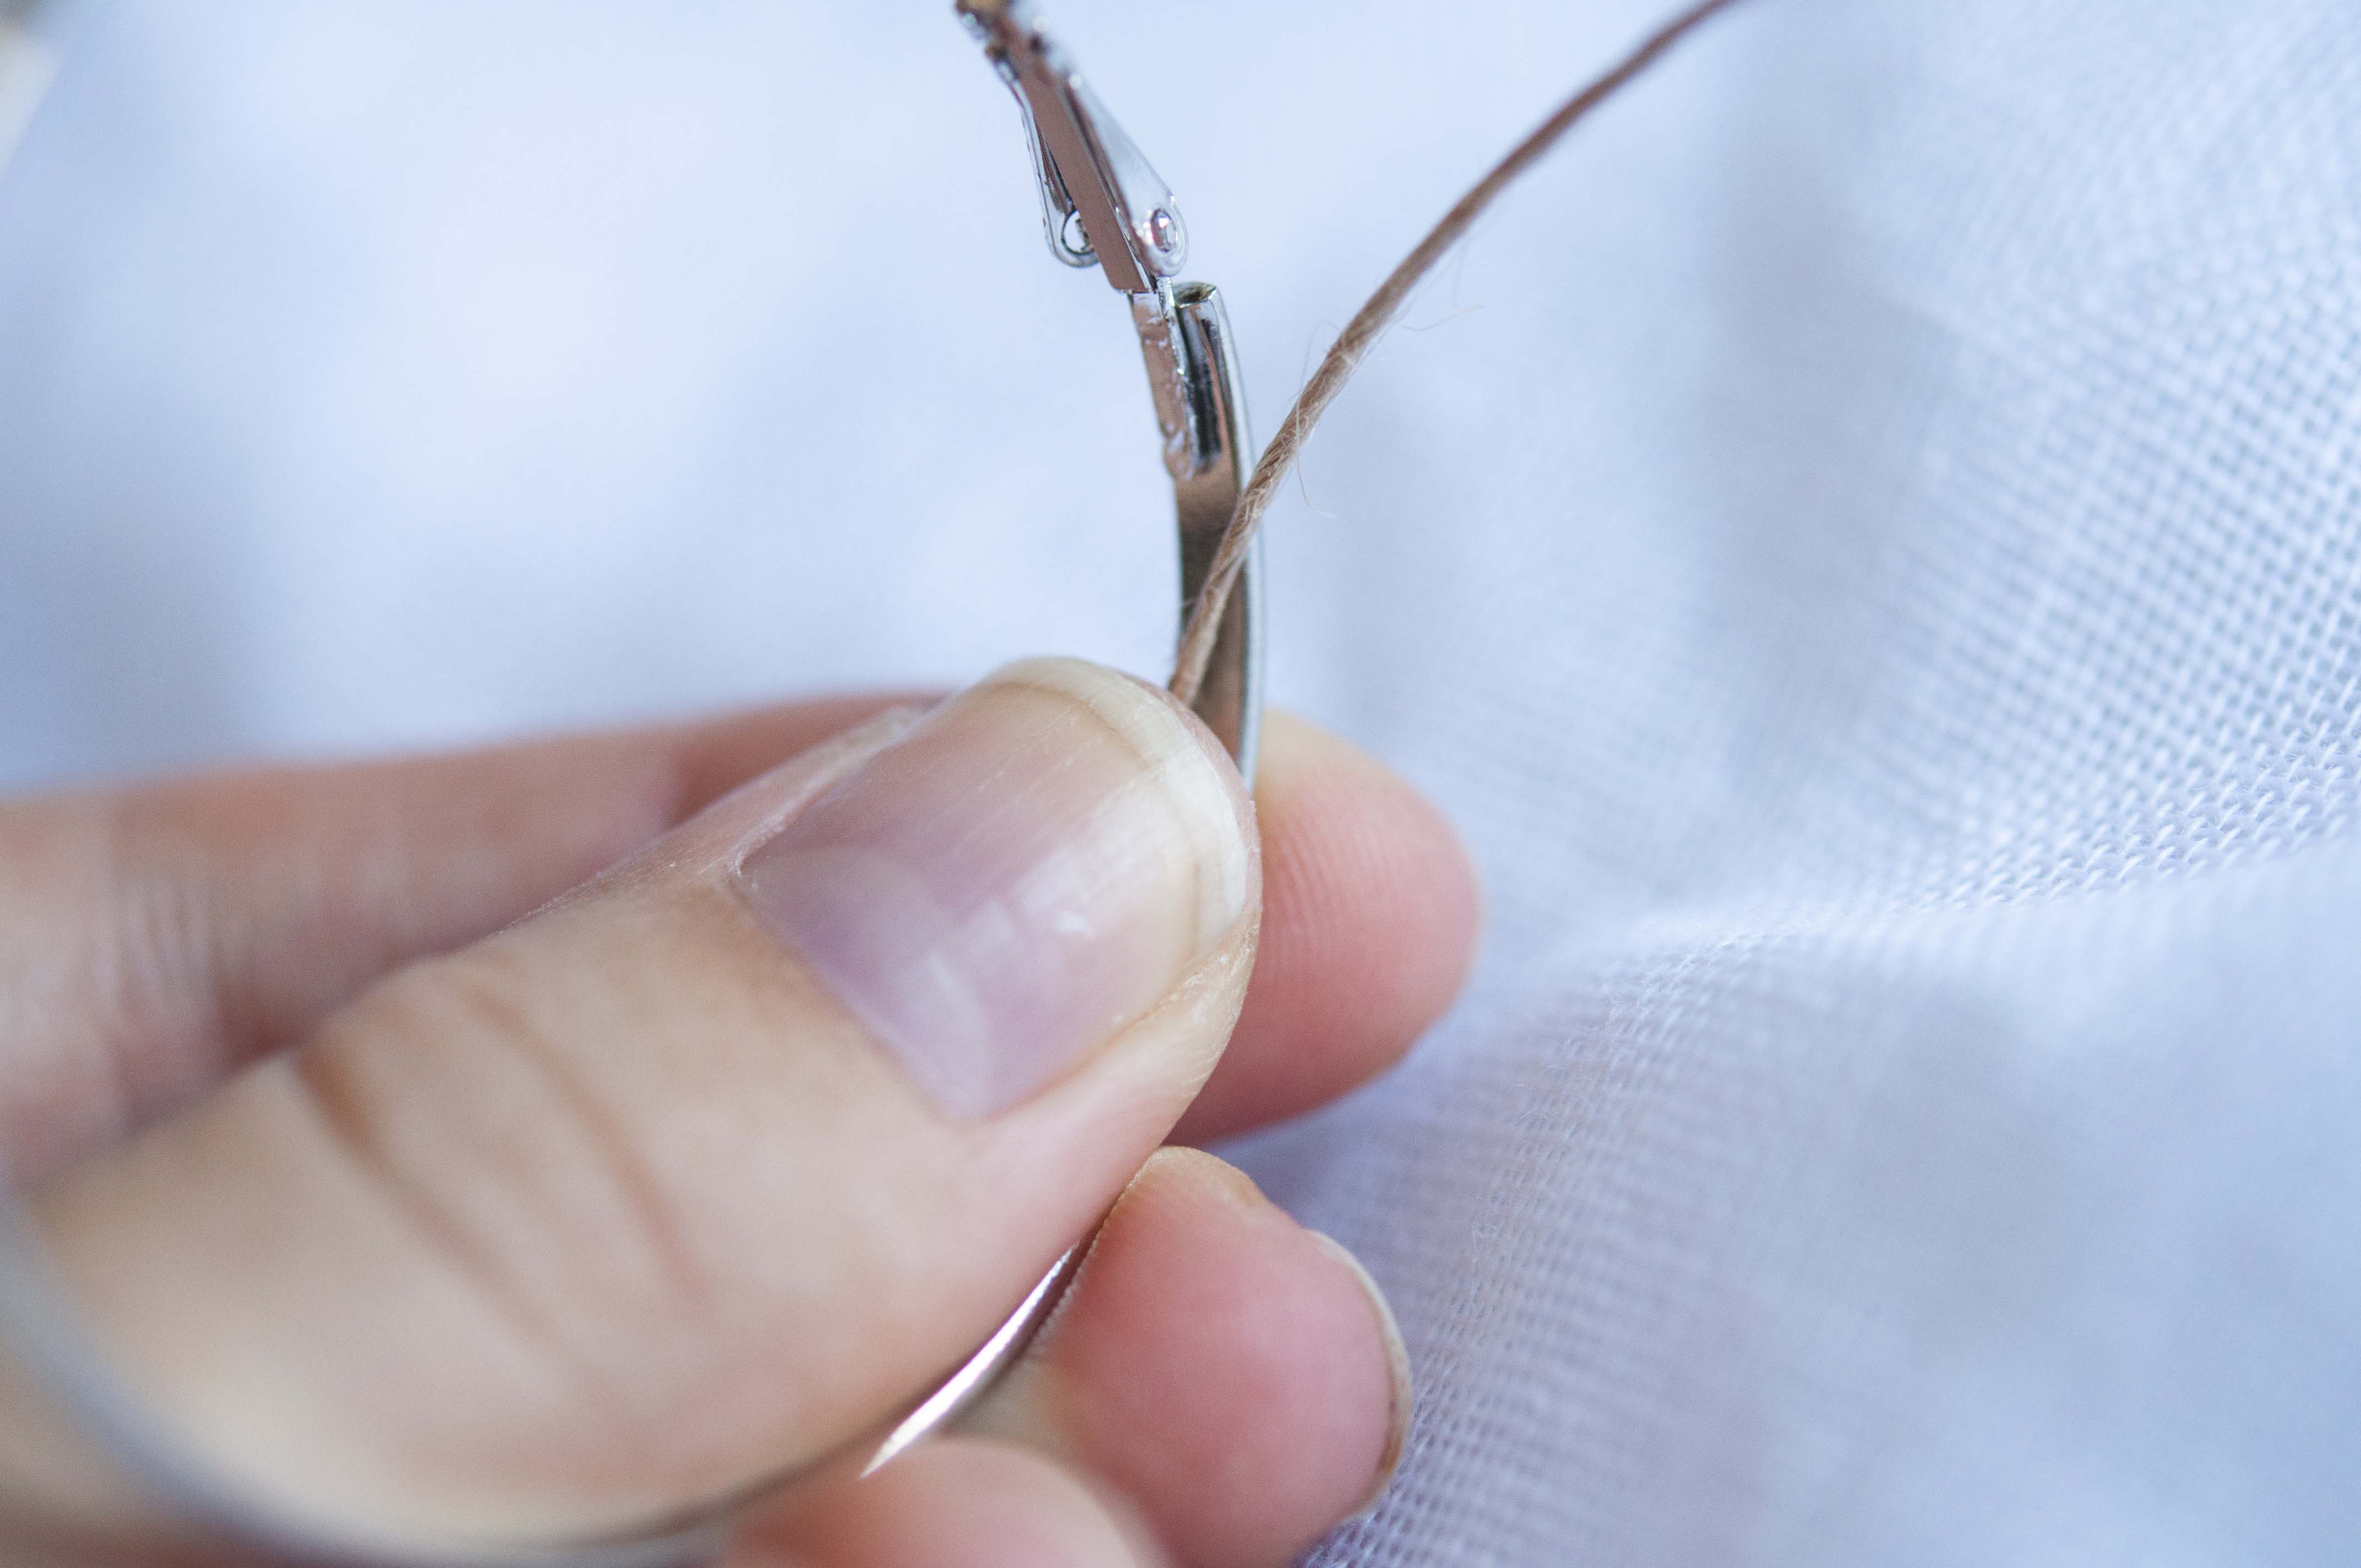
Step Number 1: Attaching the string and wrapping the hoop
The first thing to do is to cut some string about a wingspan and a half long (I’ve got fairly short arms so this may not be the most helpful measurement for you). You’re going to be making one whole hoop with a single piece of string so it’s better to cut more than less if you’re unsure.
You want to start at the back of your hoop (the bit that goes behind your ear) and glue the end of the string so that it’s pointing down the inside of the hoop. This means that when you start wrapping your long piece of string around the hoop, you can go over the glued section and cover it up.
Take the long end of the string, bring it up to the very end of the hoop and start wrapping tightly back over your glued section.
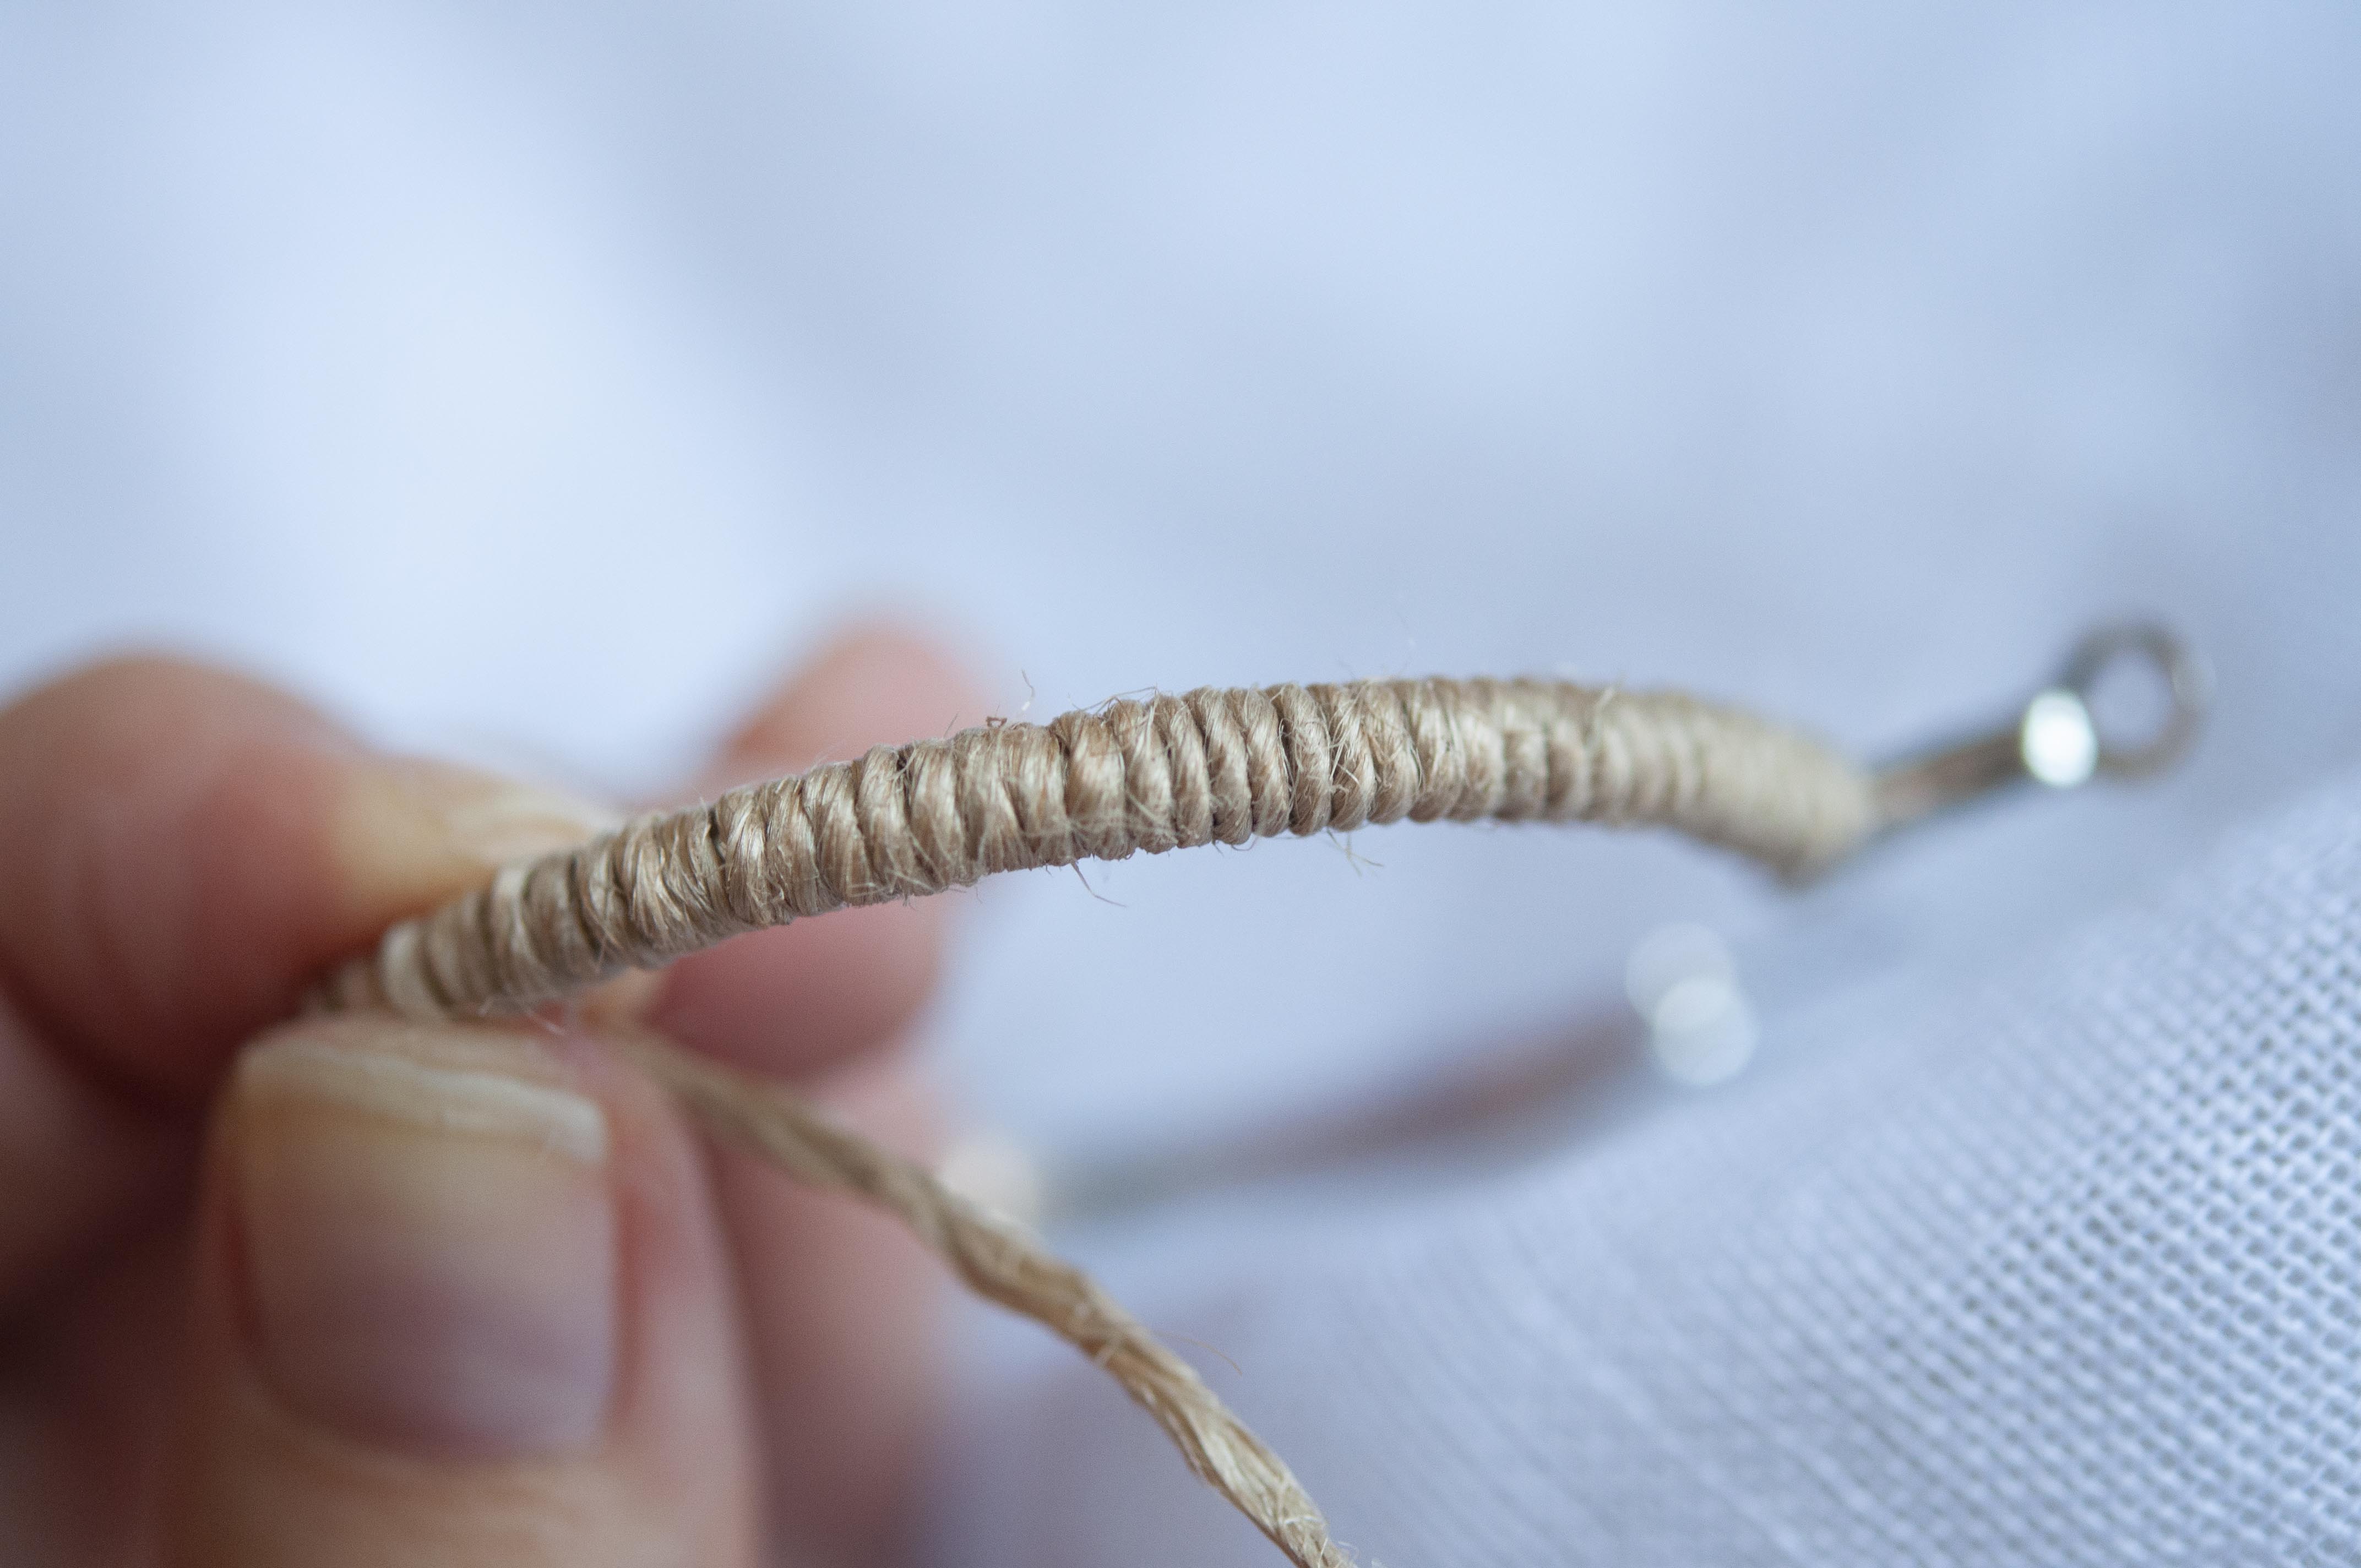
Continue wrapping tightly until your glued section is covered and keep wrapping around the entire hoop until you reach the front end of the hoop.
Step Number 2: Coiling your leaves
Once you’ve reached the front end (that goes into your ear) you can bring in your leaves. I like to make my earrings with three stems of leaves but you can make yours thicker by adding extra stems or finer by taking some away.
When you start with your leaves, you want the leaves to be facing up your hoop towards where the front of your earlobe would be.
With your sting that is still attached to the hoop, you’re going to make a loop that comes up to the side of the hoop that is facing you and that sits to this side of the leaves.
This part can get fiddly trying to hold everything in place at once so don’t try to rush it too much.
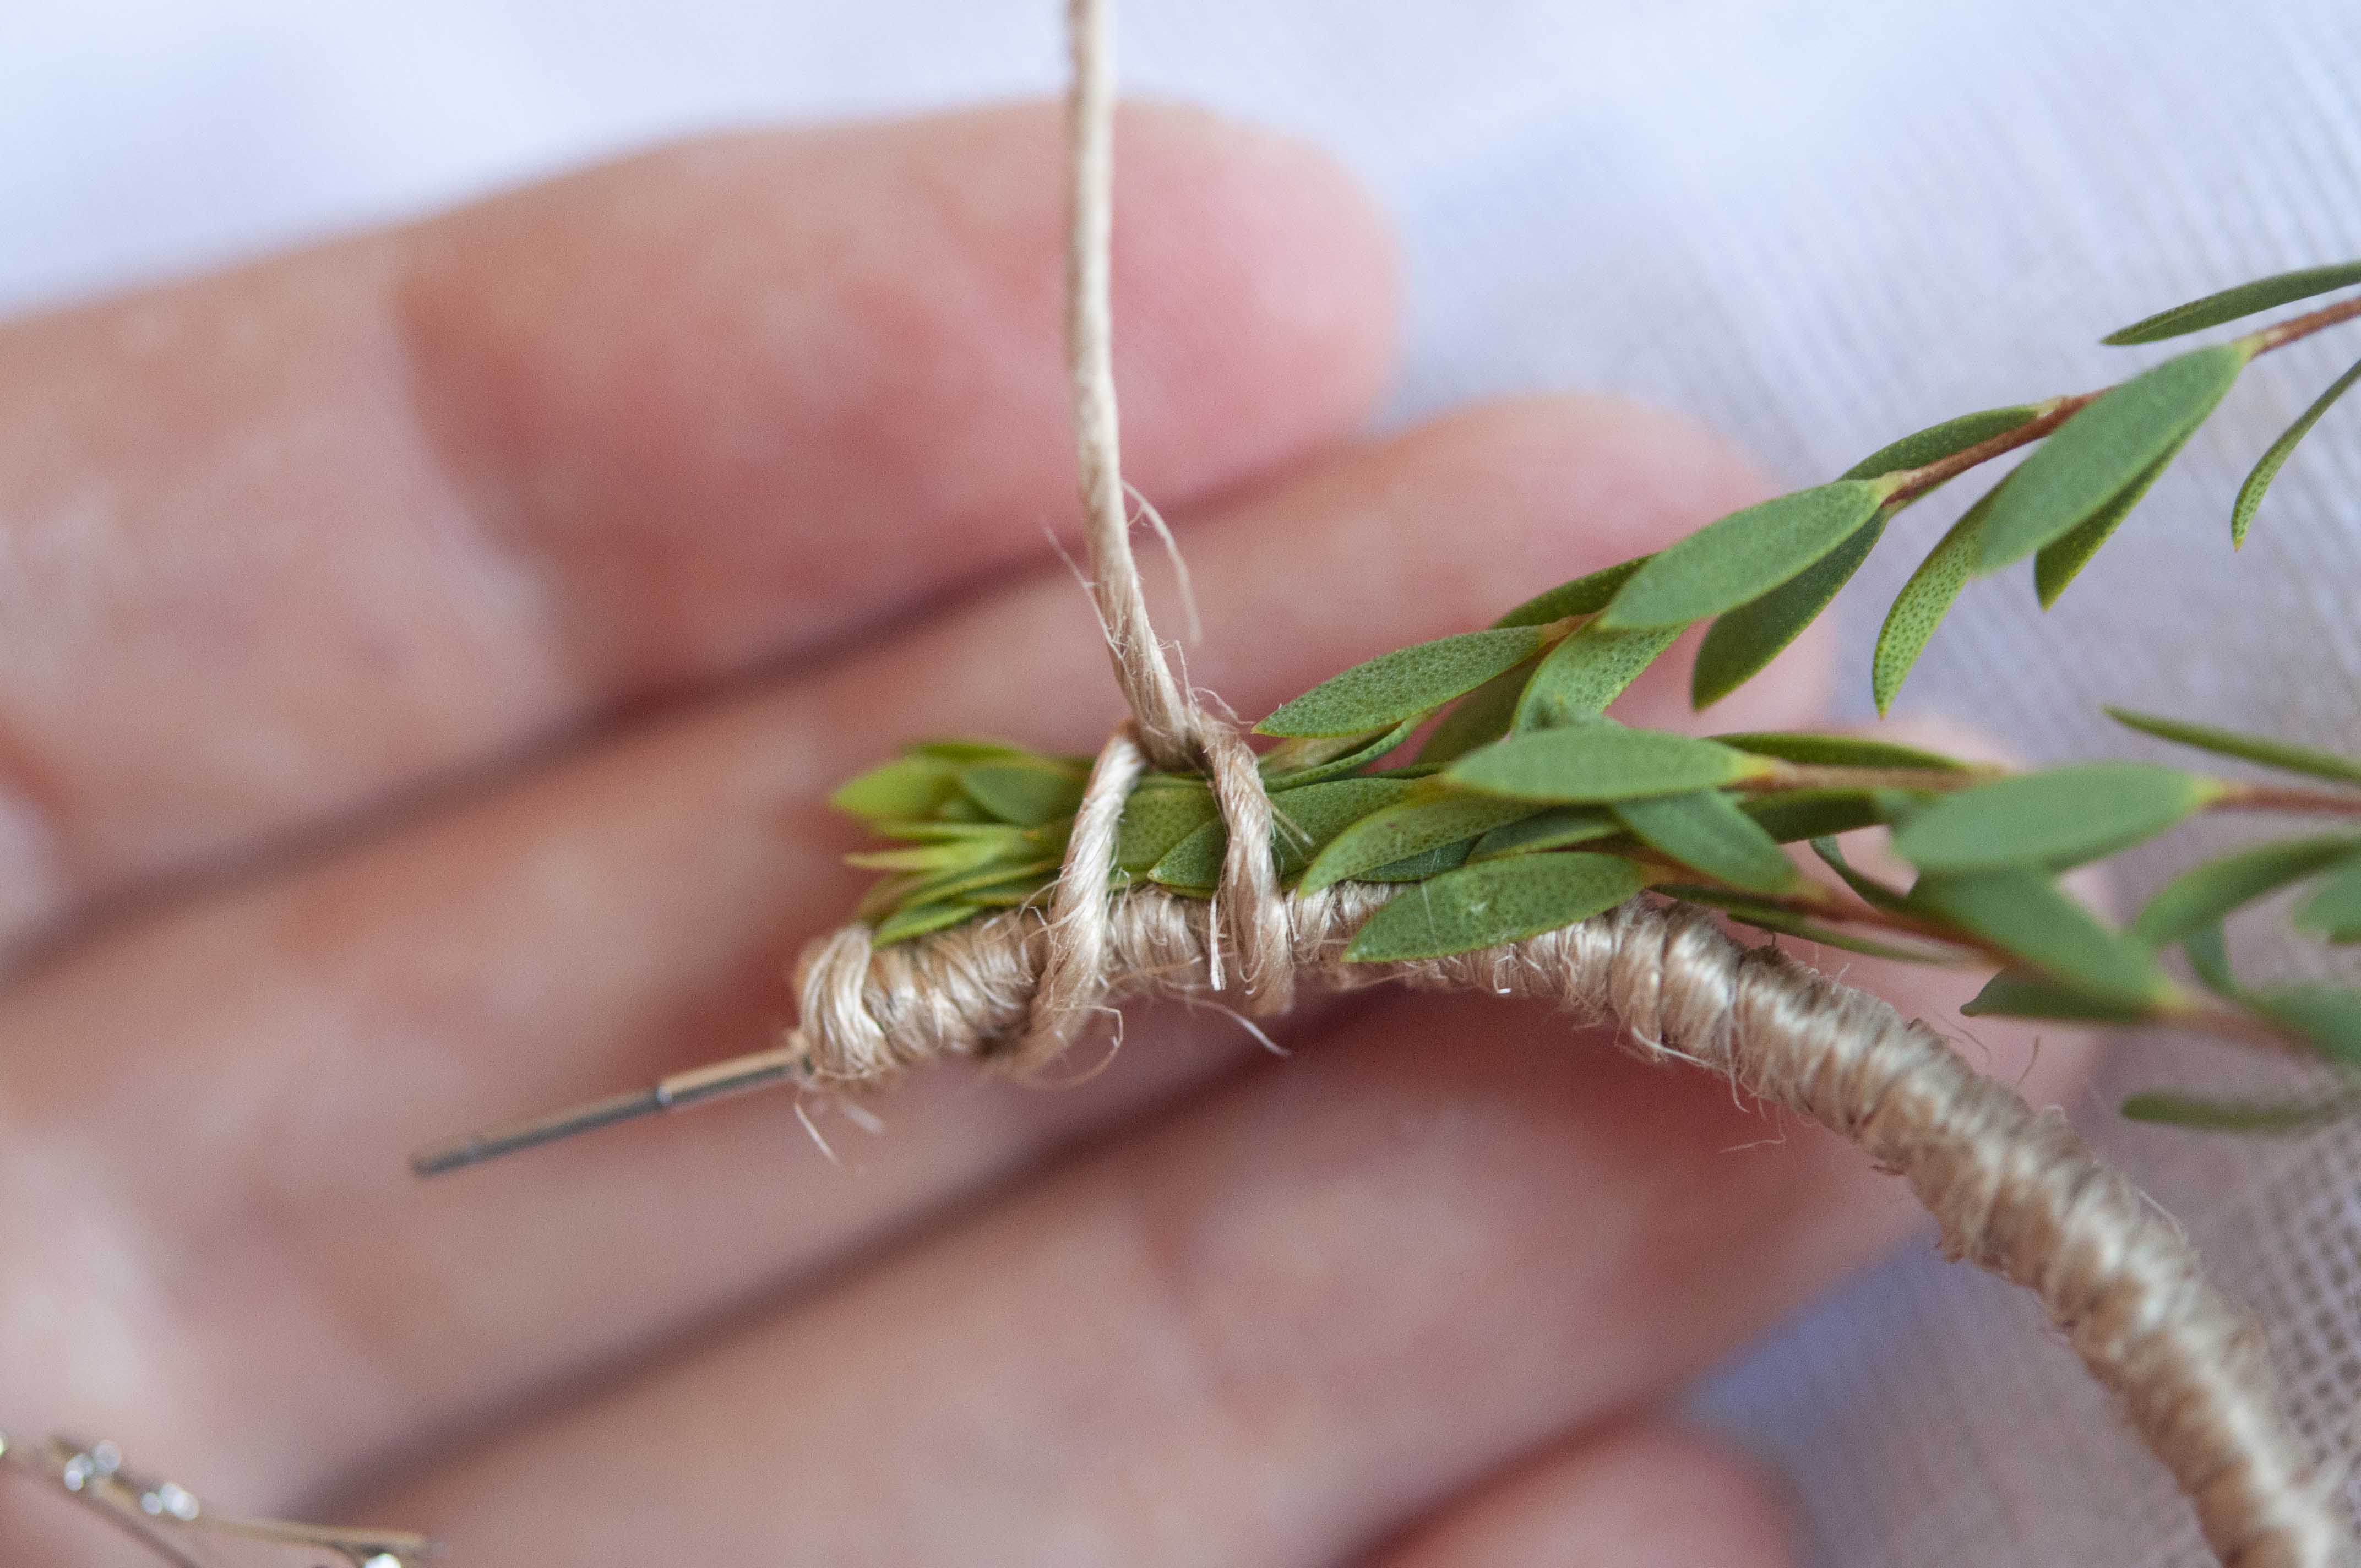
Then take your long end of string and thread it through the middle of the hoop, back up behind the leaves then through the back of the loop and towards you.
Pull this knot tightly, making sure the leaves are tucked inside the knot.
Continue these loop knots the same way as you did the first one, pulling tightly each time to secure the leaves in place. As you do these knots more and more, you will get more consistent with spacing them out evenly along the hoop.
If you’re going to run out of leaves partway through, you can easily lay news stem on top of your old ones as you go and you will never see where they stop and start as long as there’s an even amount of leaves throughout.
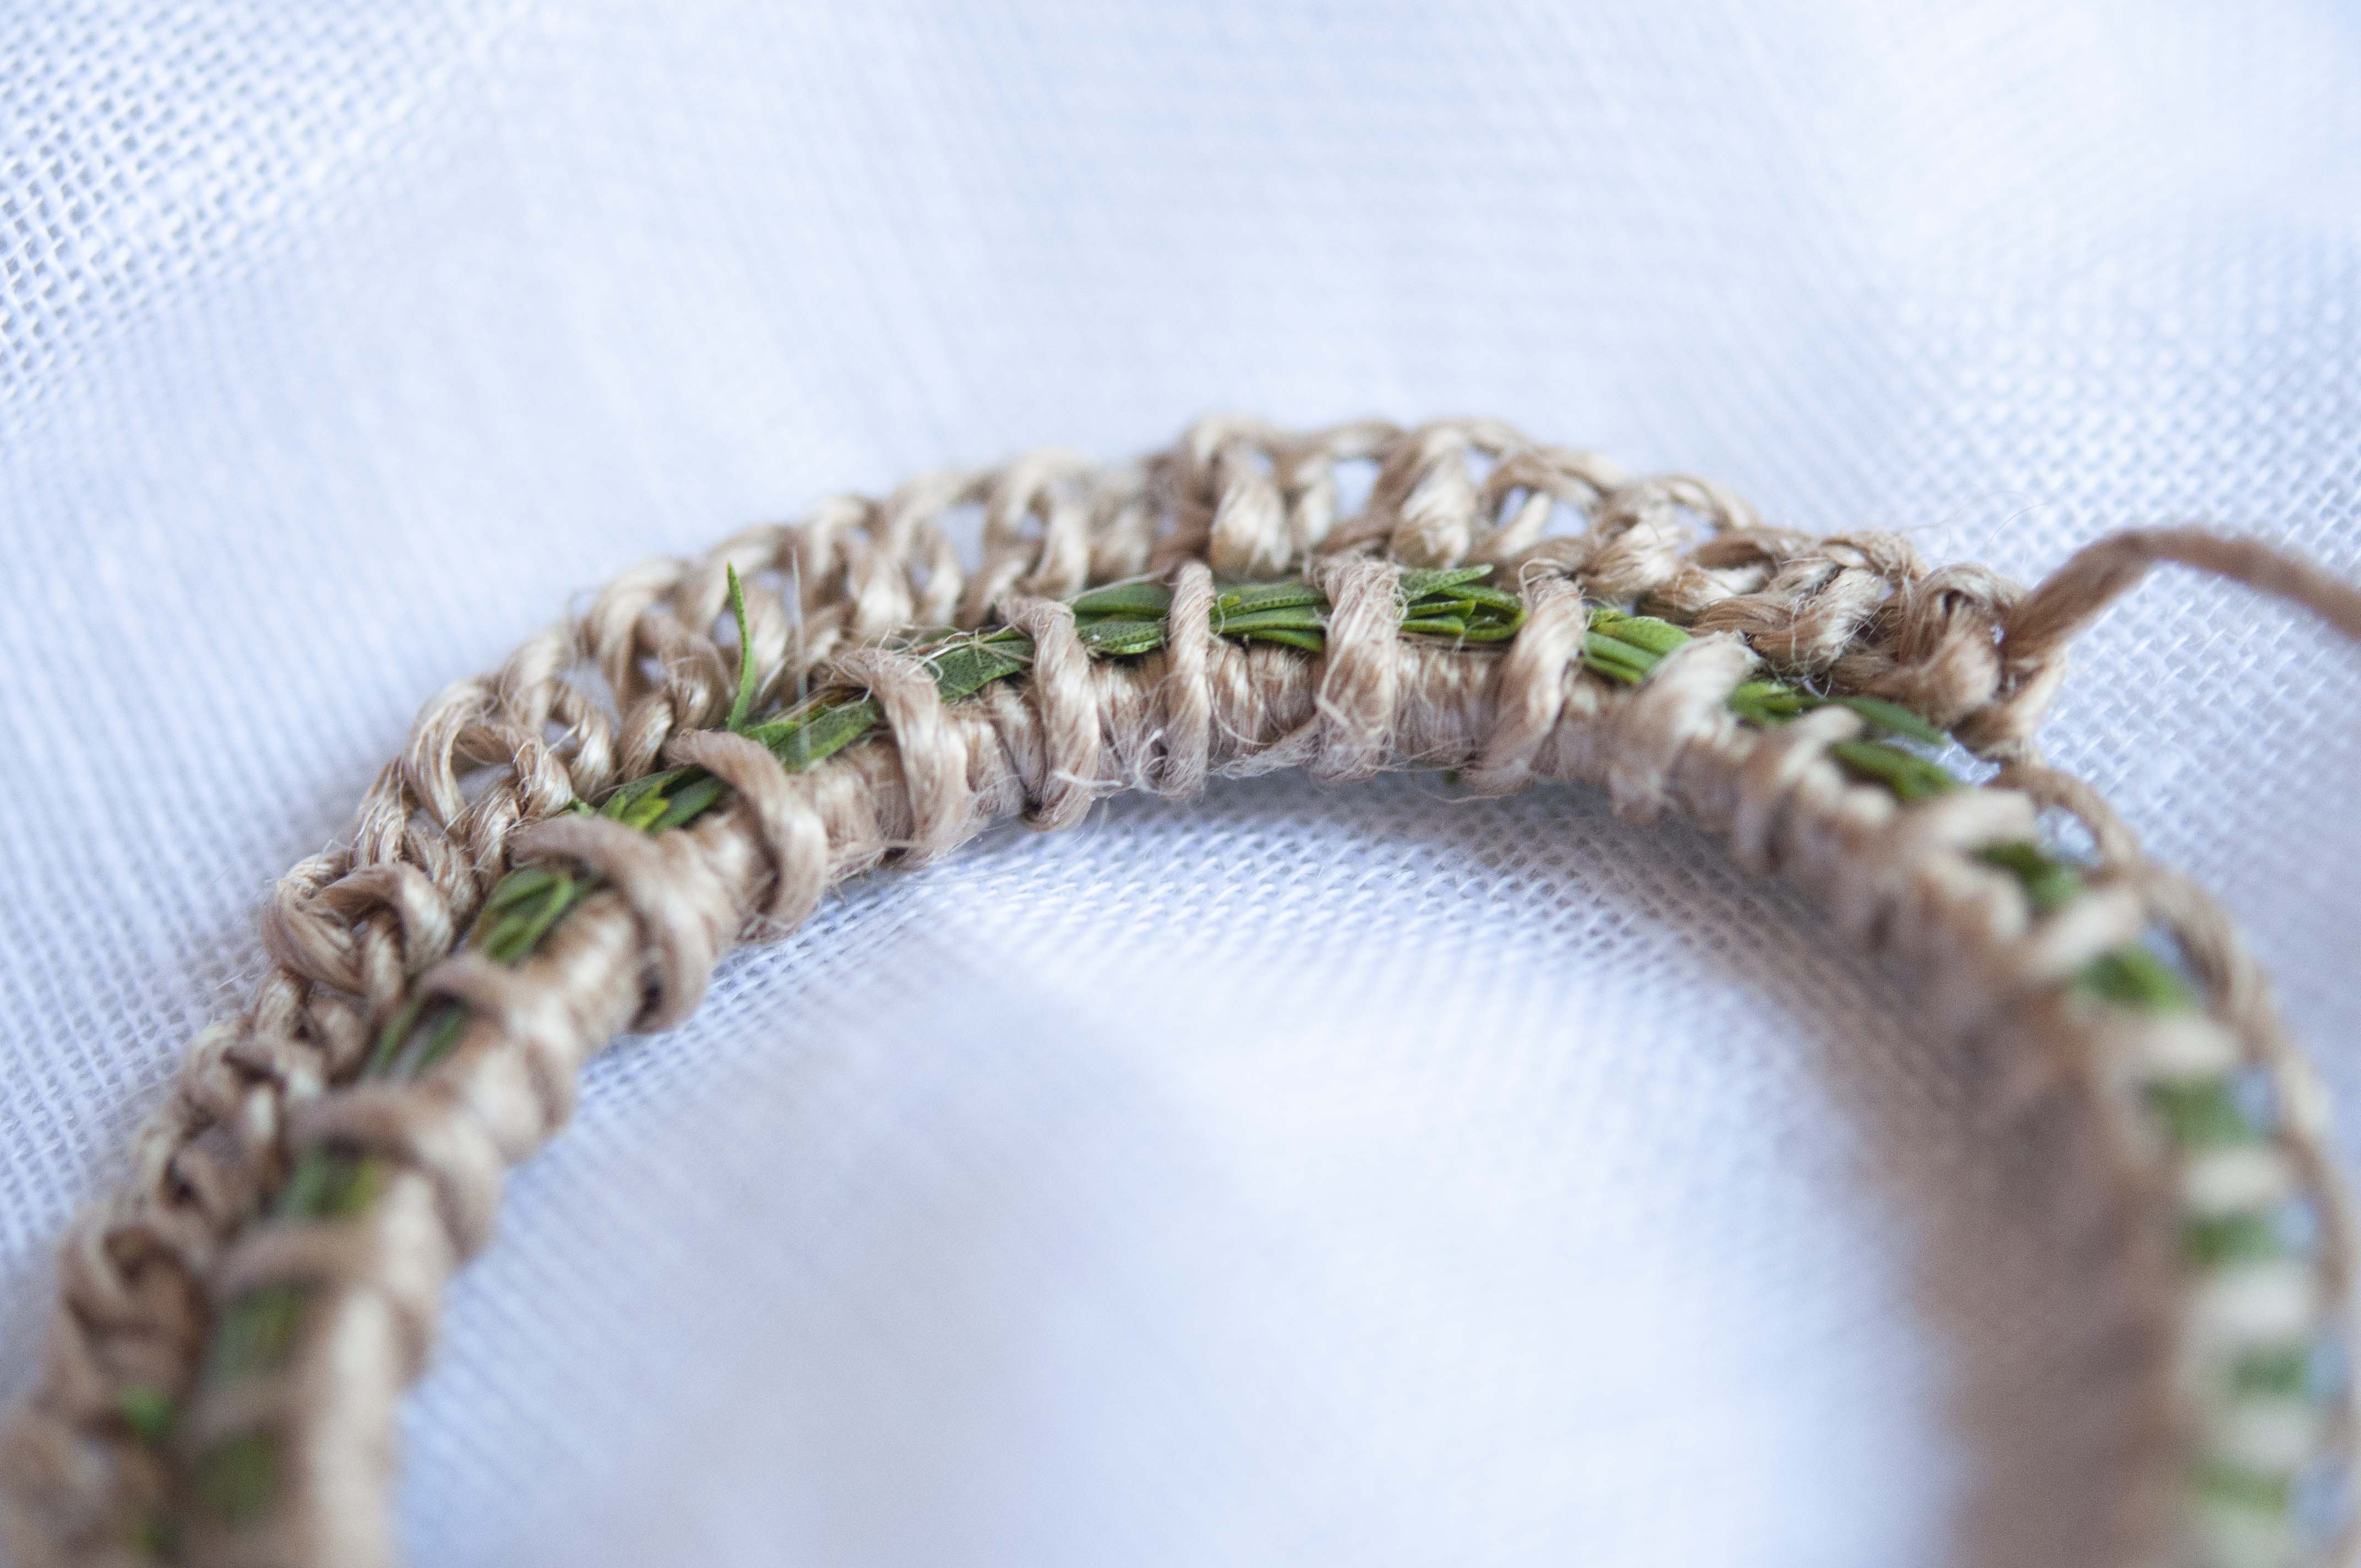
Once you reach the end, snip the remaining leaves off so that they line up with the end of the hoop. And that’s the coiling part done!
Step Number 3: Adding frills
You could easily finish your hoops as they are now, but if you want them to look like more of a statement then adding these frills is an easy and effective way to to do it.
Taking your needle, thread through the end of the string, then head back under the last coil you completed, creating a loop. You’re going to bring the needle back through this loop from behind and pull it tightly.
Using the same technique, thread under the next coil from front to back, creating a loop, then head back through the loop from back to front.
This is actually the same technique as you used for coiling your leaves to the hoop but you’re threading through a different section and not trapping any leaves inside the coils.
Continue through each of the coils around the hoop. I like to do two knots per coil in the lower part of the hoop to bulk it out more but one knot per coil will look nice and neat.
Finally, once you reach the end, you can tightly pull the end of your string to the underside of your hoop and glue it there where you can’t see it so obviously. Once the string it stuck down, you can snip off the end AND THAT IS IT, MY FRIENDS!
If you enjoyed this tutorial, you can head to my Instagram and let me know what else you’d like me to make into a tutorial!
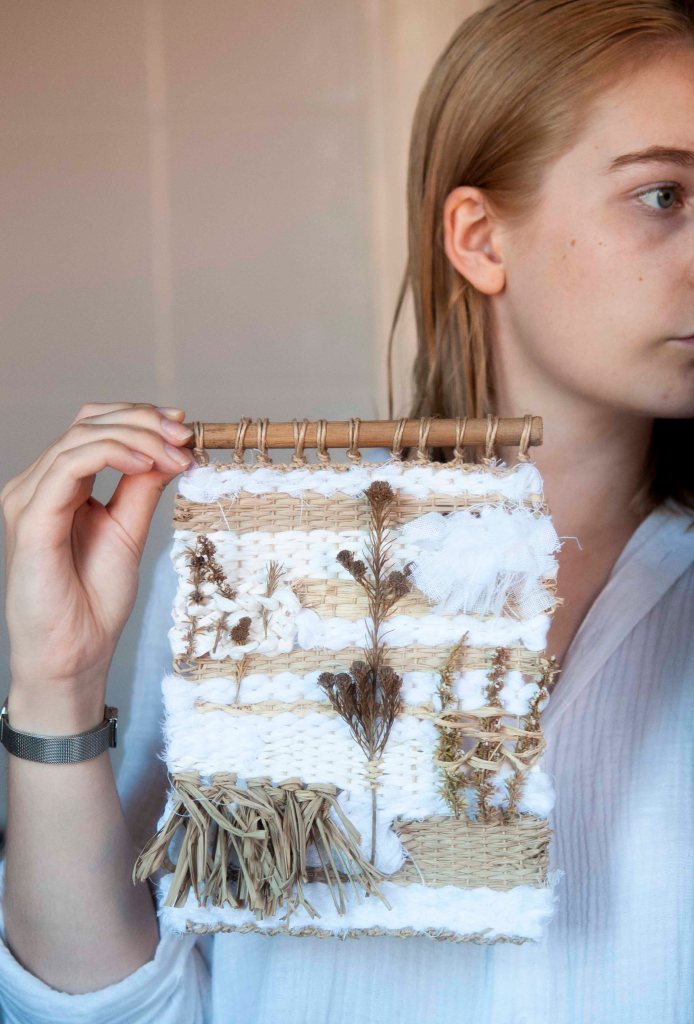
This beginners course will guide you in making a simple and delicate woven wall hanging that has an undoubtedly complex appearance…
Hello and welcome to my first DIY tutorial for you!
As with all my work, this wall hanging is made to be experimental and has plenty of room for tailoring to make it truly yours. I will teach you the basics, plus some slightly more complex stitches, giving you all the skills that you need to set you on your way to making something beautiful and unique.
Included in this tutorial:
Warping a loom
Basic weaving stitch
Creating colour and texture blocks
Creating a fringe
Weaving in dried plants
Soumak stitch
Removing the weaving from the loom
Finishing the loose ends
Mounting the wall hanging
The materials you use can be determined by the resources you have around you or you can choose to acquire specific materials that suit your vision for the piece. I’ll take you through what I used for this particular wall hanging to give you an idea of what you could include in yours.
The setup…
My materials:
Jute String
White Linen
Natural Raffia
White Raffia
Dried Native Plants
Homemade Loom
Large darning needle
Scissors
Bamboo stake for mounting
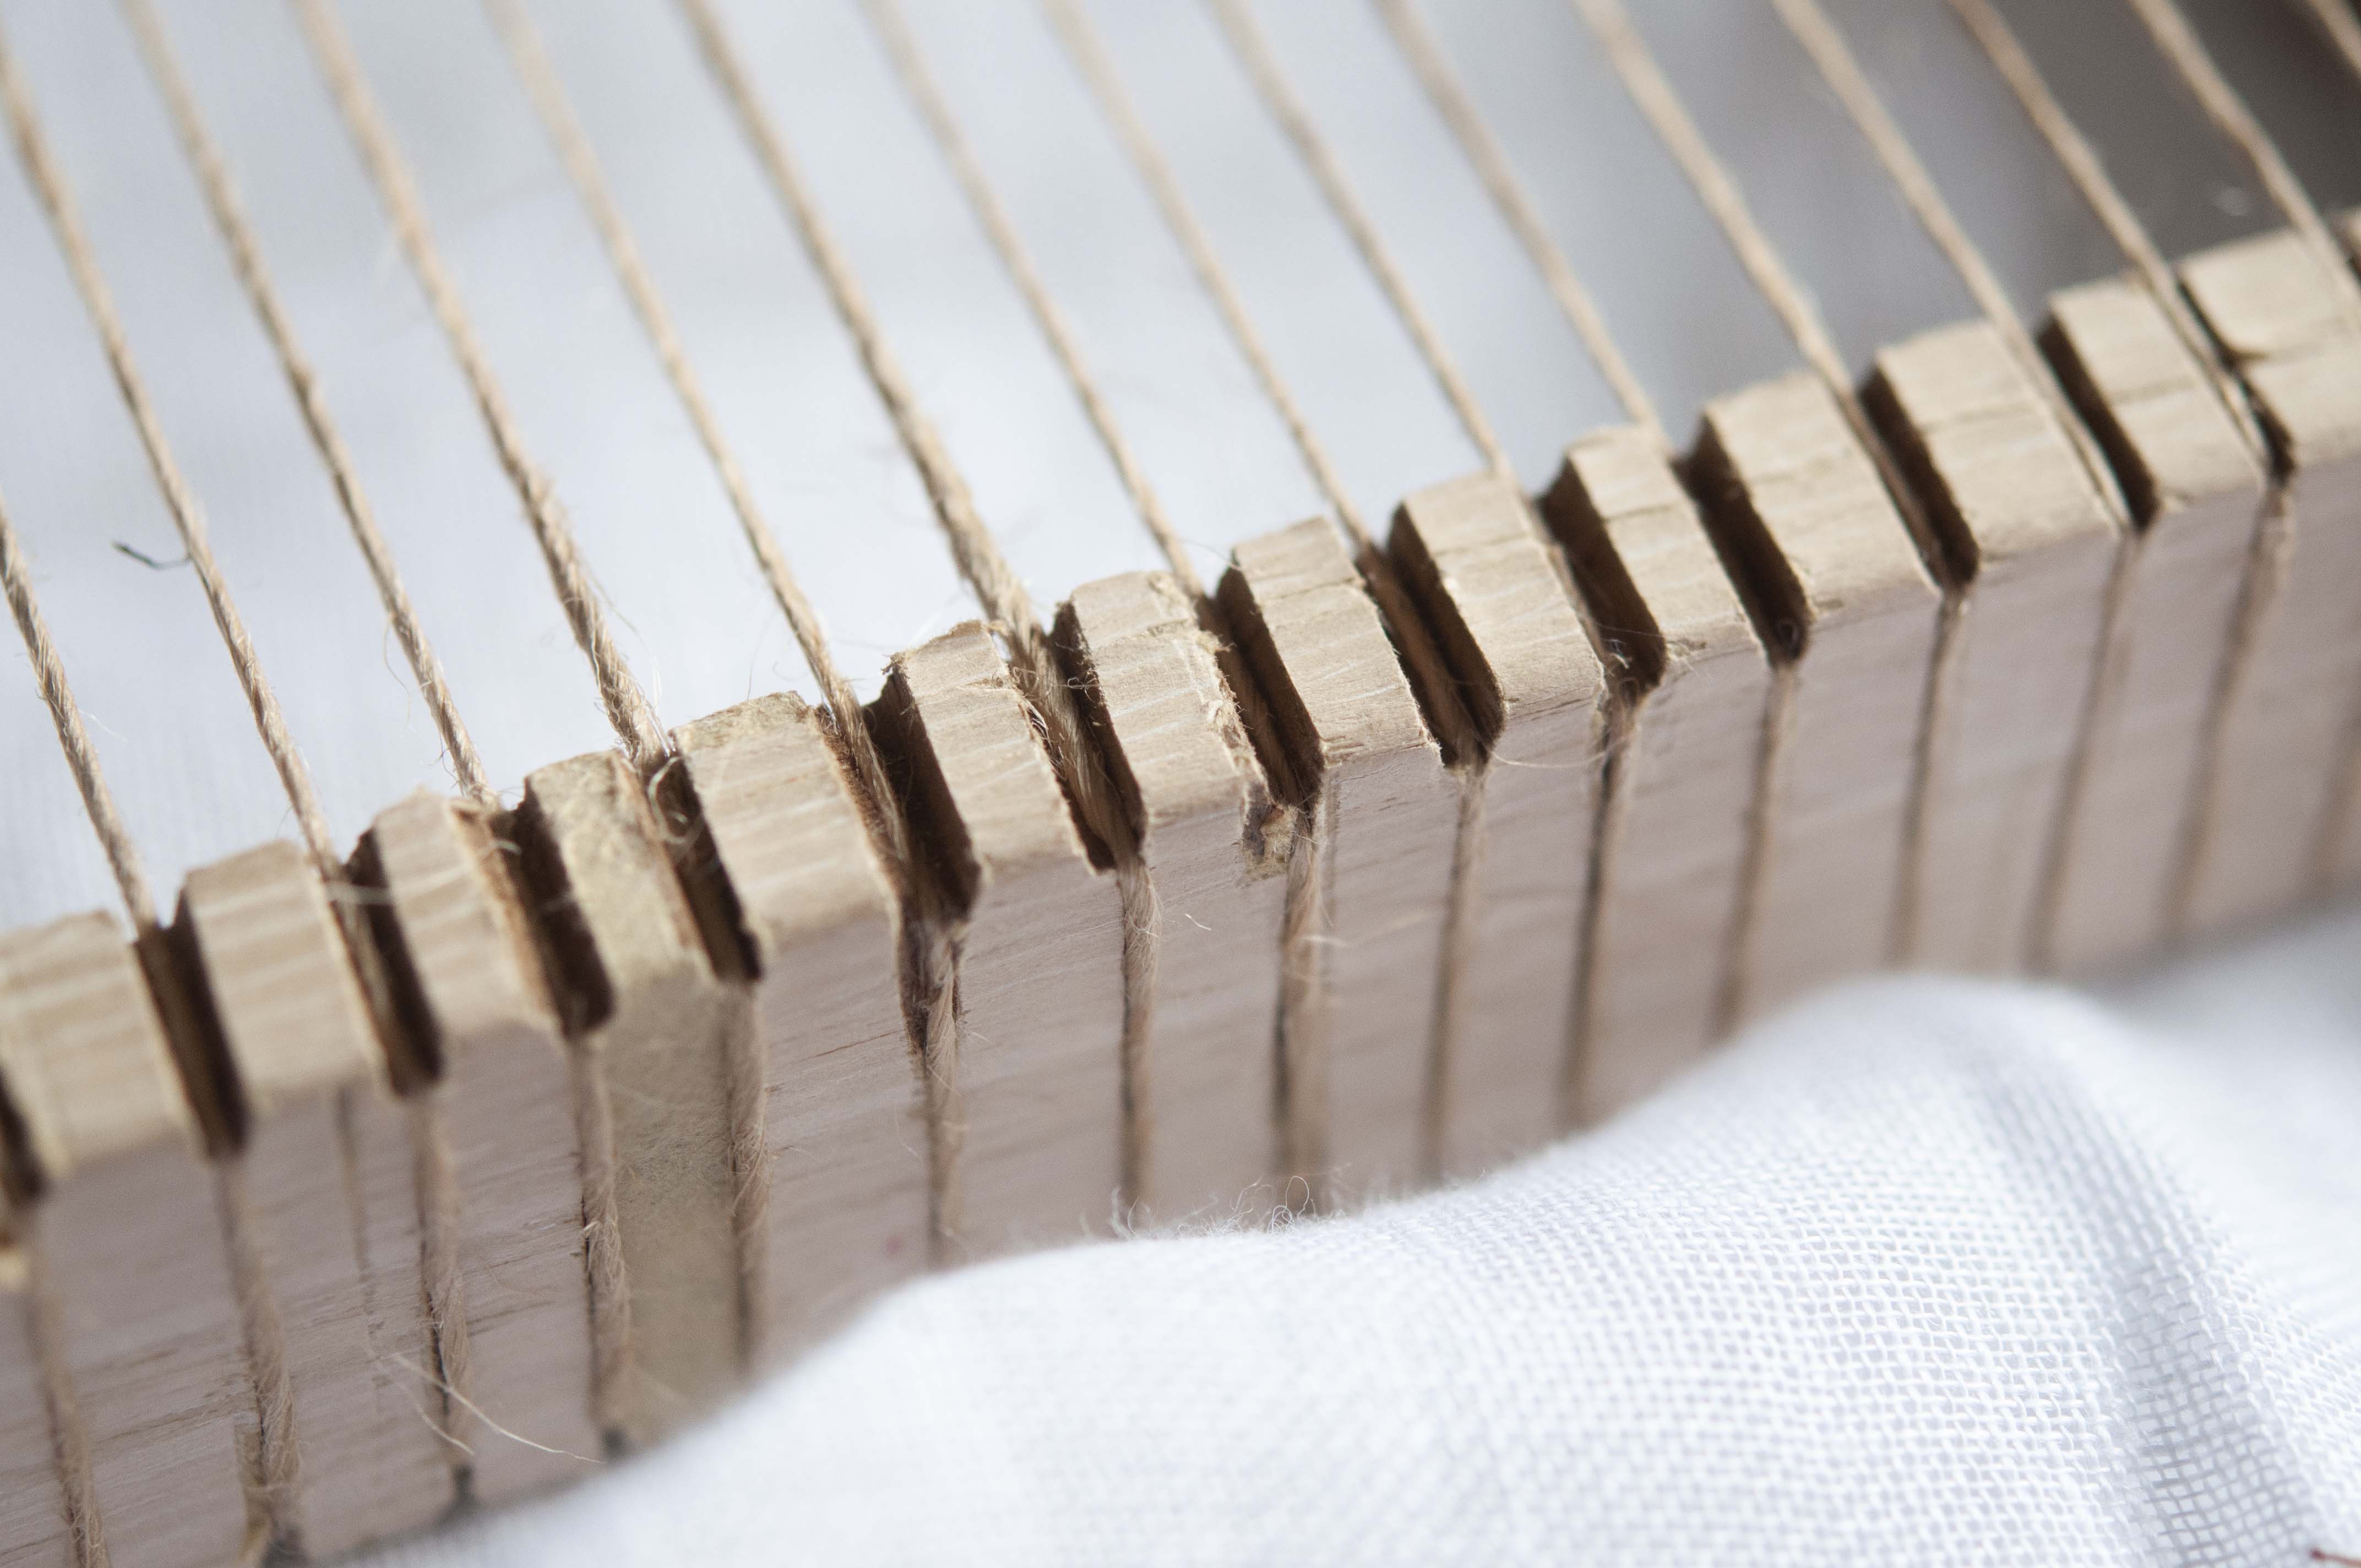
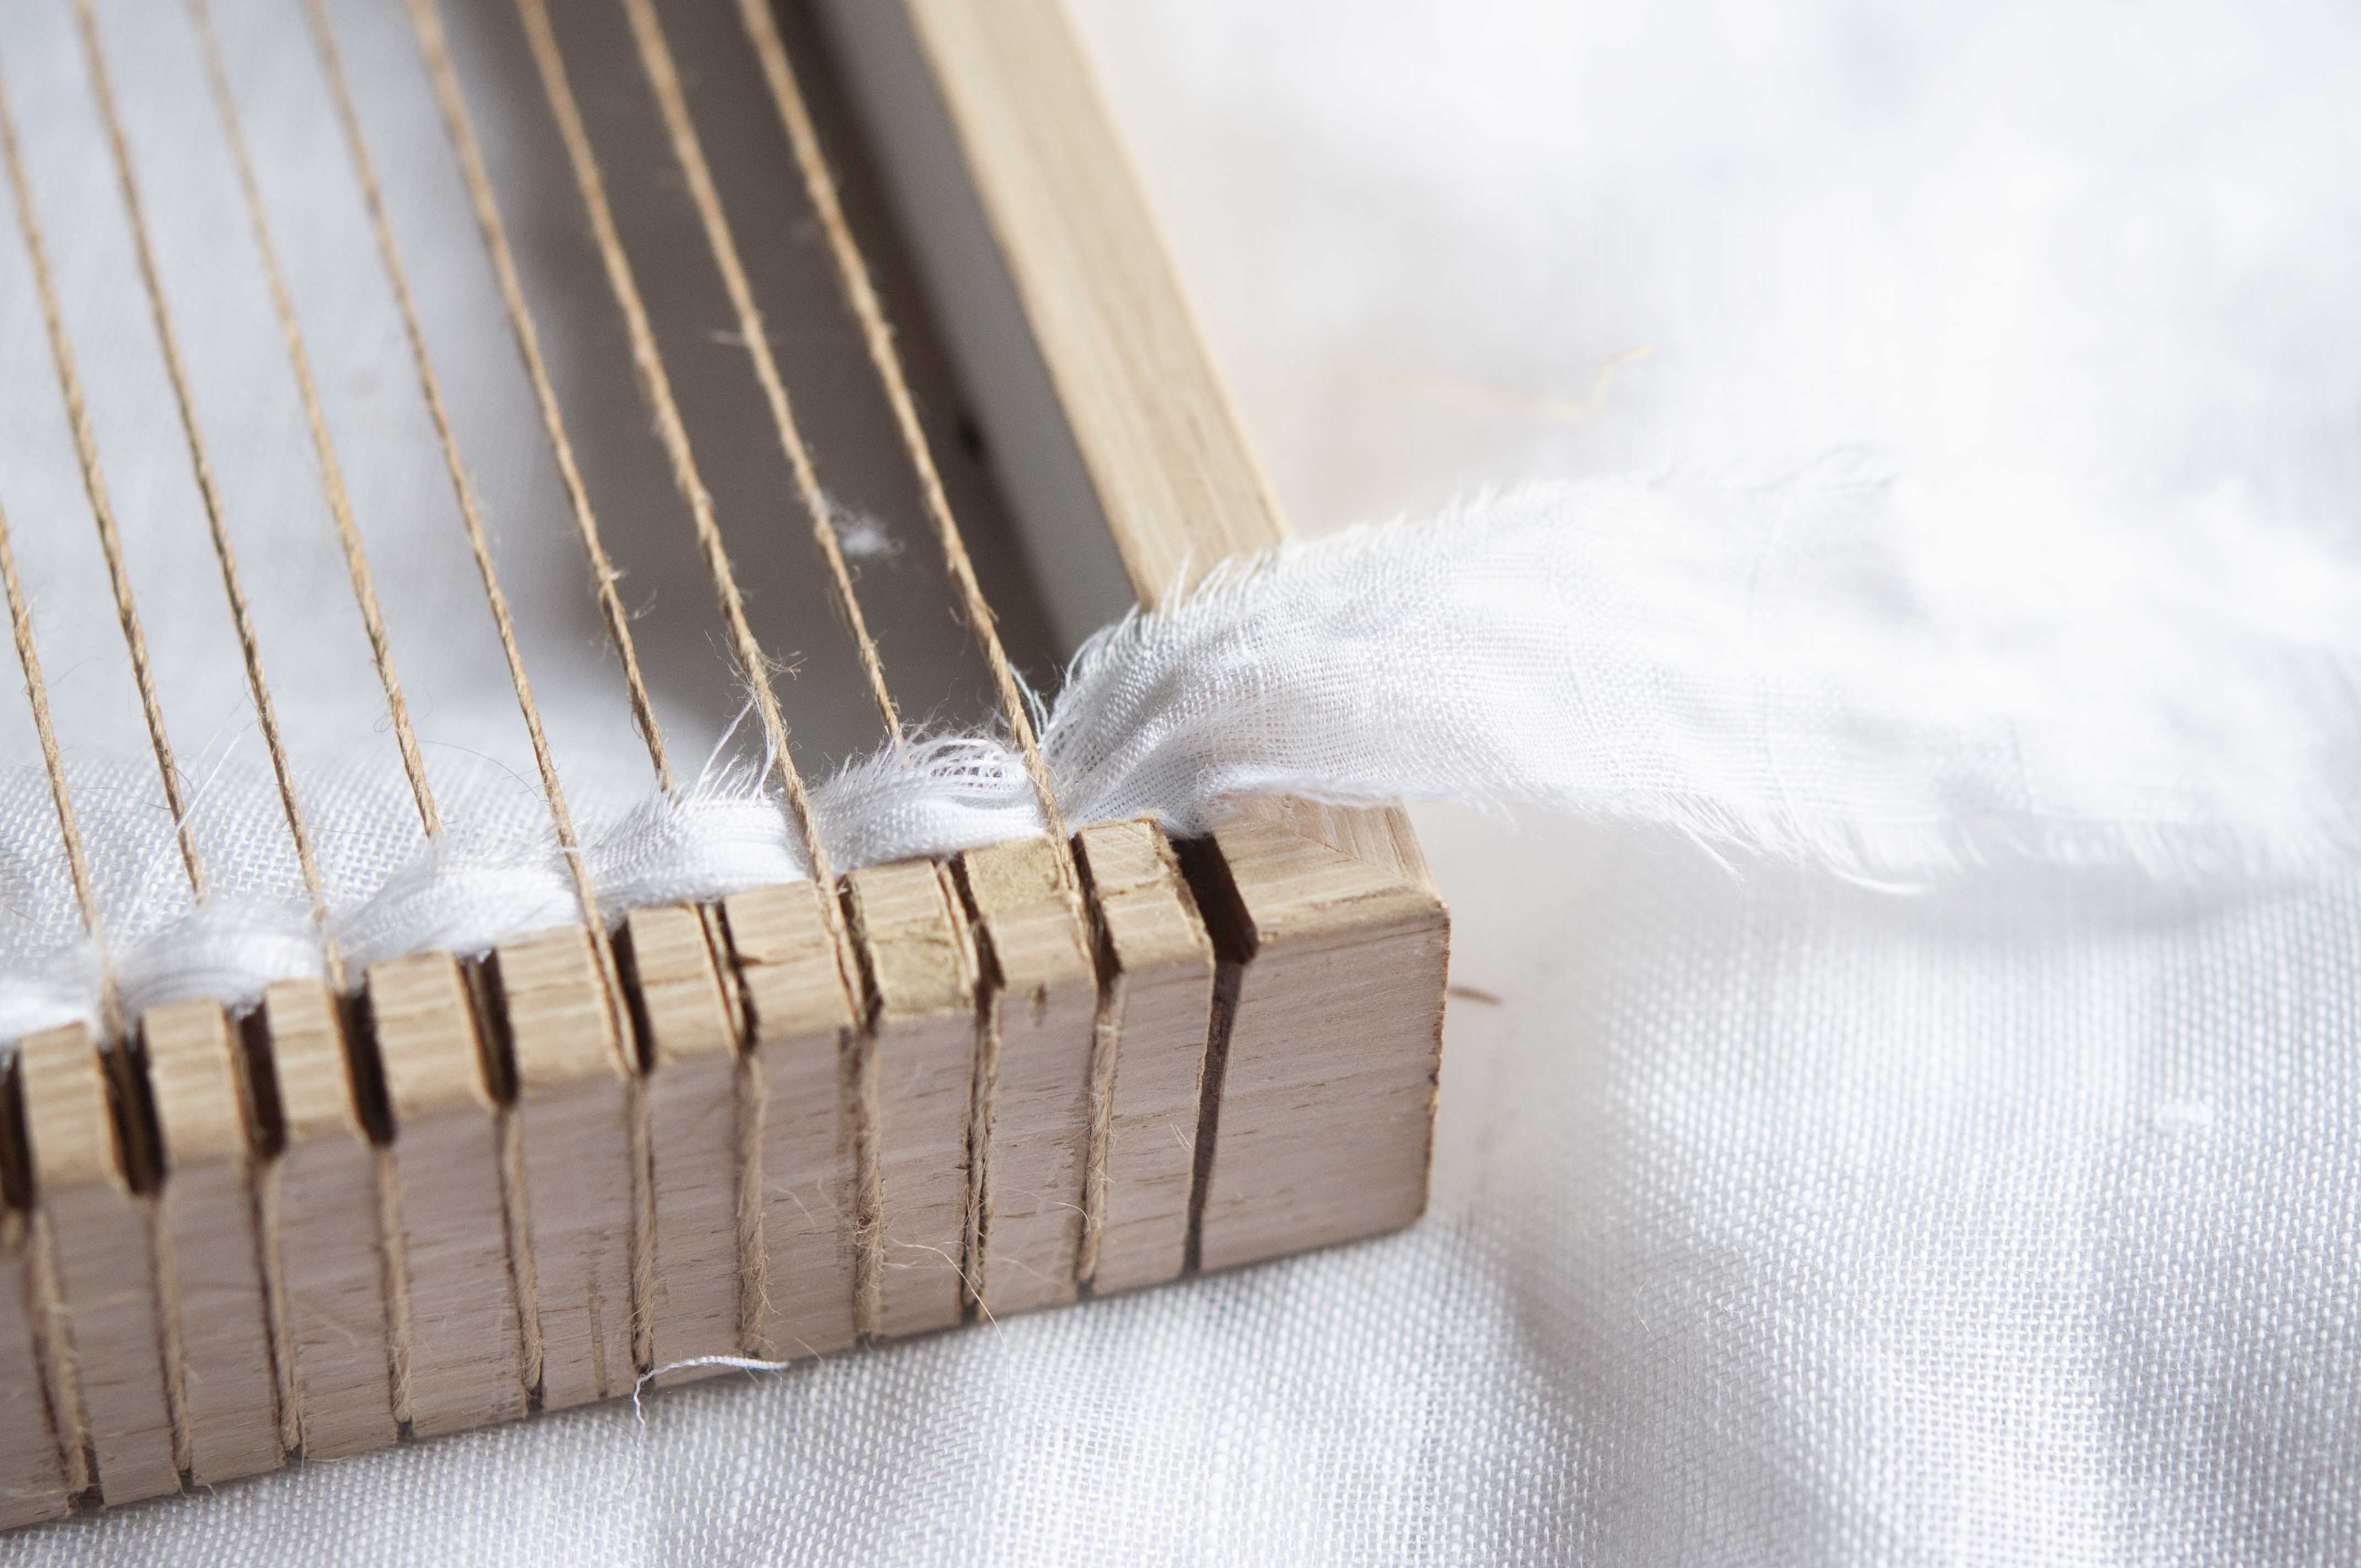
Firstly, you will need to find yourself a loom if you don’t have one already. I used my homemade loom which started out as a photo frame, but, if you’re looking to buy one then there are great options on Etsy.
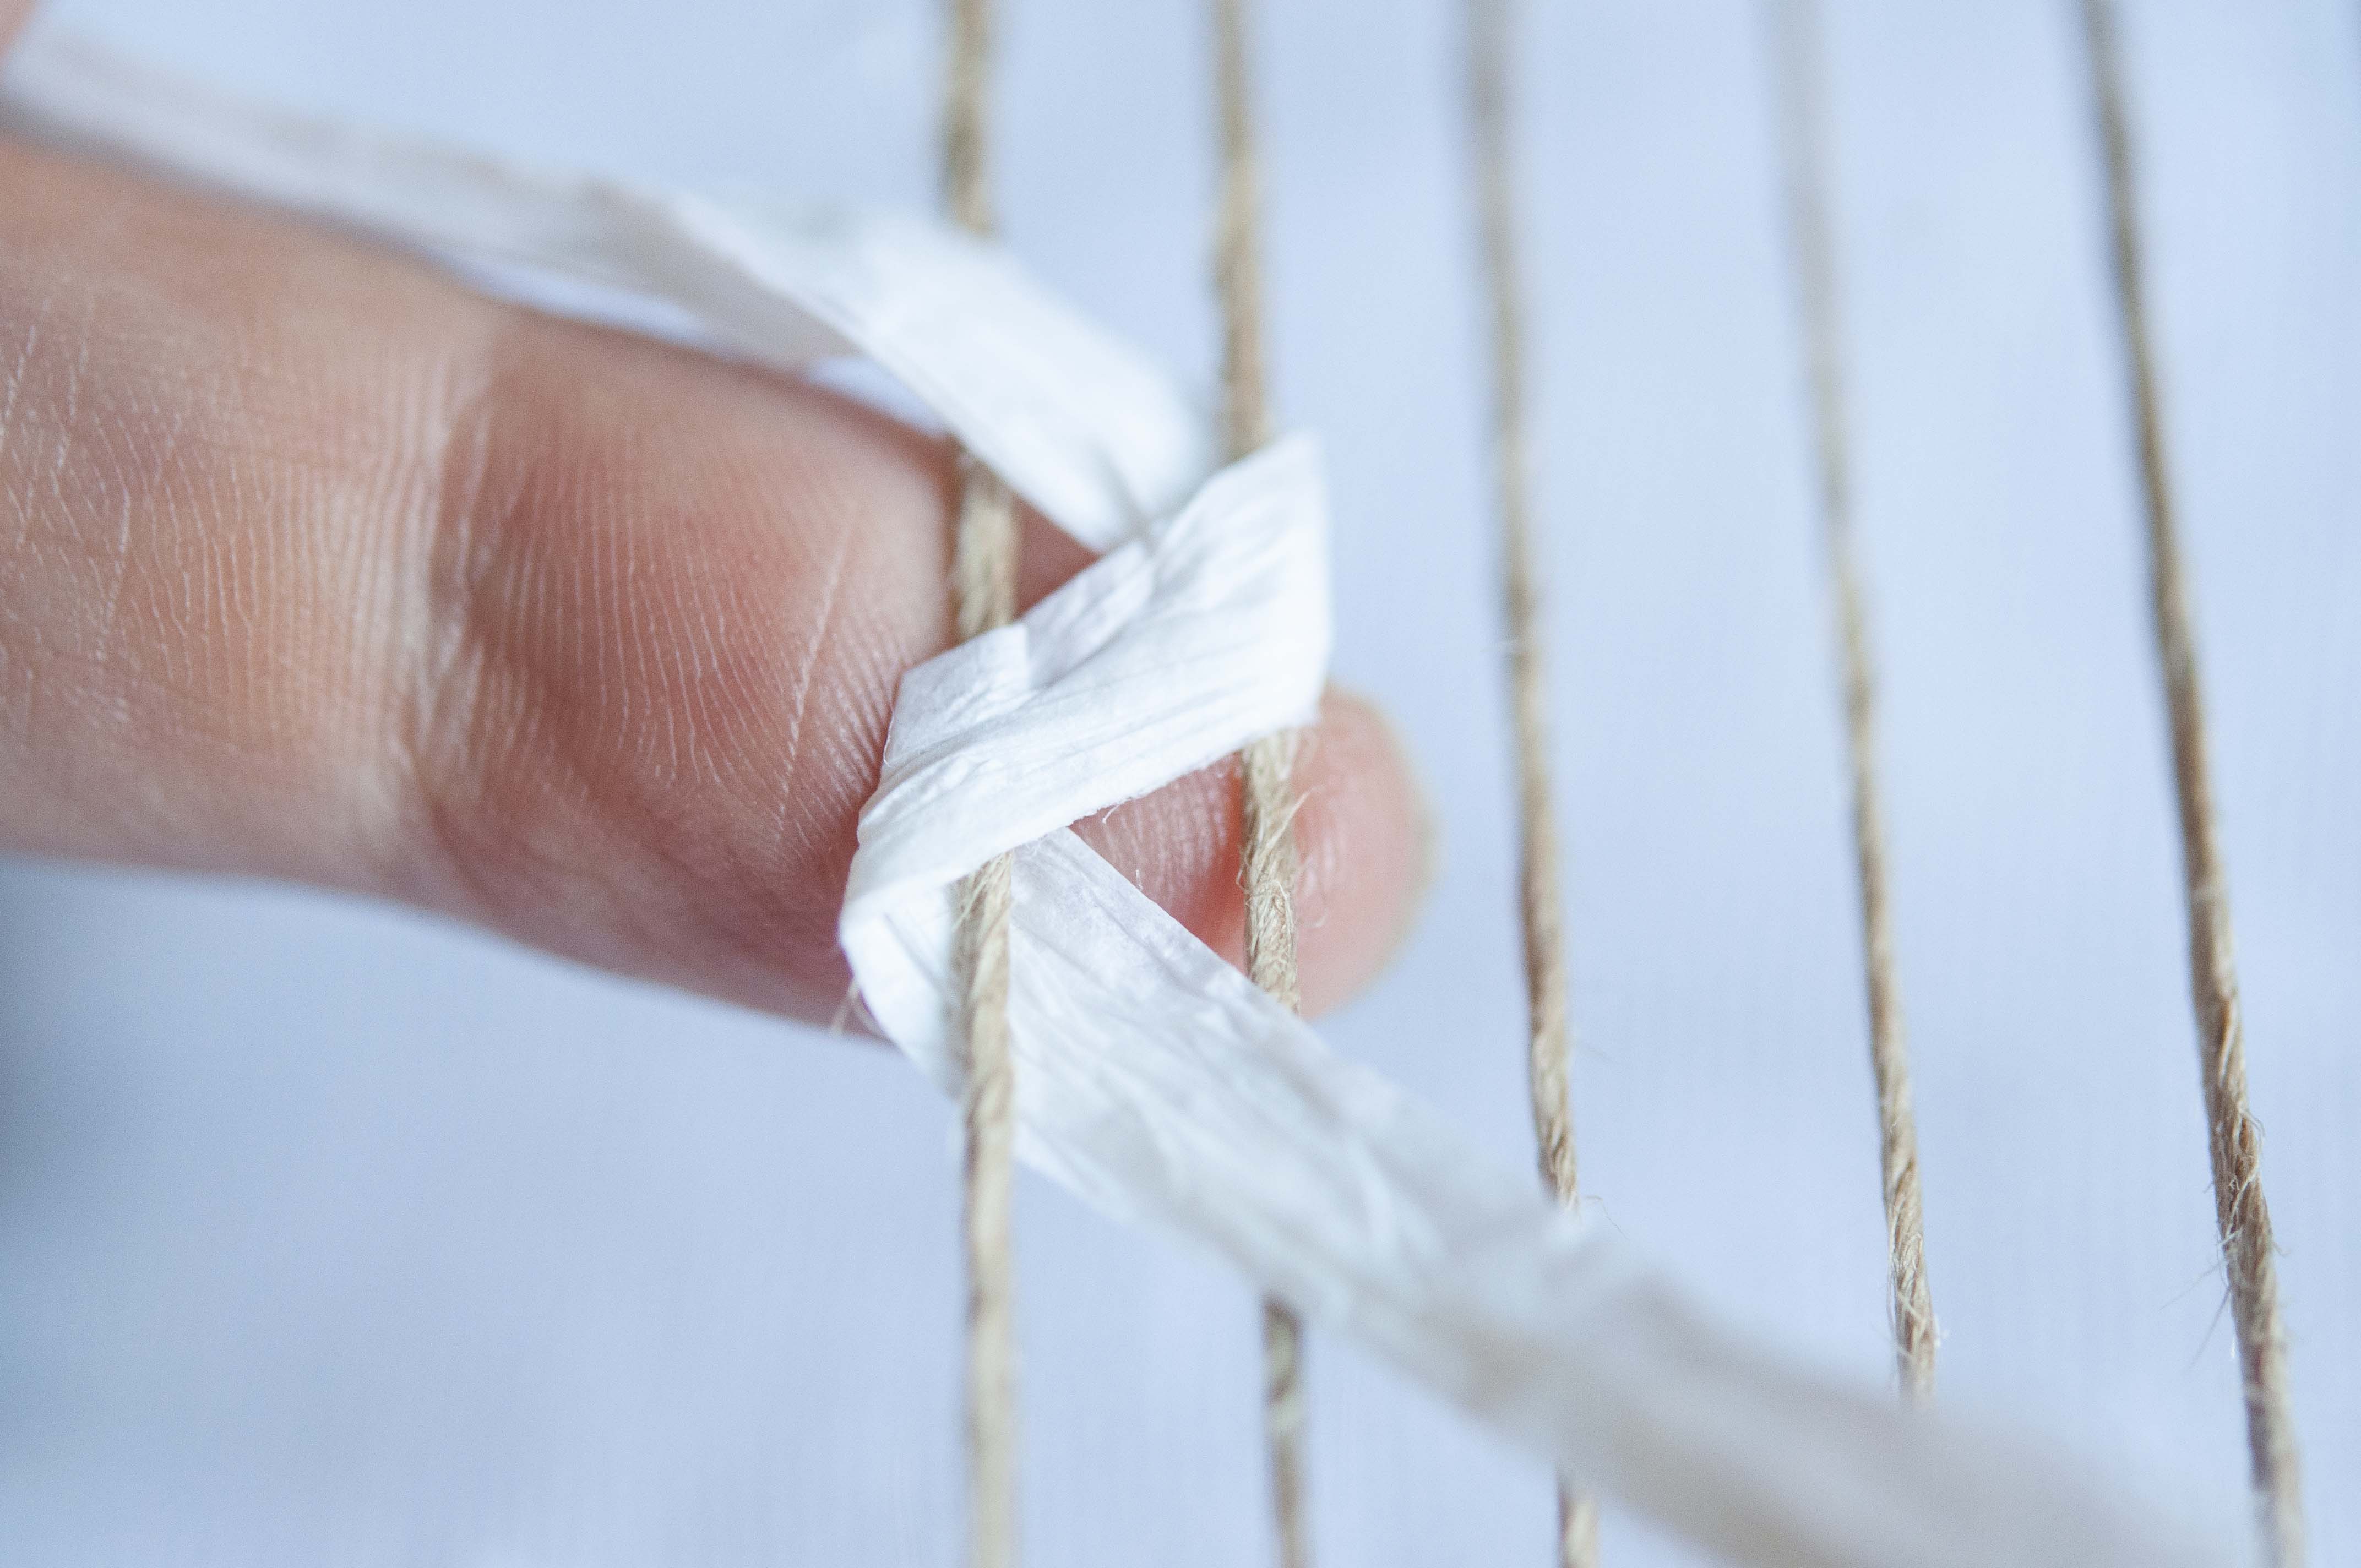
Secondly, to warp your loom (add the vertical threads) you need a firm fibre that will not stretch when pulled. If there is any give in this fibre, your weaving will distort horizontally. I’ve used jute string which is a natural fibre that is more sustainable than the likes of cotton and is also very hearty. This can be purchased at Spotlight or at some hardware stores.
Towarp your loom, secure the string at one end then thread through the notches back and forth pulling as tightly as you can to achieve a firm tension.
The basic weave…
Once your loom is warped, you can start preparing your fibres that will form the weft of your weaving (the horizontal threads).
For this wall hanging, I used two different white linens that I tore into long thin strips about 2 to 3 centimetres wide. You can create variation in the texture of your wall hanging by using different types of fabrics and by varying the width of your strips.
Take a look at the fabrics and scraps you already have before going out and buying anything new. Scrap fabrics can often result in a far more intriguingly personal weaving.
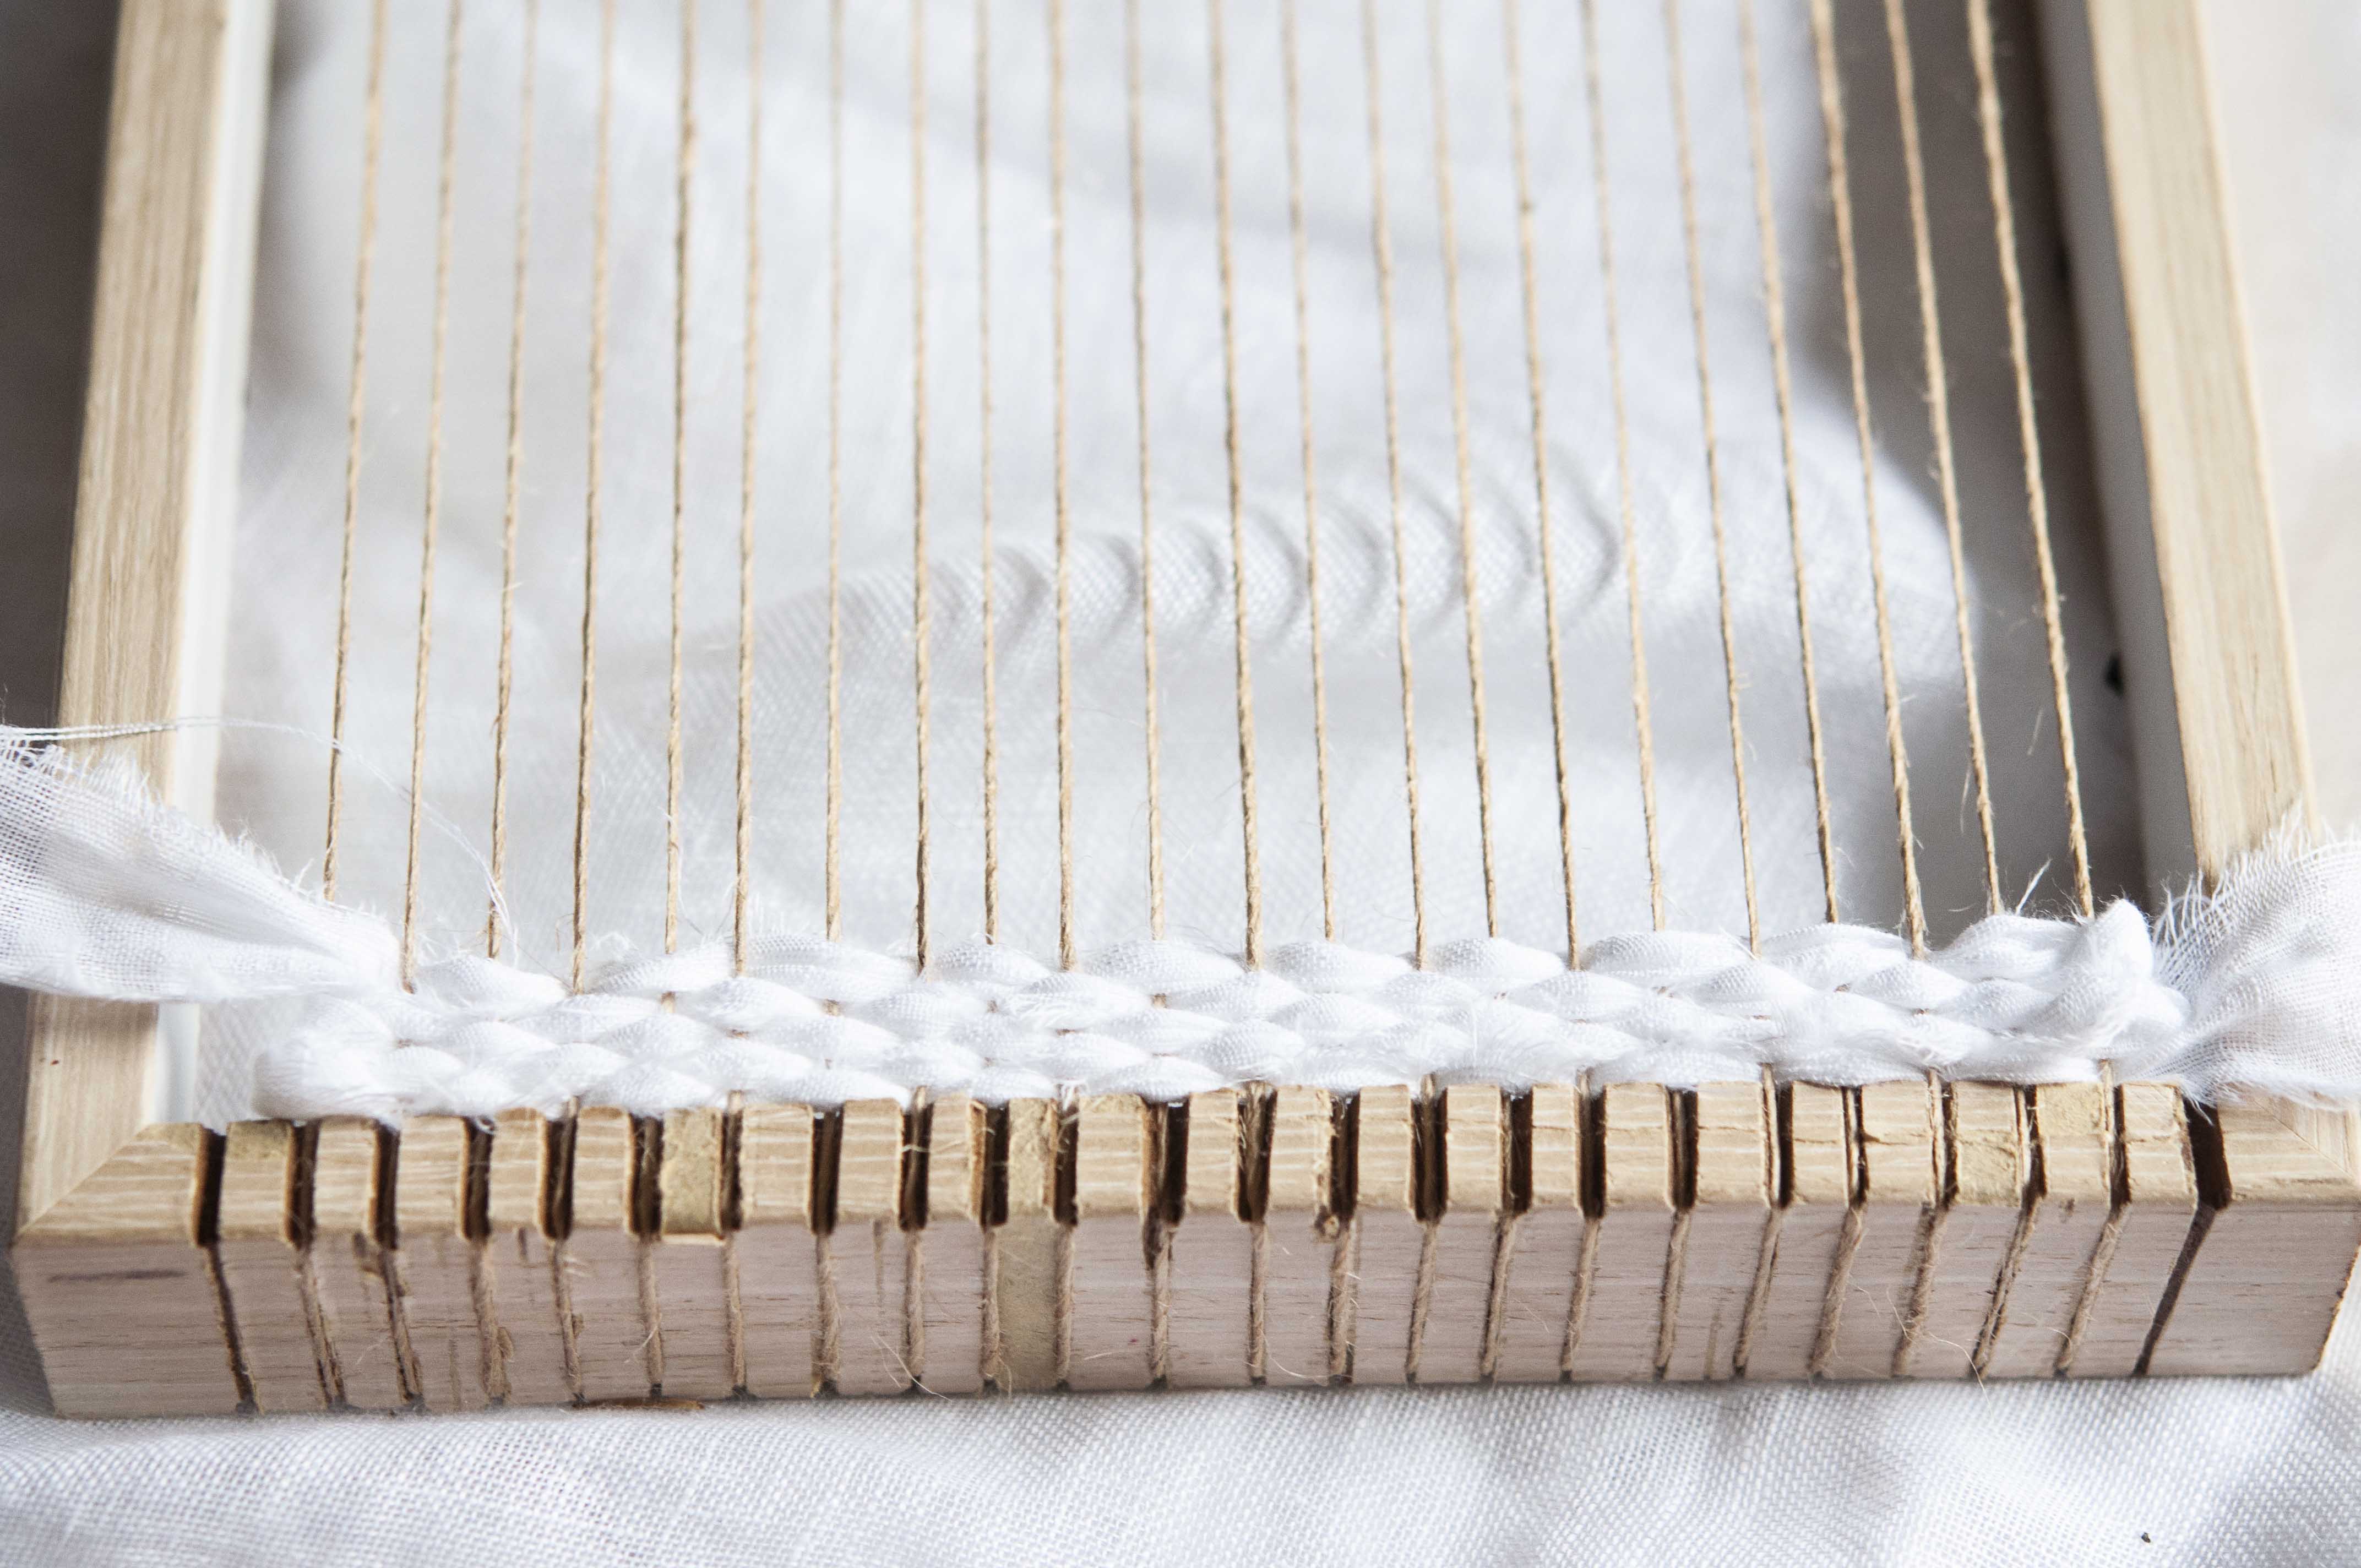
Once you’ve threaded a strip of fabric through your large darning needle, you can start your weaving. This is the fun part! The bulk of this wall hanging is achieved by using the most basic weaving stitch which is super easy and becomes very fast to do.
Simply weave the needle over and under each warp thread until you reach the other end of your loom. Pull the linen through, leaving a tail of about 10cm at the end you started at.
Work your way back in the opposite direction, making sure you are going over and under the opposite warp threads that you went through on your first row.
If you see your warp threads starting to pull into the centre, this means you are pulling your weft fabric through too tightly.
Keep weaving back and forth until your strip runs out, then push all your rows tightly down to the bottom of your loom, making sure you leave a 10cm strip of fabric hanging out at both ends. It is important that you have a solid base at the bottom of your weaving so make sure you have at least 4 rows completed before moving on.
When starting a new strip of fabric or other fibre, make sure you return to your weaving at the side of the loom that you left off and thread back in the opposite direction to the row below, leaving a tail at the end.
Beyond this, you can add any fibres you like by using the same technique, however, I will show you a few techniques that will add interest to your piece and set it apart from the rest.
Creating blocks of colours and textures…
One way to add some flavour to your weaving is by creating blocks of textures and colours to break up your horizontal rows. You can easily do this by using the same simple technique as you’ve already learnt but stopping part way along the row and returning back the way you came.
I did a few full rows of natural raffia before I began on my block. I wanted my block to take up an area within the left third of my weaving so I began on the row that went from left to right then stopped when I was about a third of the way along. To build your block, treat the warp thread that you stop at as if it were the warp thread at the very end of the row and return back to the left, weaving through alternative warp threads to the row you just completed.
Build as many rows up as you like, making sure you stop at the same warp thread each time if you want a straight line up.
Alternatively, if you’re feeling adventurous, you can stop at different warp threads each time to create a more organic or jagged line.
Next, I used the same technique but this time starting from the right-hand side and with a different material to fill in the empty section. You can use any material to achieve this blocking technique but it’s a good idea to vary where your blocks sit along the warp threads so that there aren’t big open holes between your blocks in the same place every time. One way to make sure this doesn’t become a problem is by doing a few full-length rows between vertical blocks.
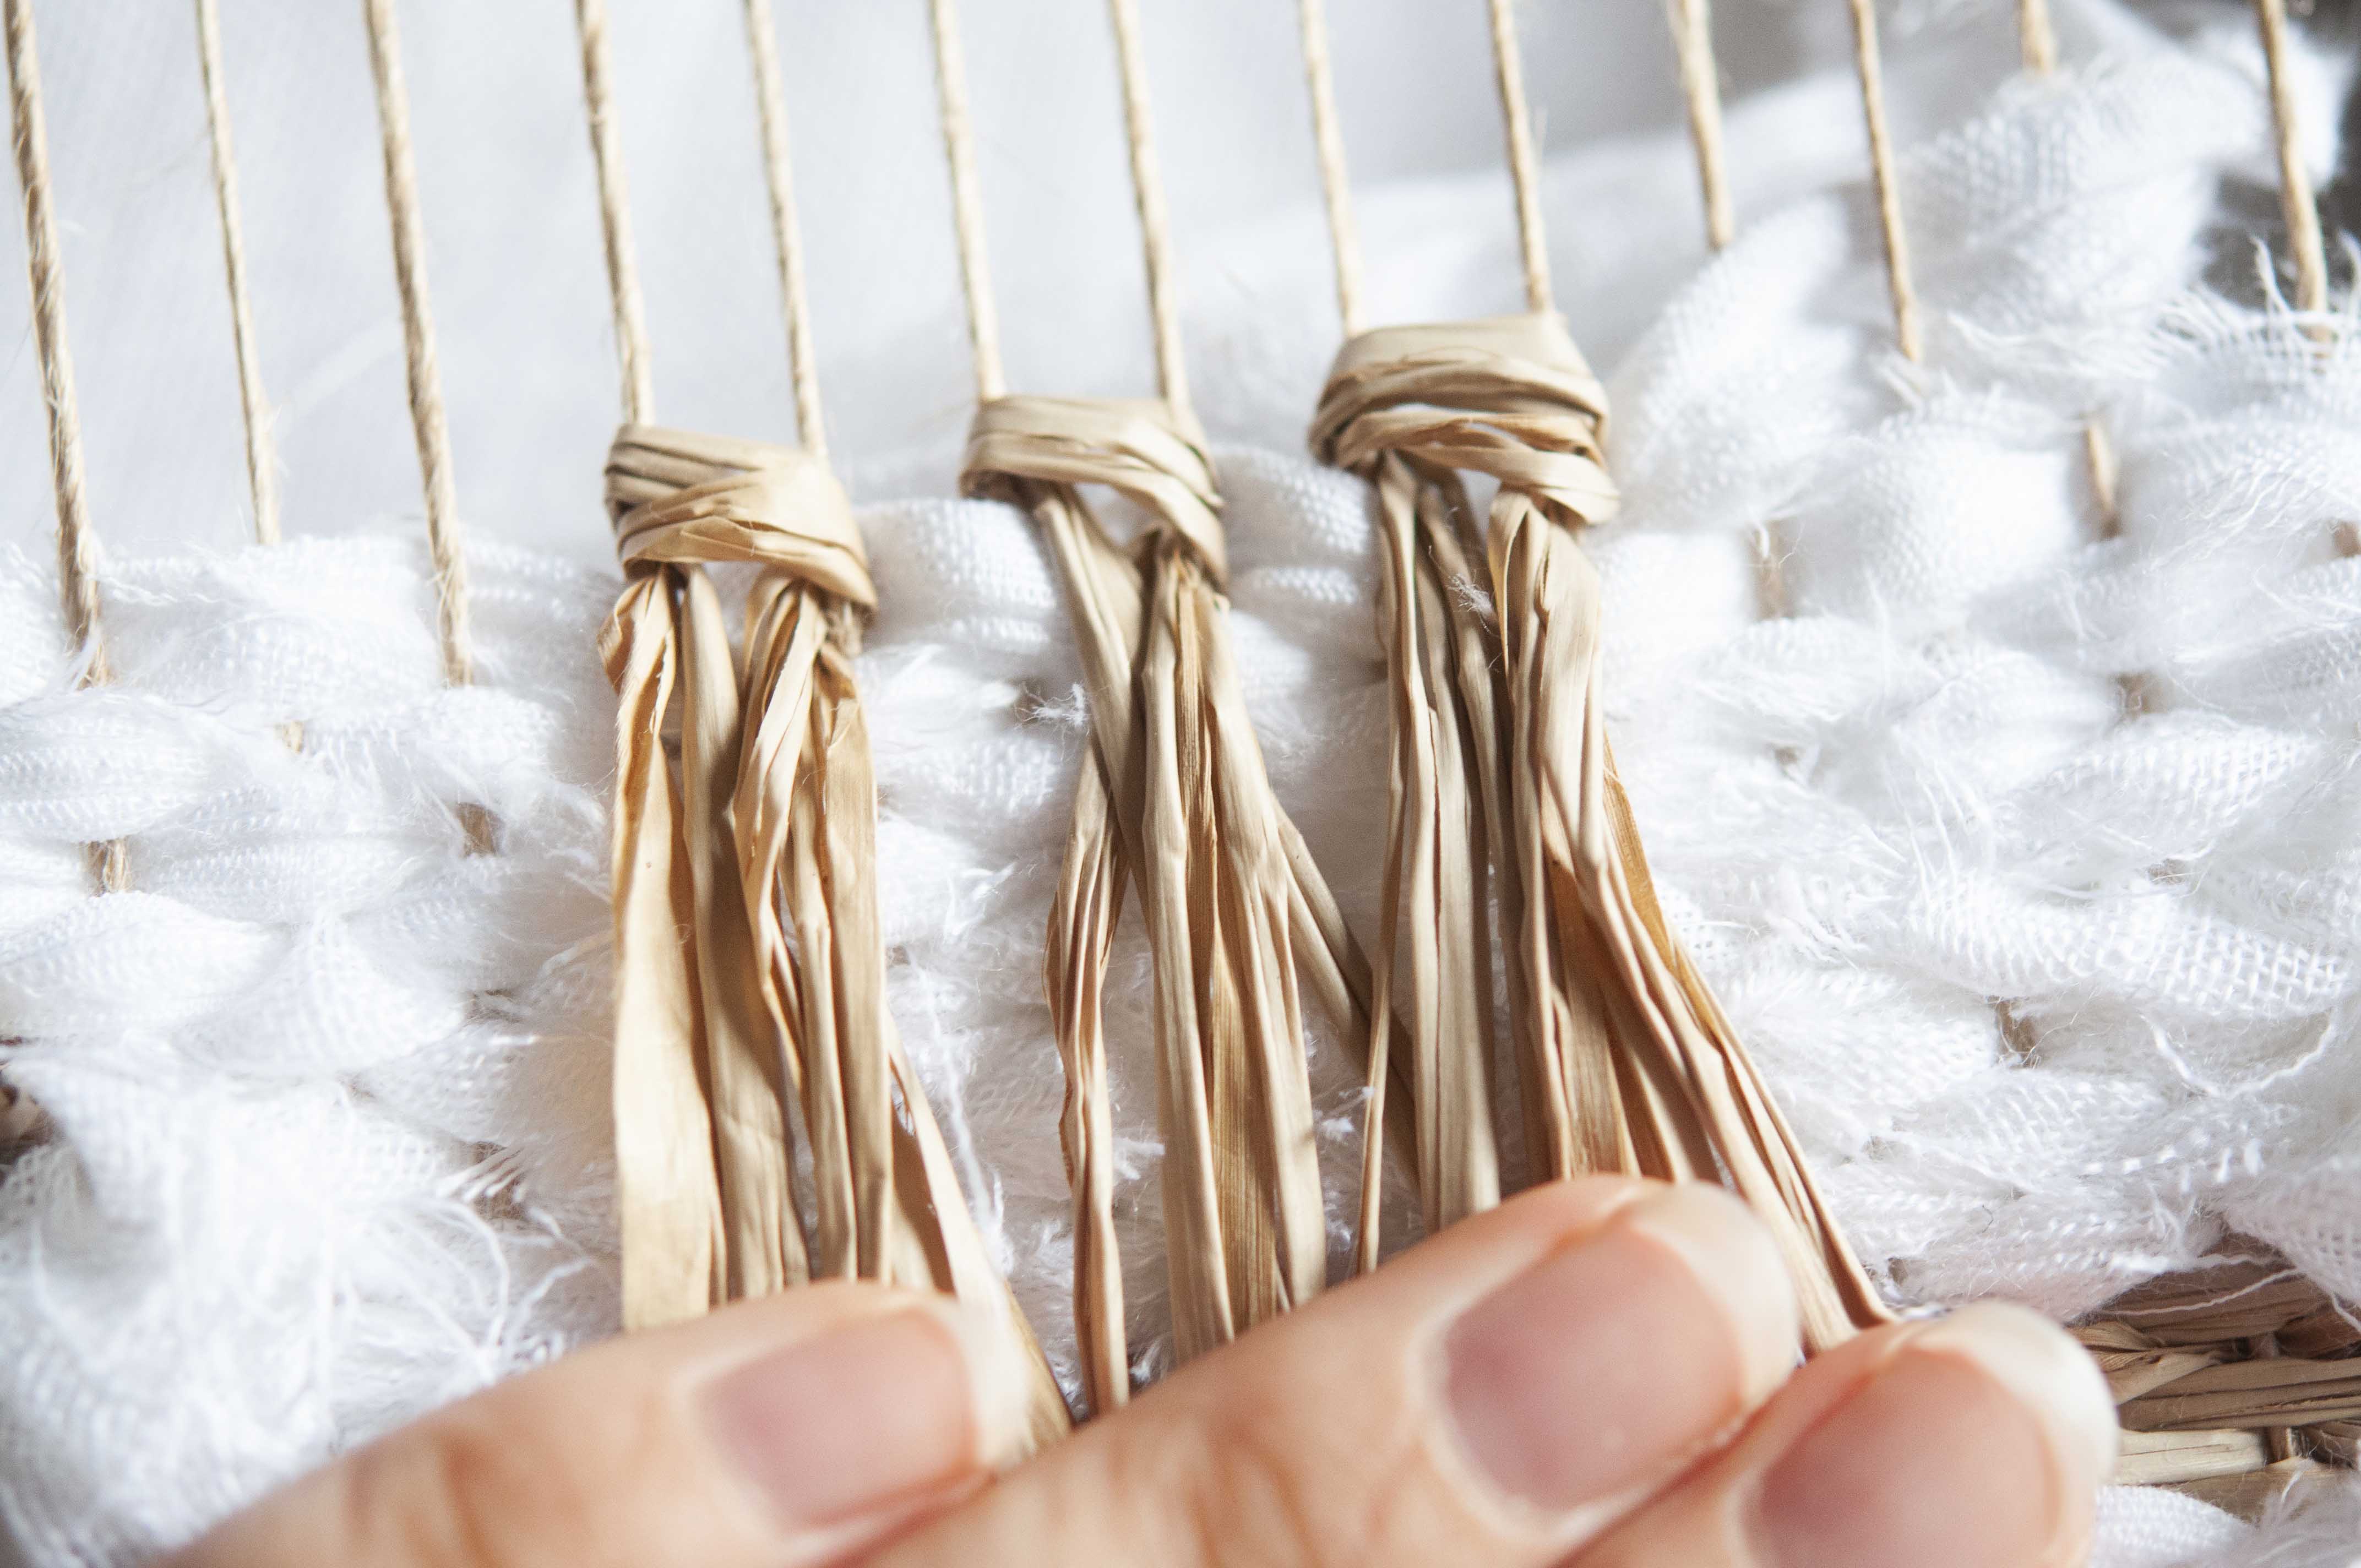
Creating a fringe…
Another technique that I love to use to create texture is fringing. You can do blocks of fringing or long rows, depending on what will best balance your work. For this piece, I chose to do a small block of fringing on the right-hand side of my weaving to balance out the block of raffia I did earlier on the left.
When creating a fringe, it is important to note that it will cover whatever weaving you have completed below it so make sure you don’t put a fringe over something you want to be seen clearly.
To create the fringe, I took two short pieces of natural raffia (approx. 10cm long), and placed them horizontally over two warp threads then brought the ends through to the middle and pulled them out the front and to the sides. You can then pull the ends outwards and down to rest the knot on top of the row of weaving below.
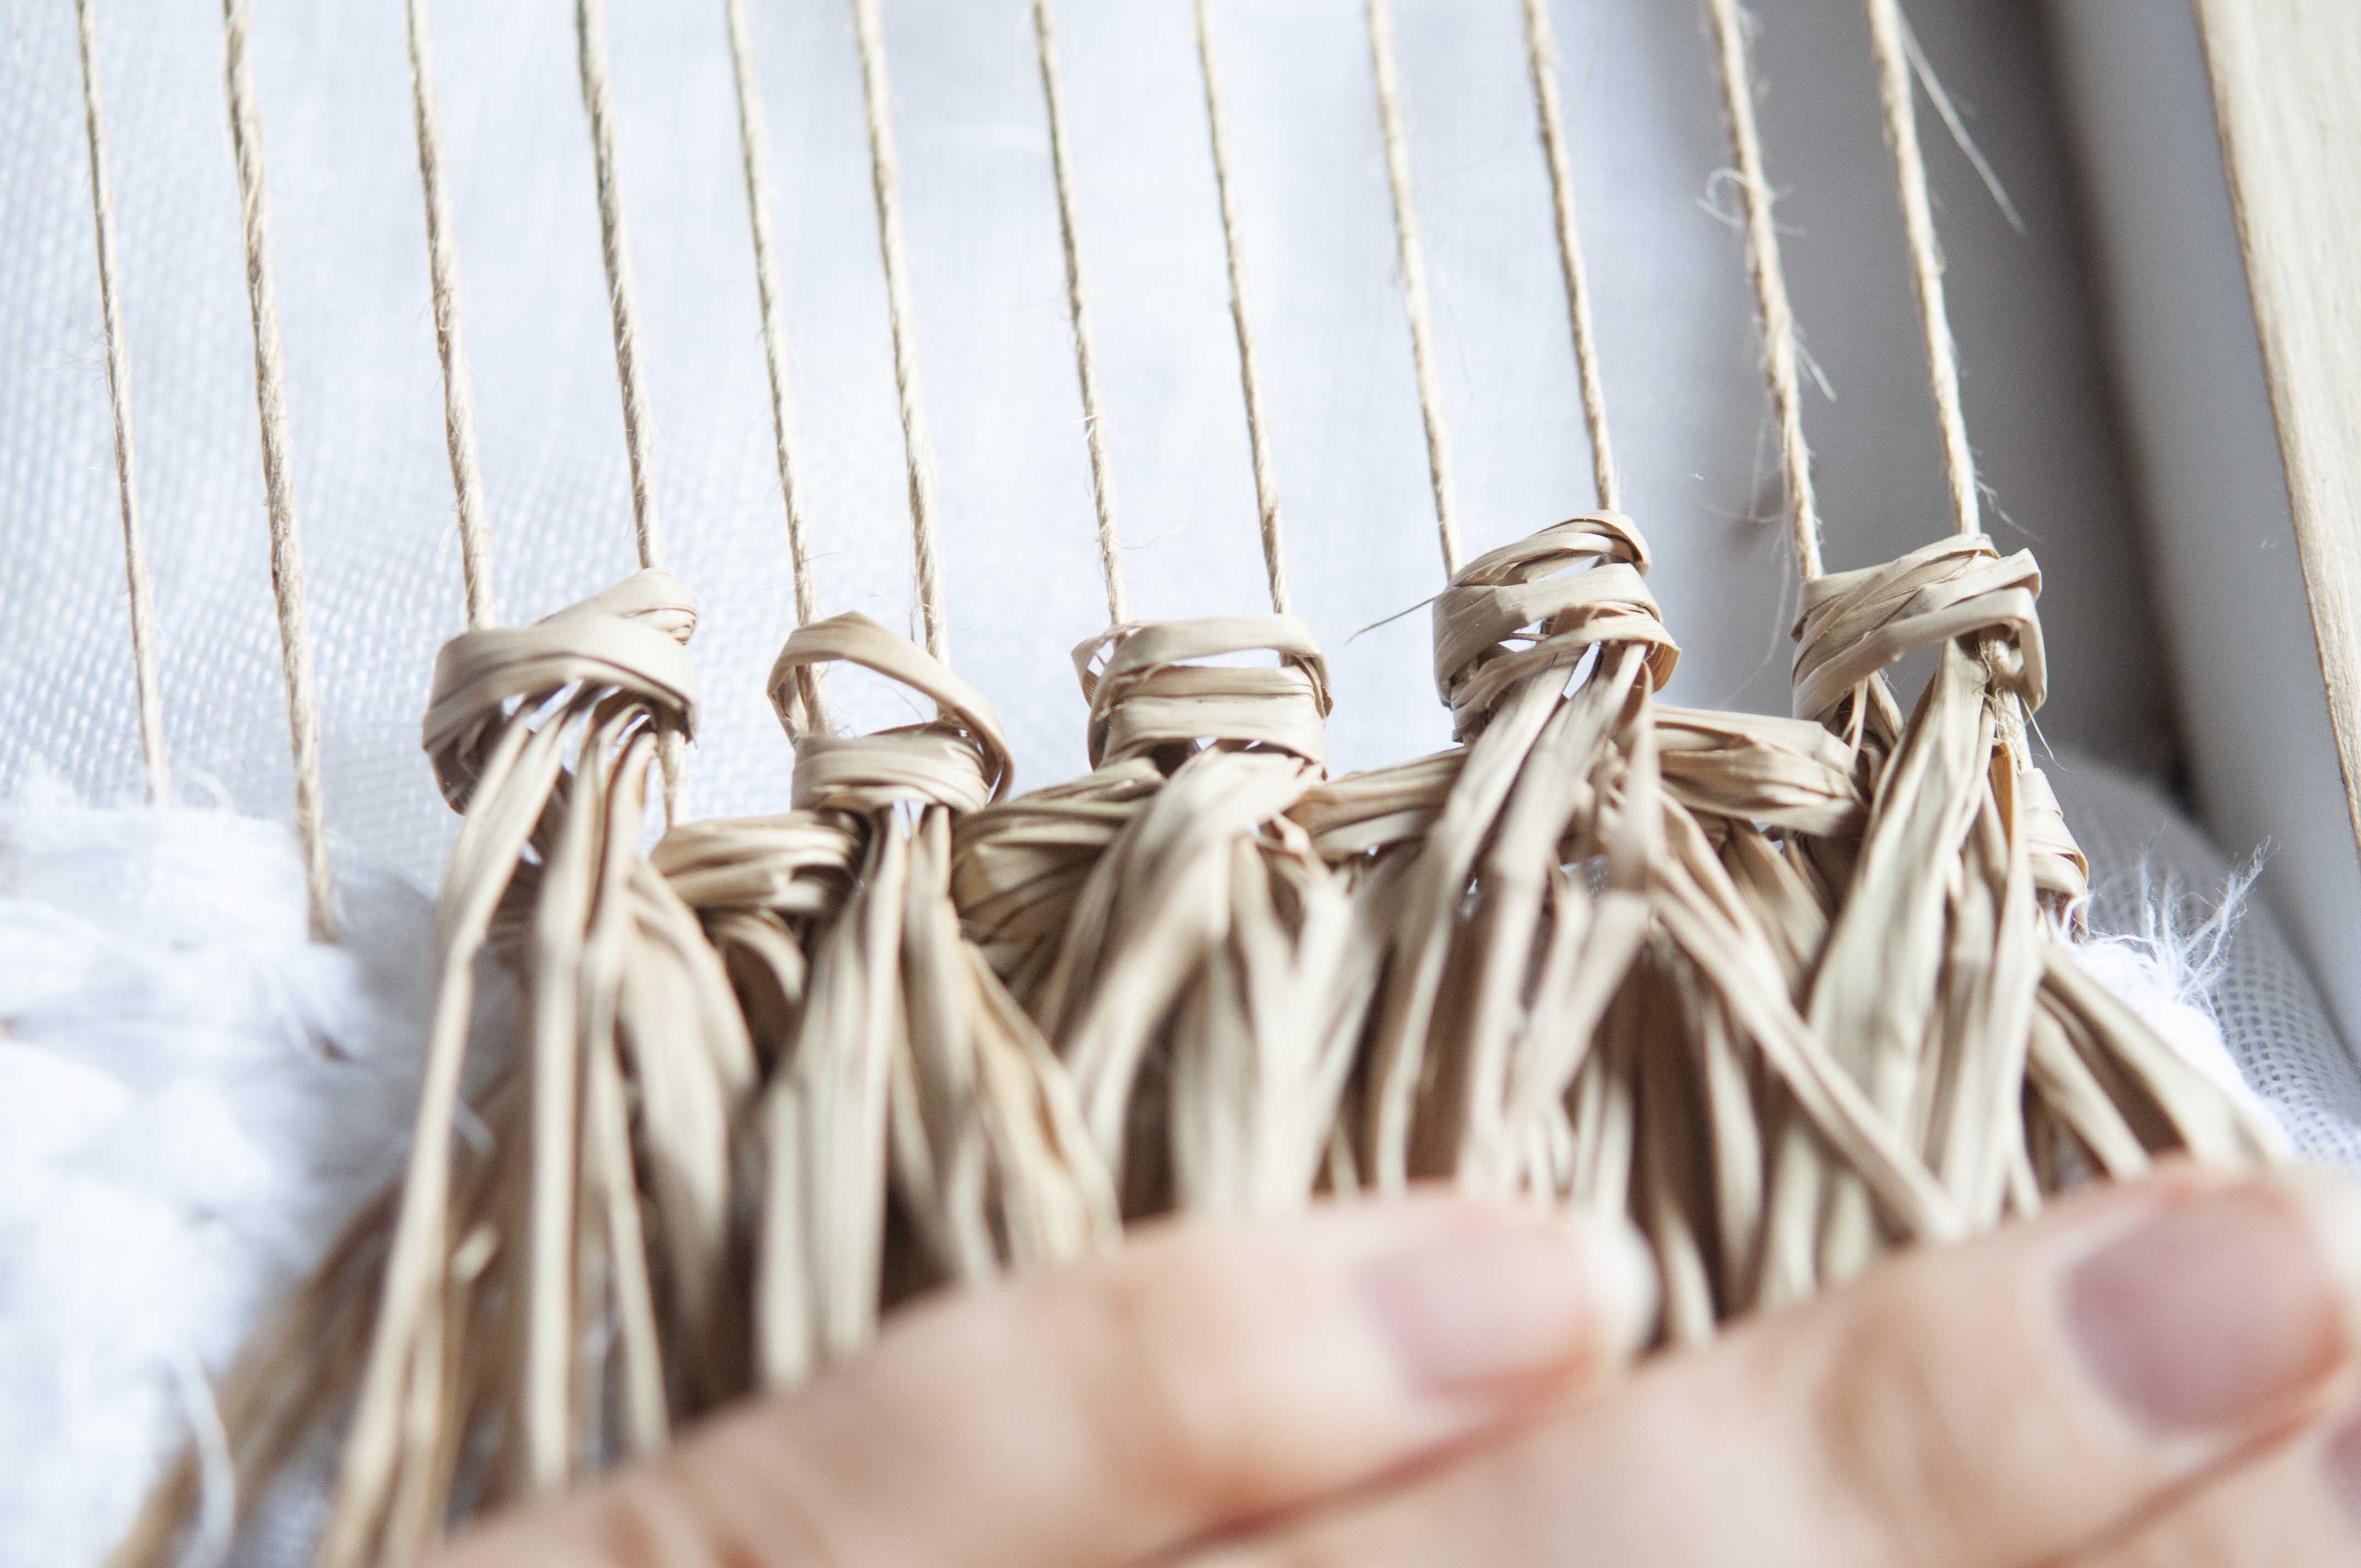
Because I wanted to create more of a textured block, I decided to layer up the fringe vertically by adding knots through the alternate pairs of warp threads to the row below.
I did at least three rows, alternating pairs of warp threads each time, but you can keep building up to create more bulk if you desire. Once you are satisfied with the amount of fringe you have, you can snip off the bottoms to create a straight edge or keep them as is for extra interest.
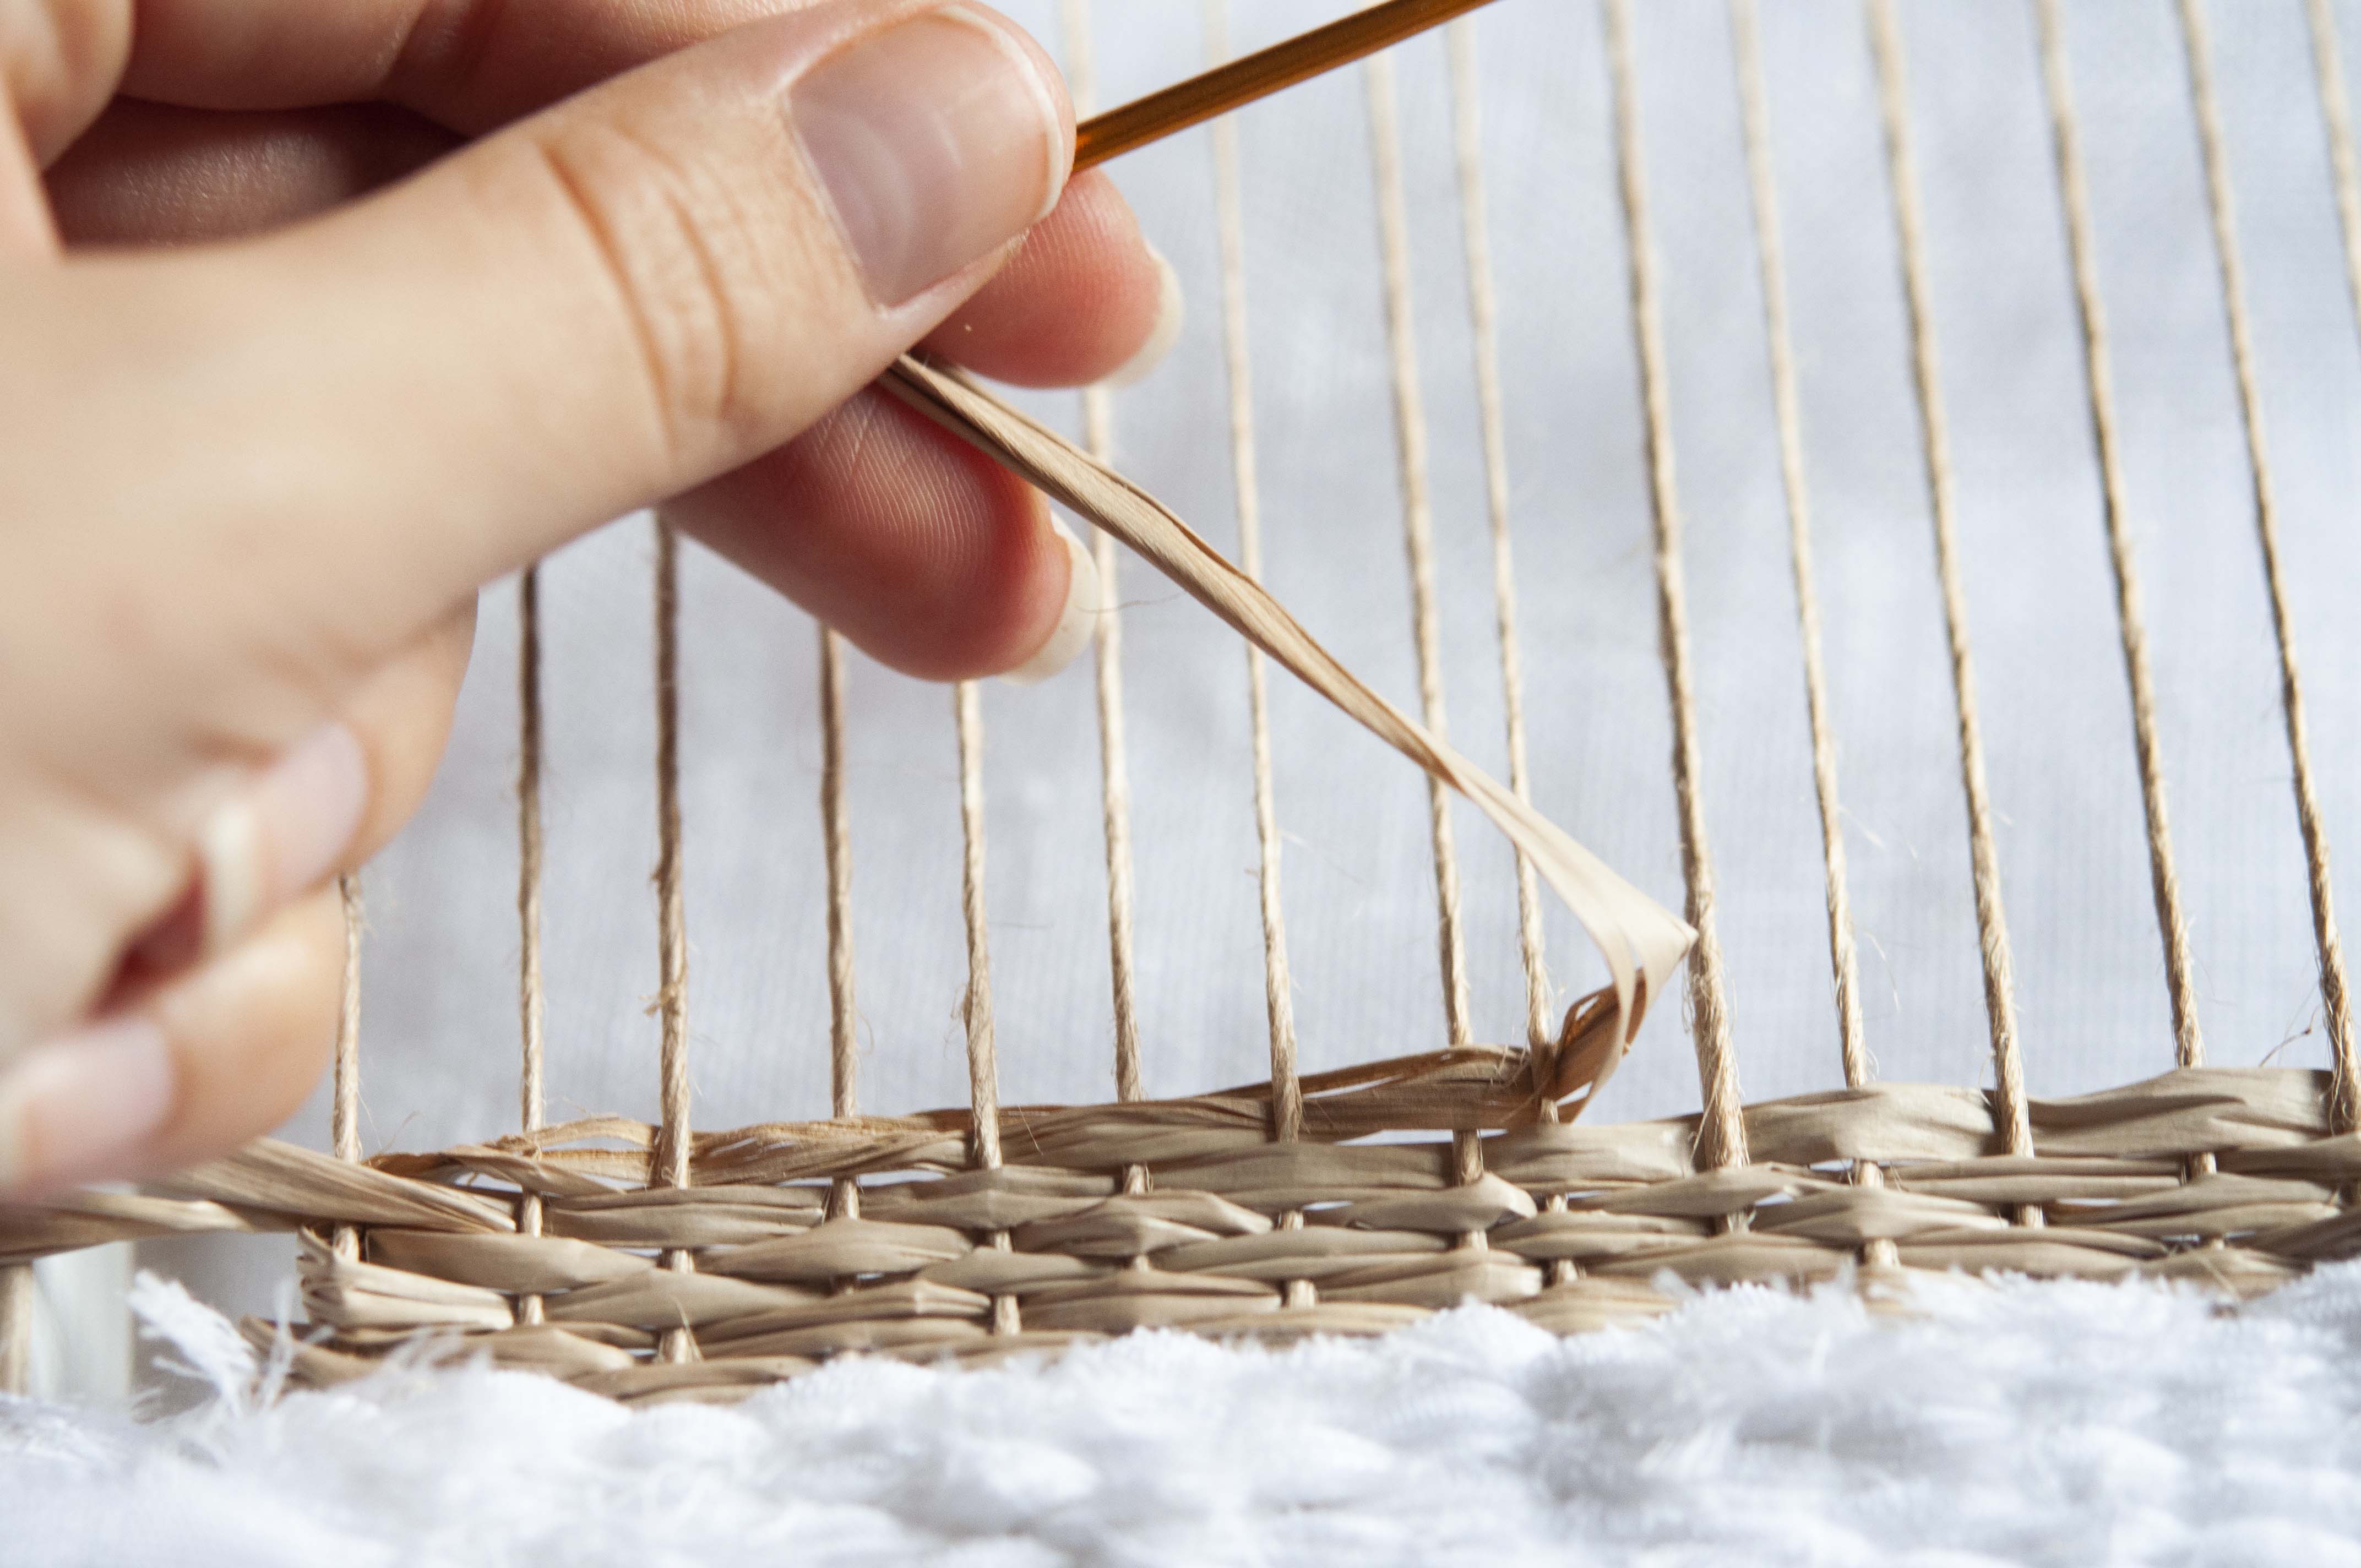
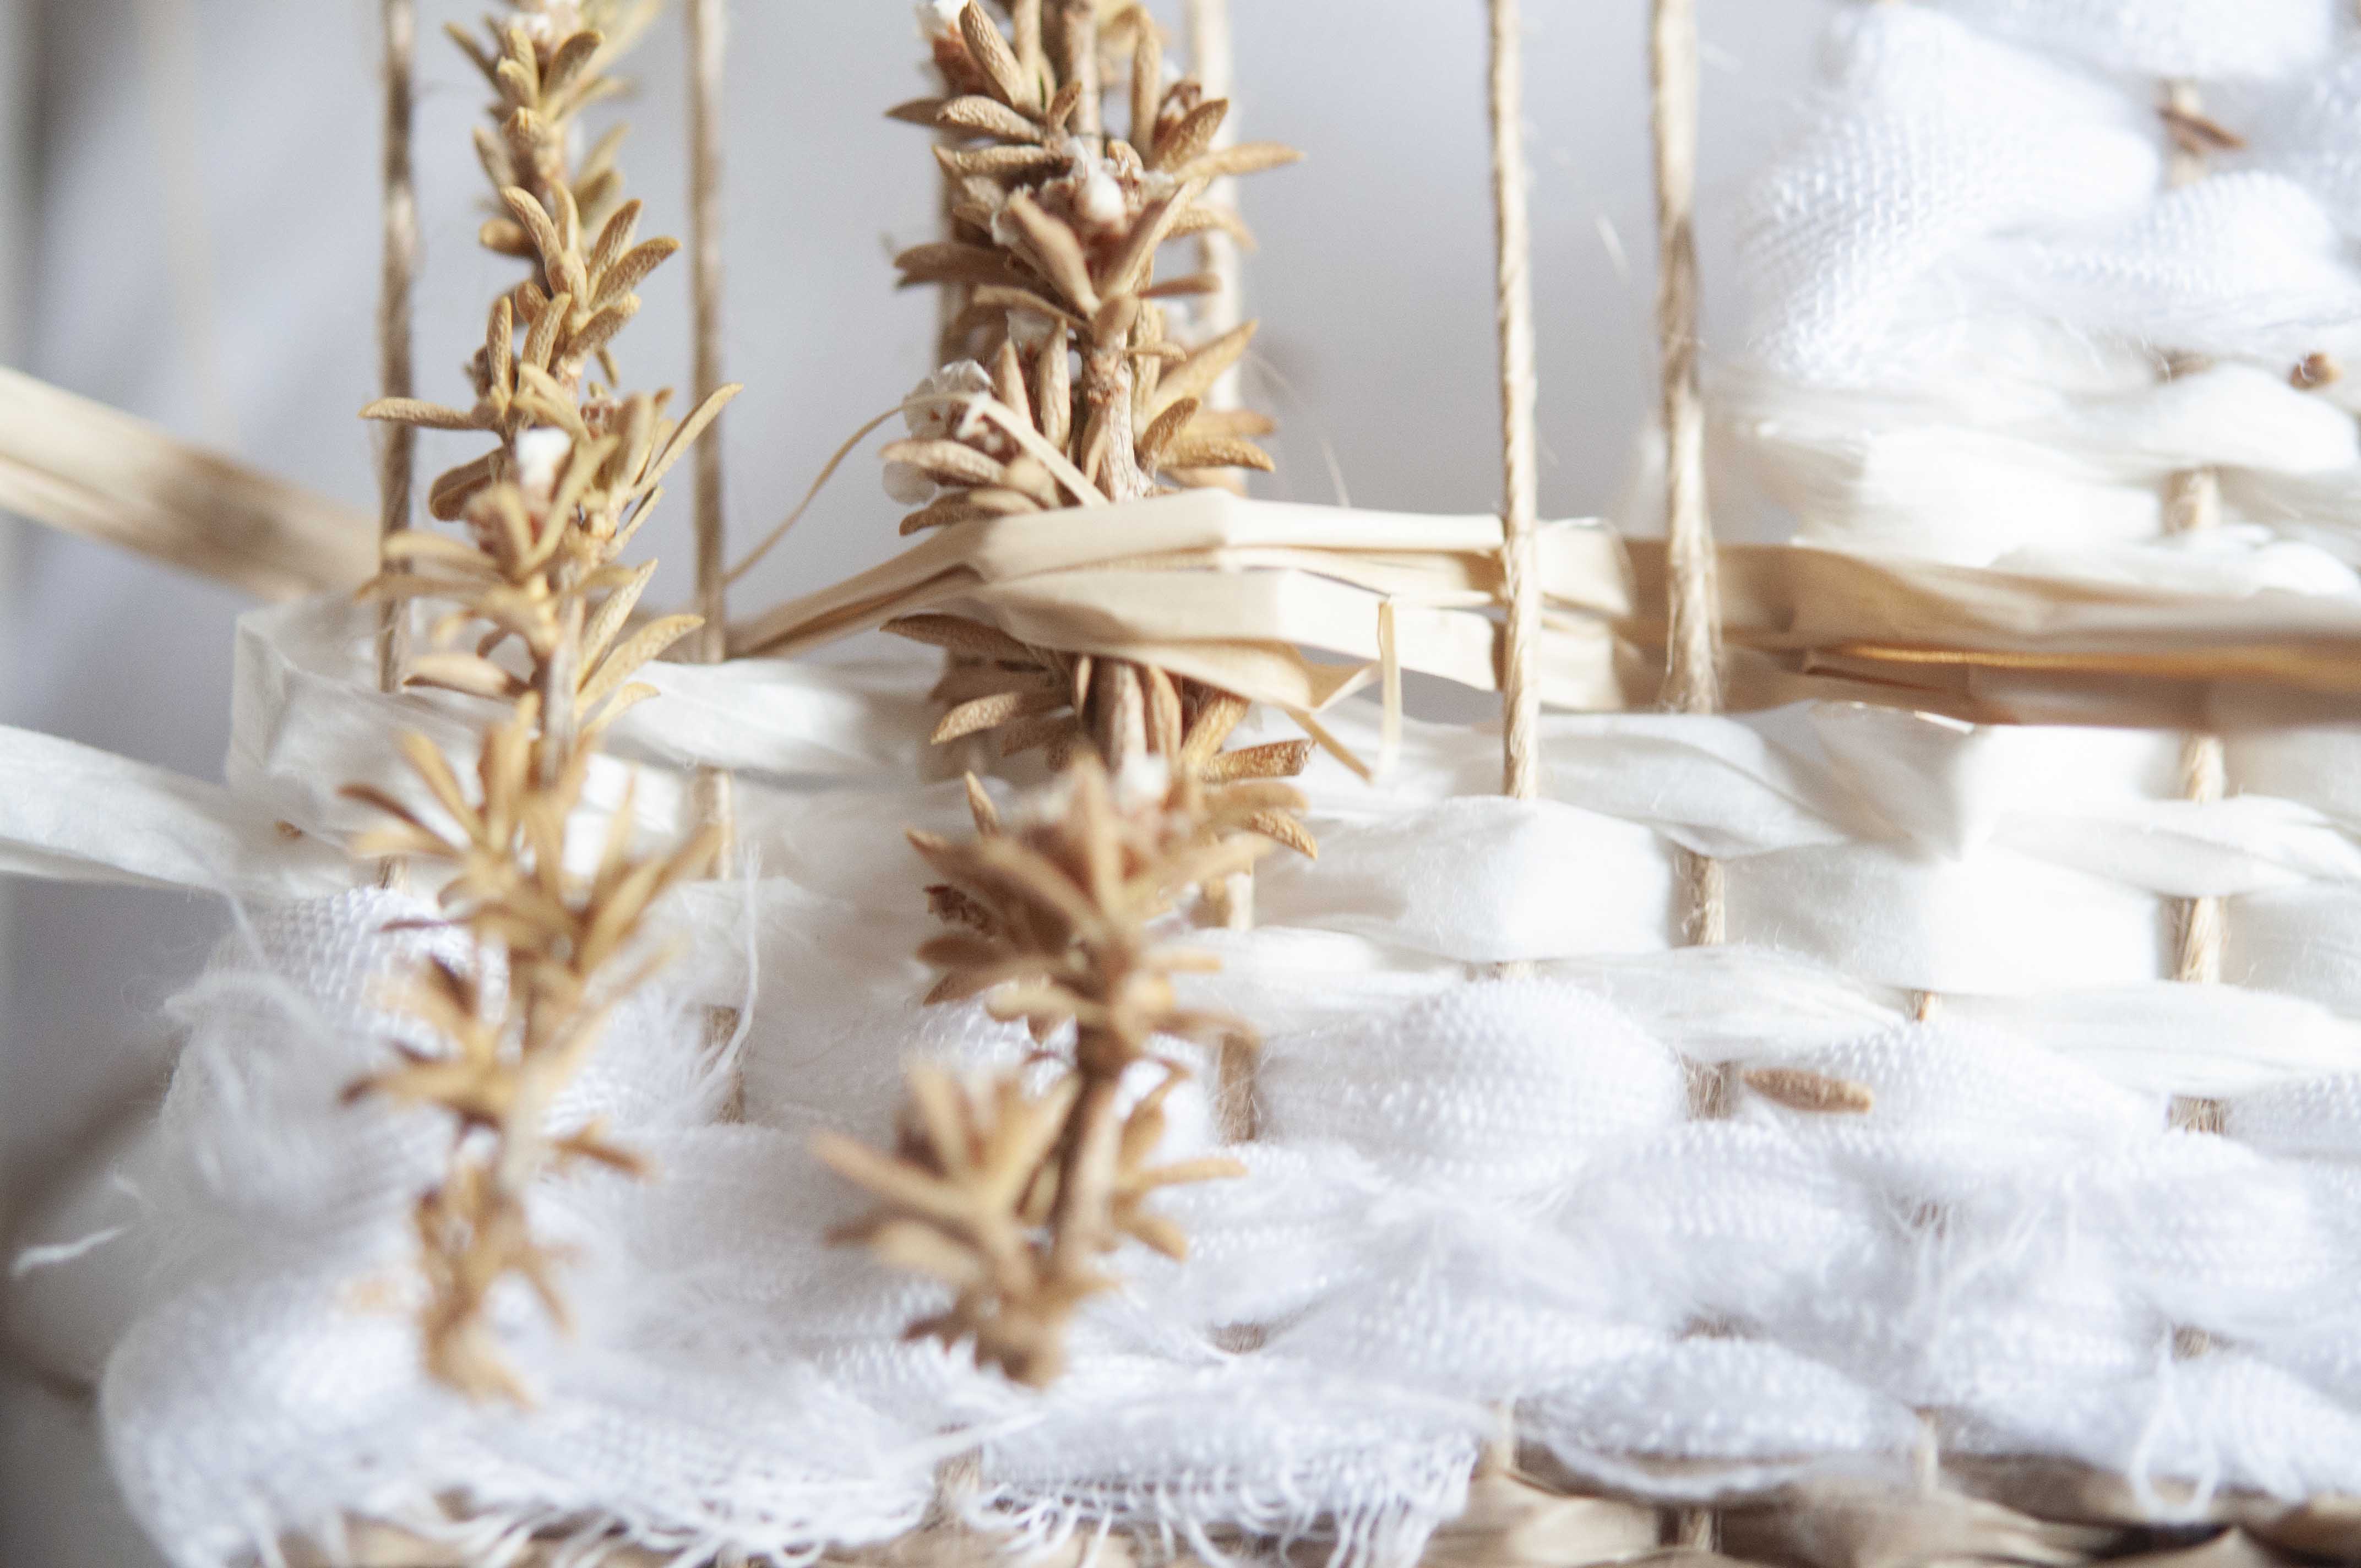
Weaving in dried plants…
Now that you have two extra techniques down, I’m going to show you how to add a third feature of interest that will really make your wall hanging unique to you.
You can use fresh plants from your garden or from around the neighbourhood but I have used dried plants from a bunch of native Australian plants that have been dead on my windowsill for a long time. If you’re using fresh plants, be wary of shrinkage and staining when they dry out pressed against other materials.
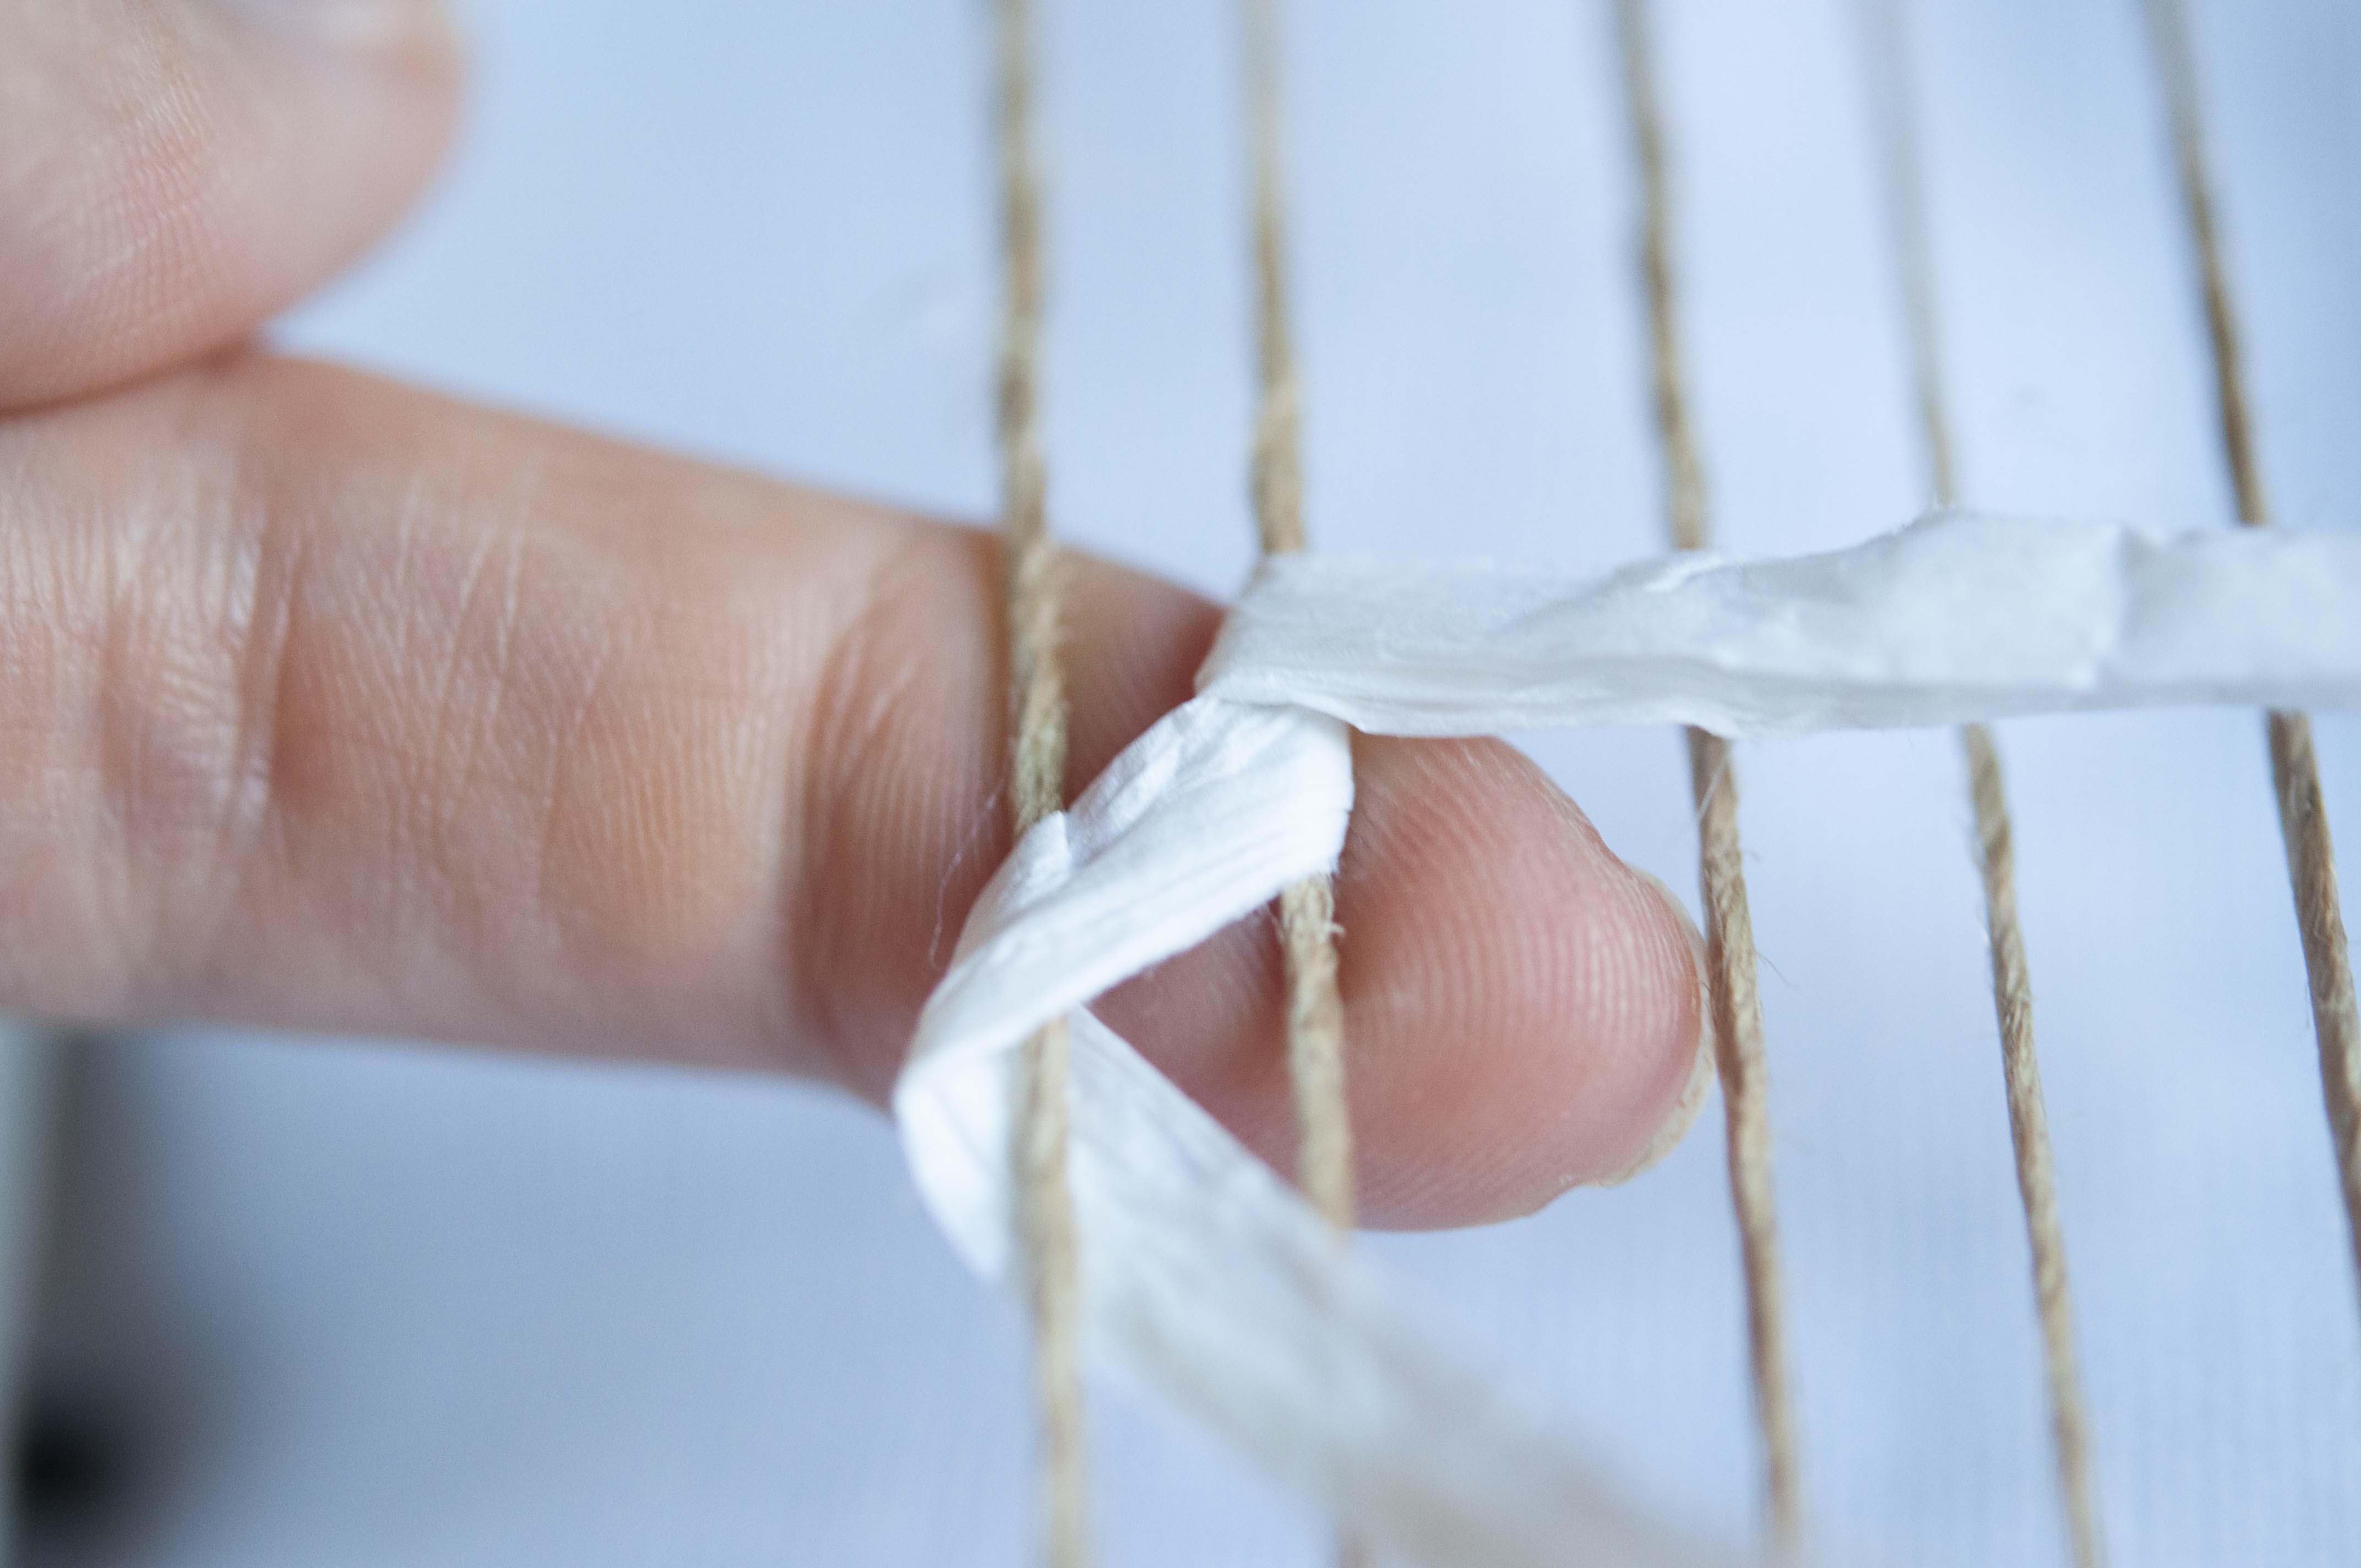
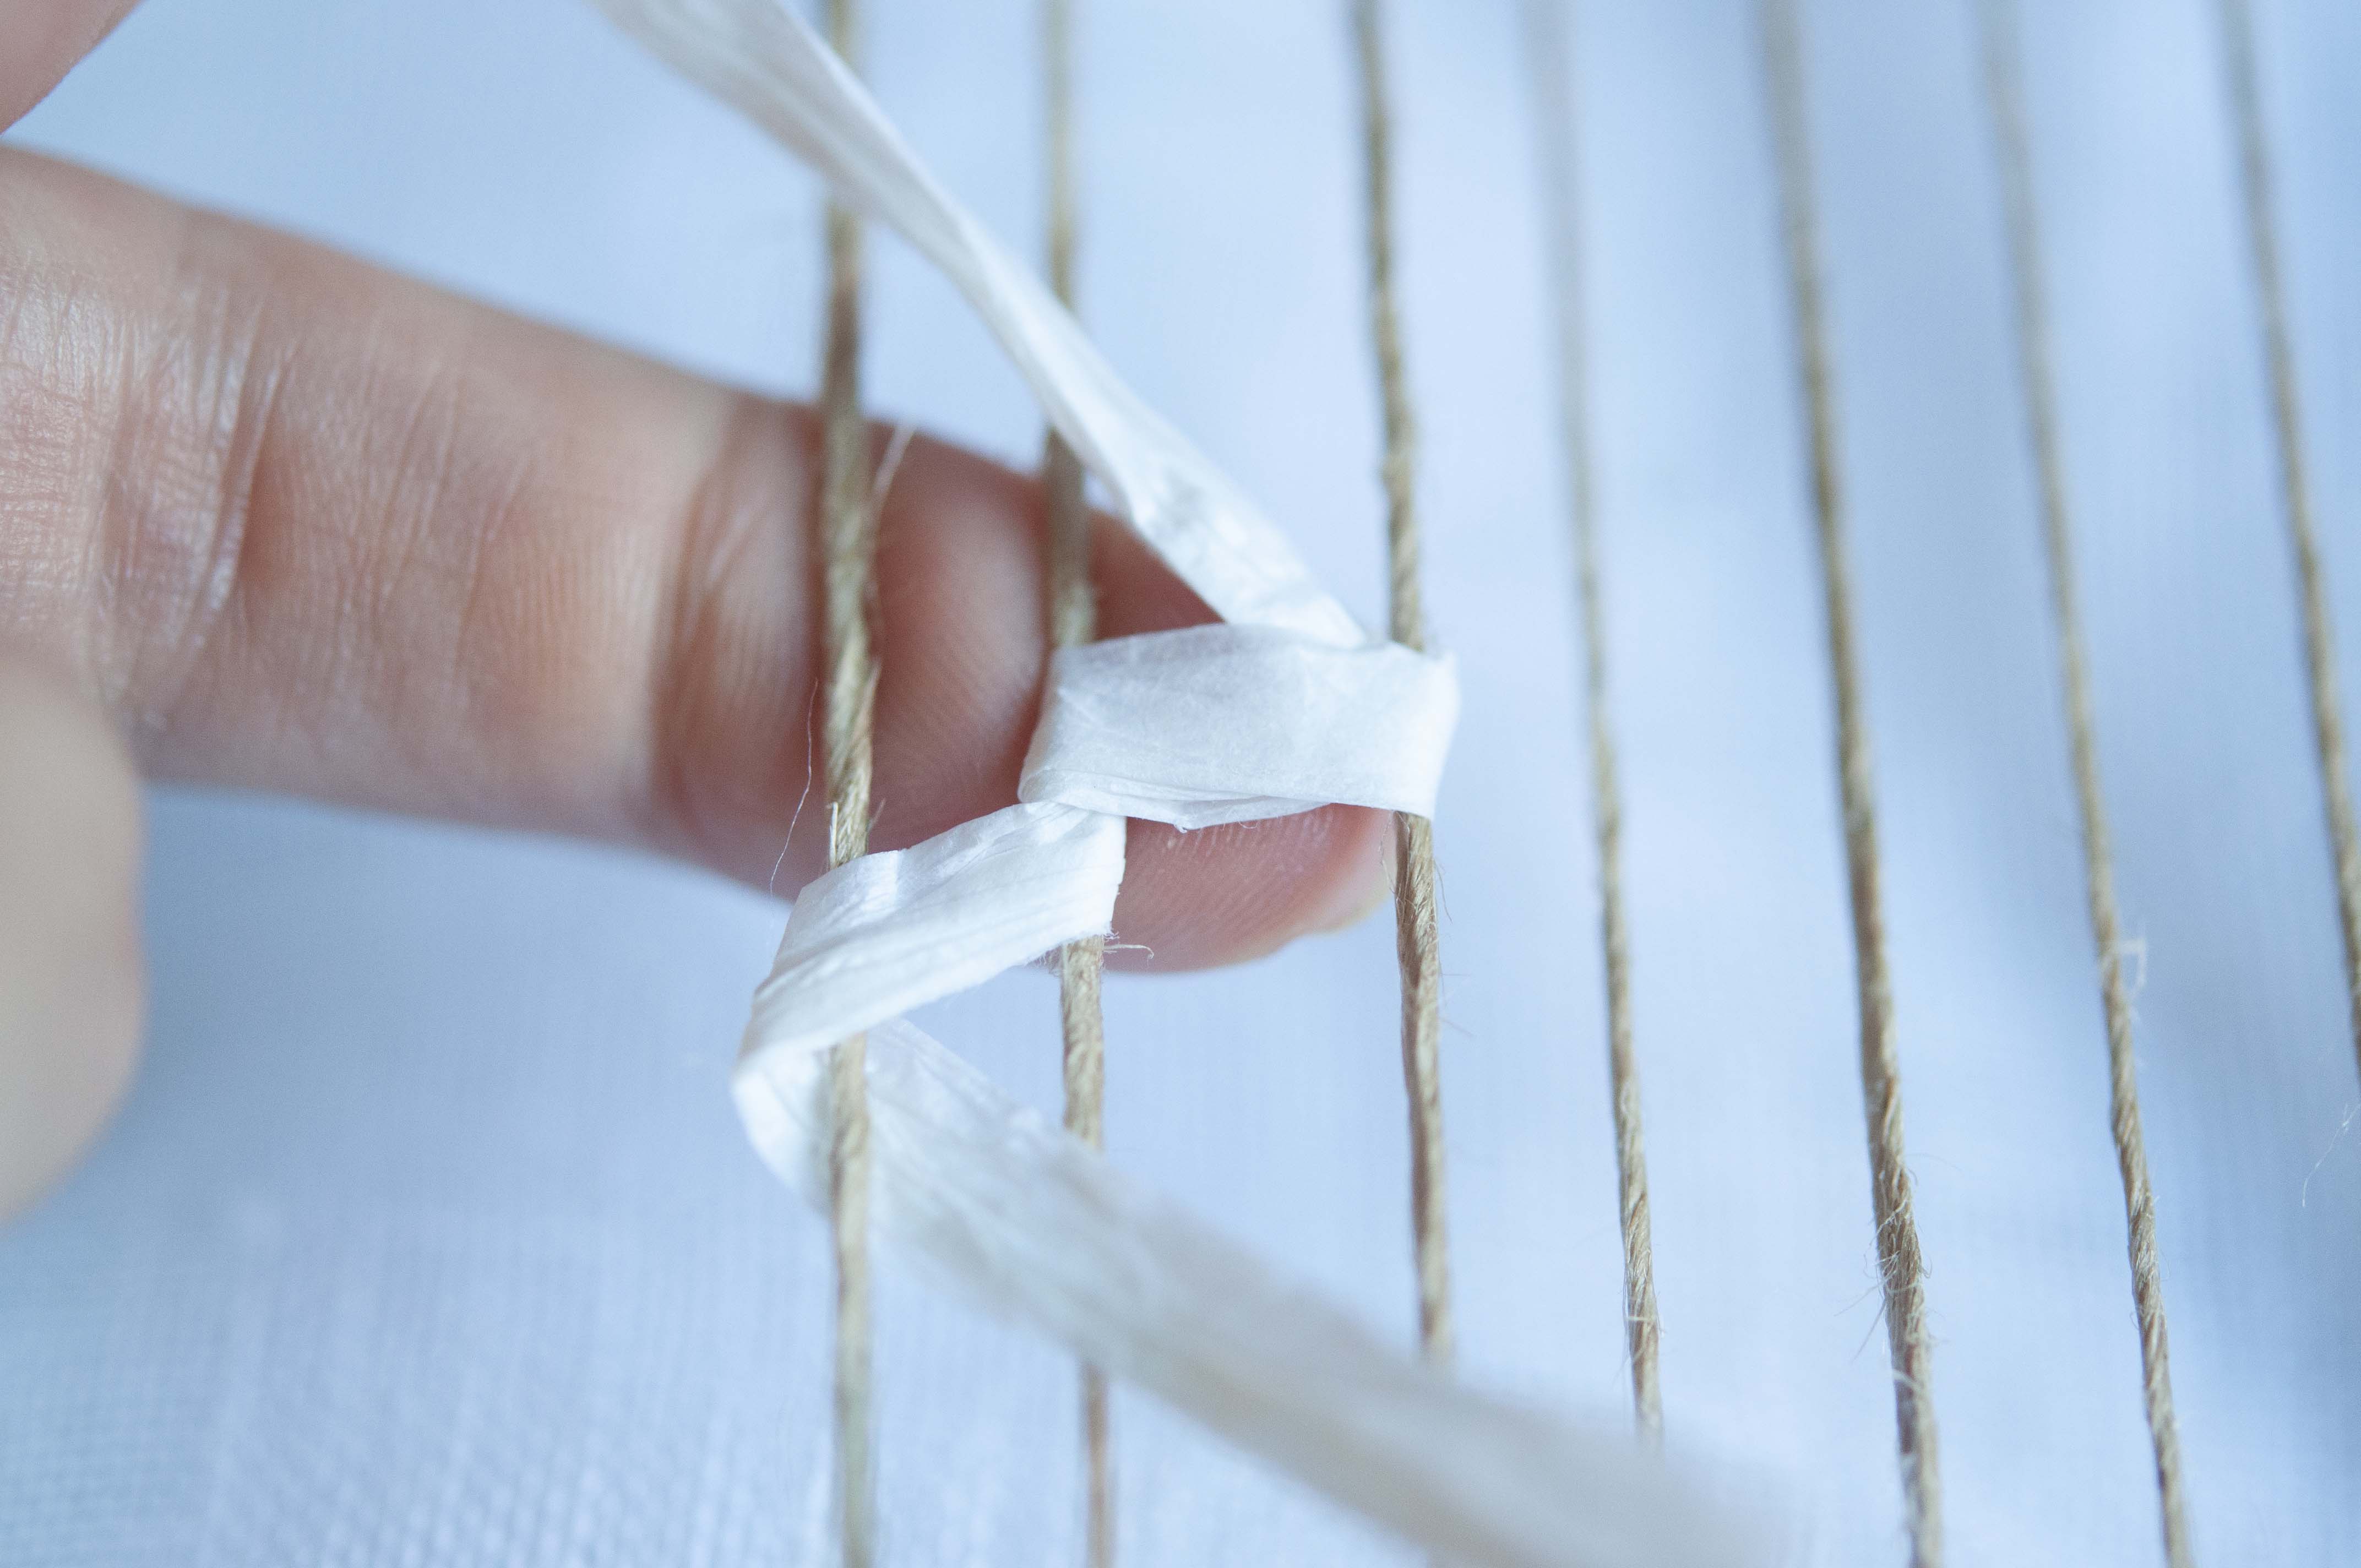
Place the lengths of flora over the top of pairs of warp threads so that there are vertical gaps between each piece of flora. You are going to treat each pair of threads and their associated piece of a plant as one entity that you will group together for this weave.
You’re going to go under the first pair of warp threads and their associate piece of flora then bring your raffia up to the front.
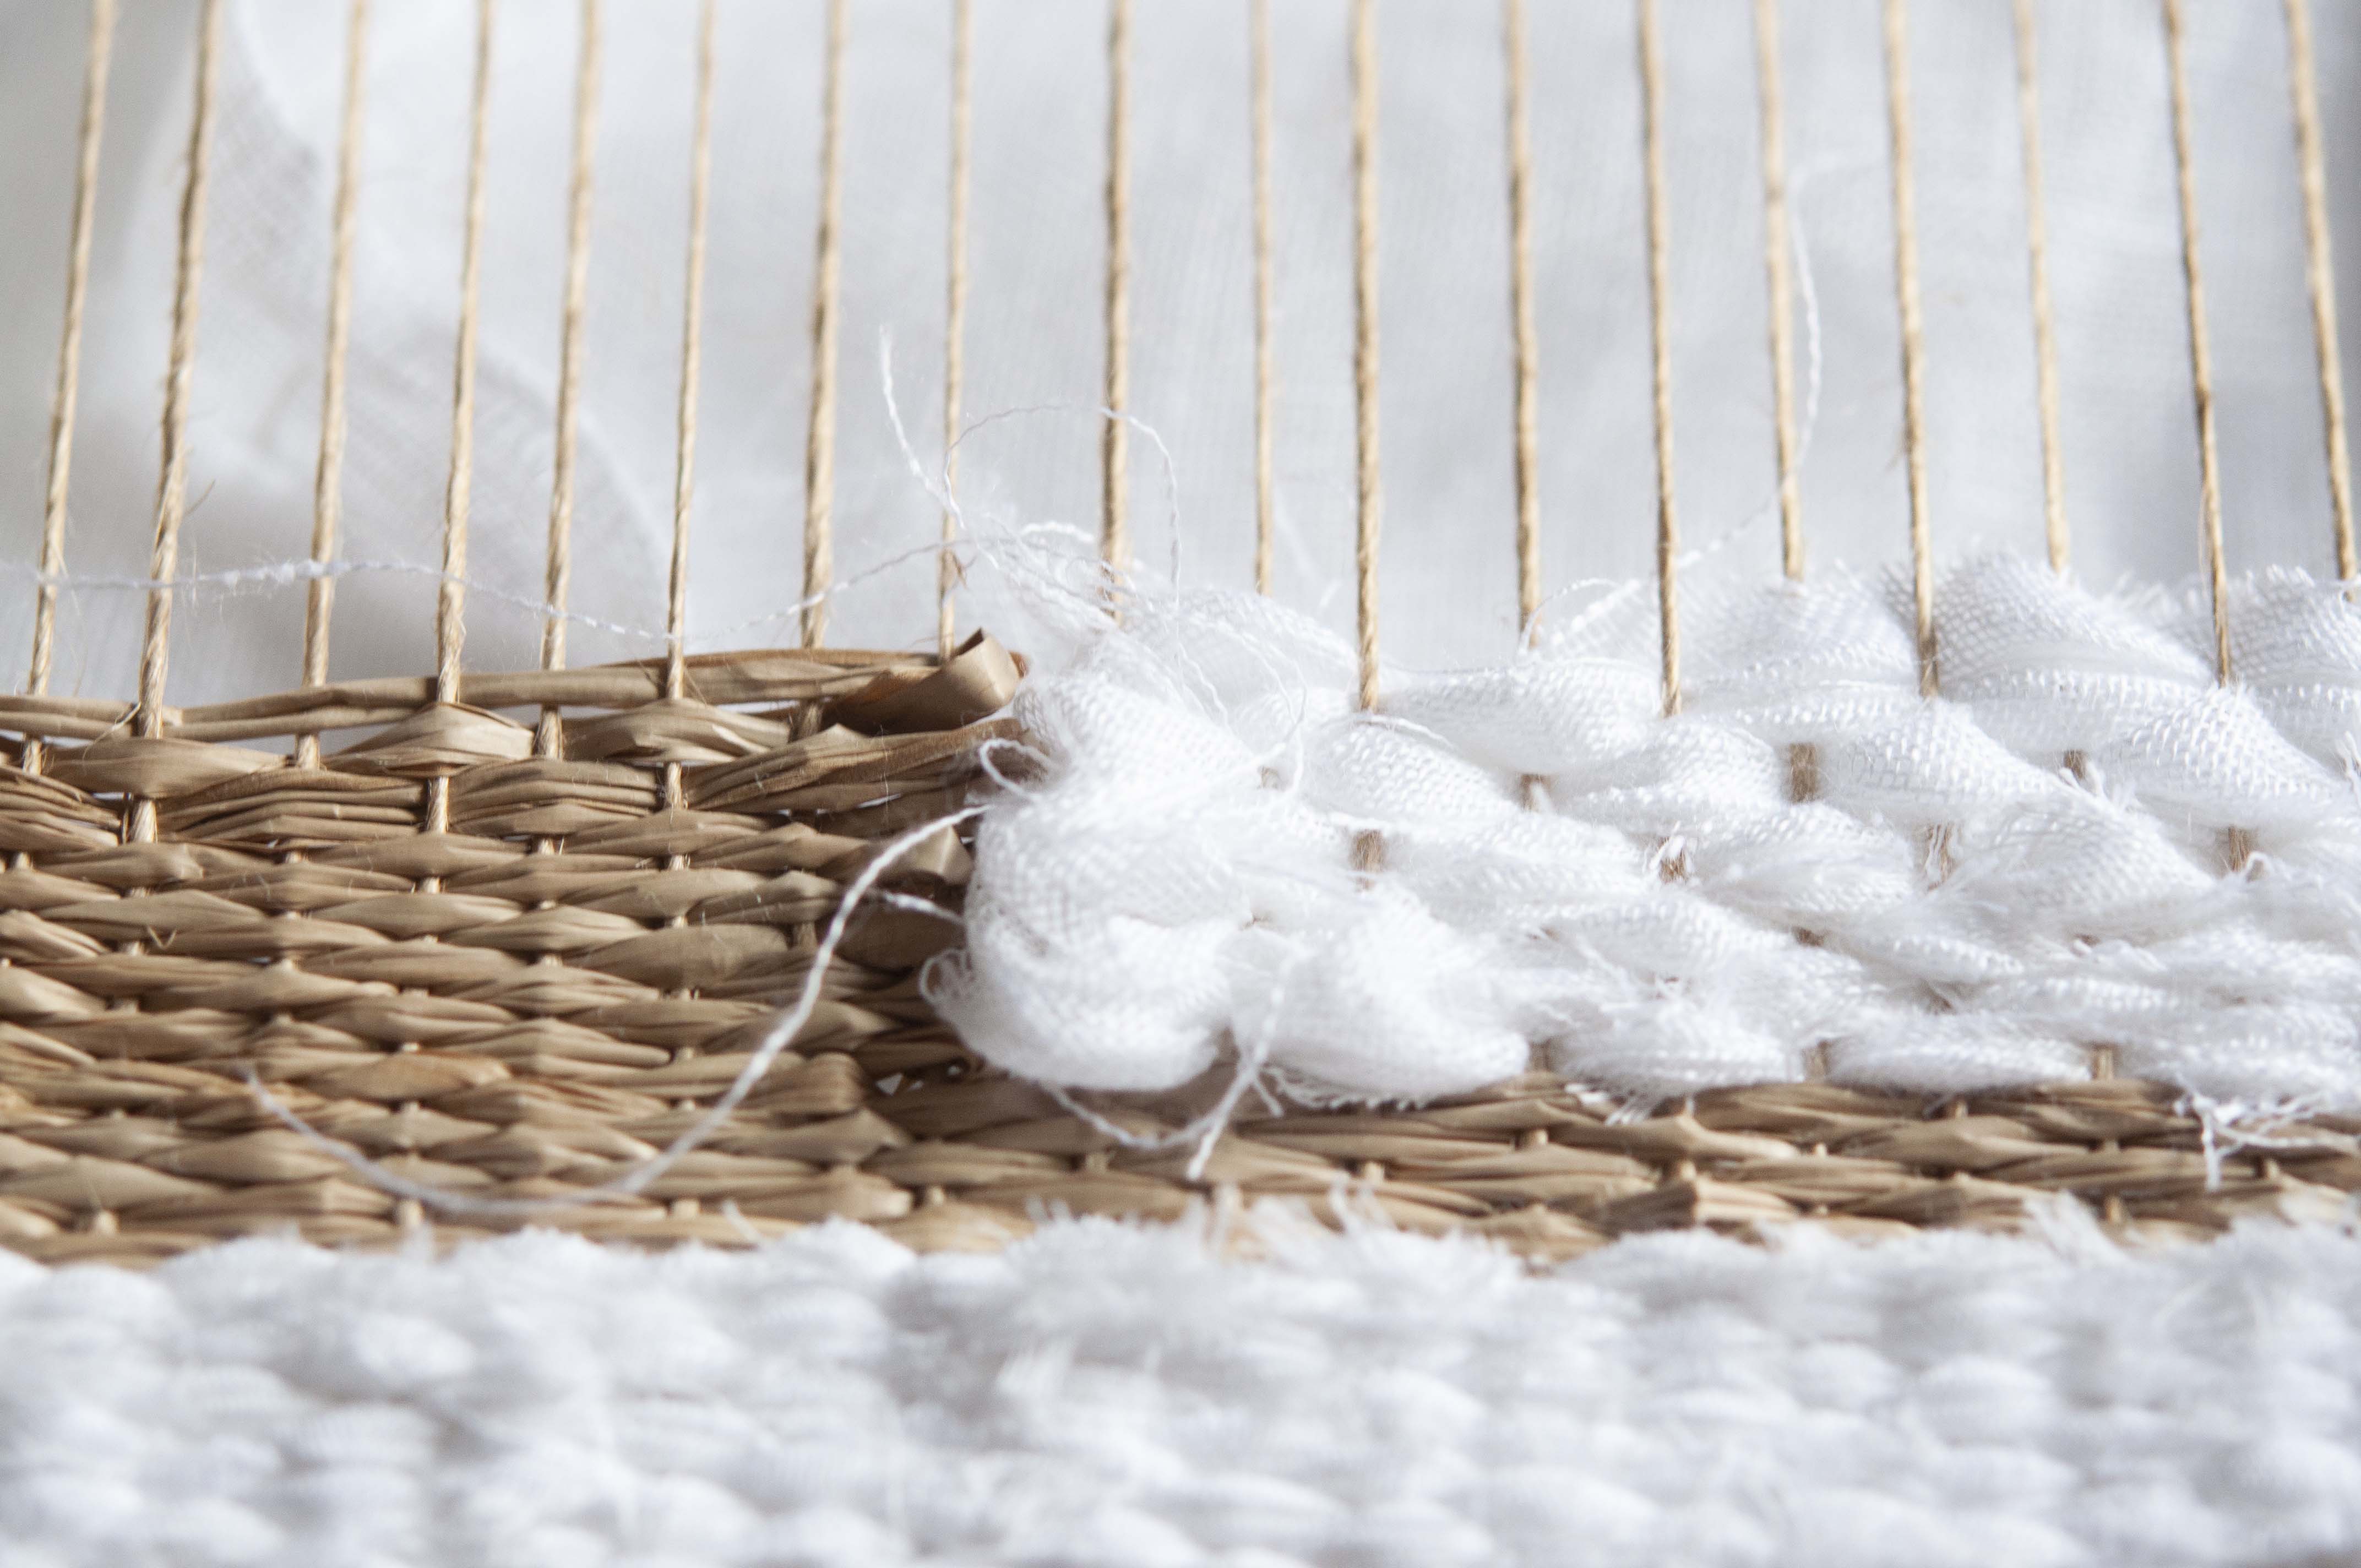
Place in your second piece of flora then lay the raffia over it and its pair of warp threads below.
Head back underneath the third pair of warp threads then place the last piece of flora over the top.
You are simply doing the same technique as you first learnt but with two warp threads and a piece of flora acting as one entity.
Head back and forth alternating between in front and behind each entity as you normally would in any other simple weave.
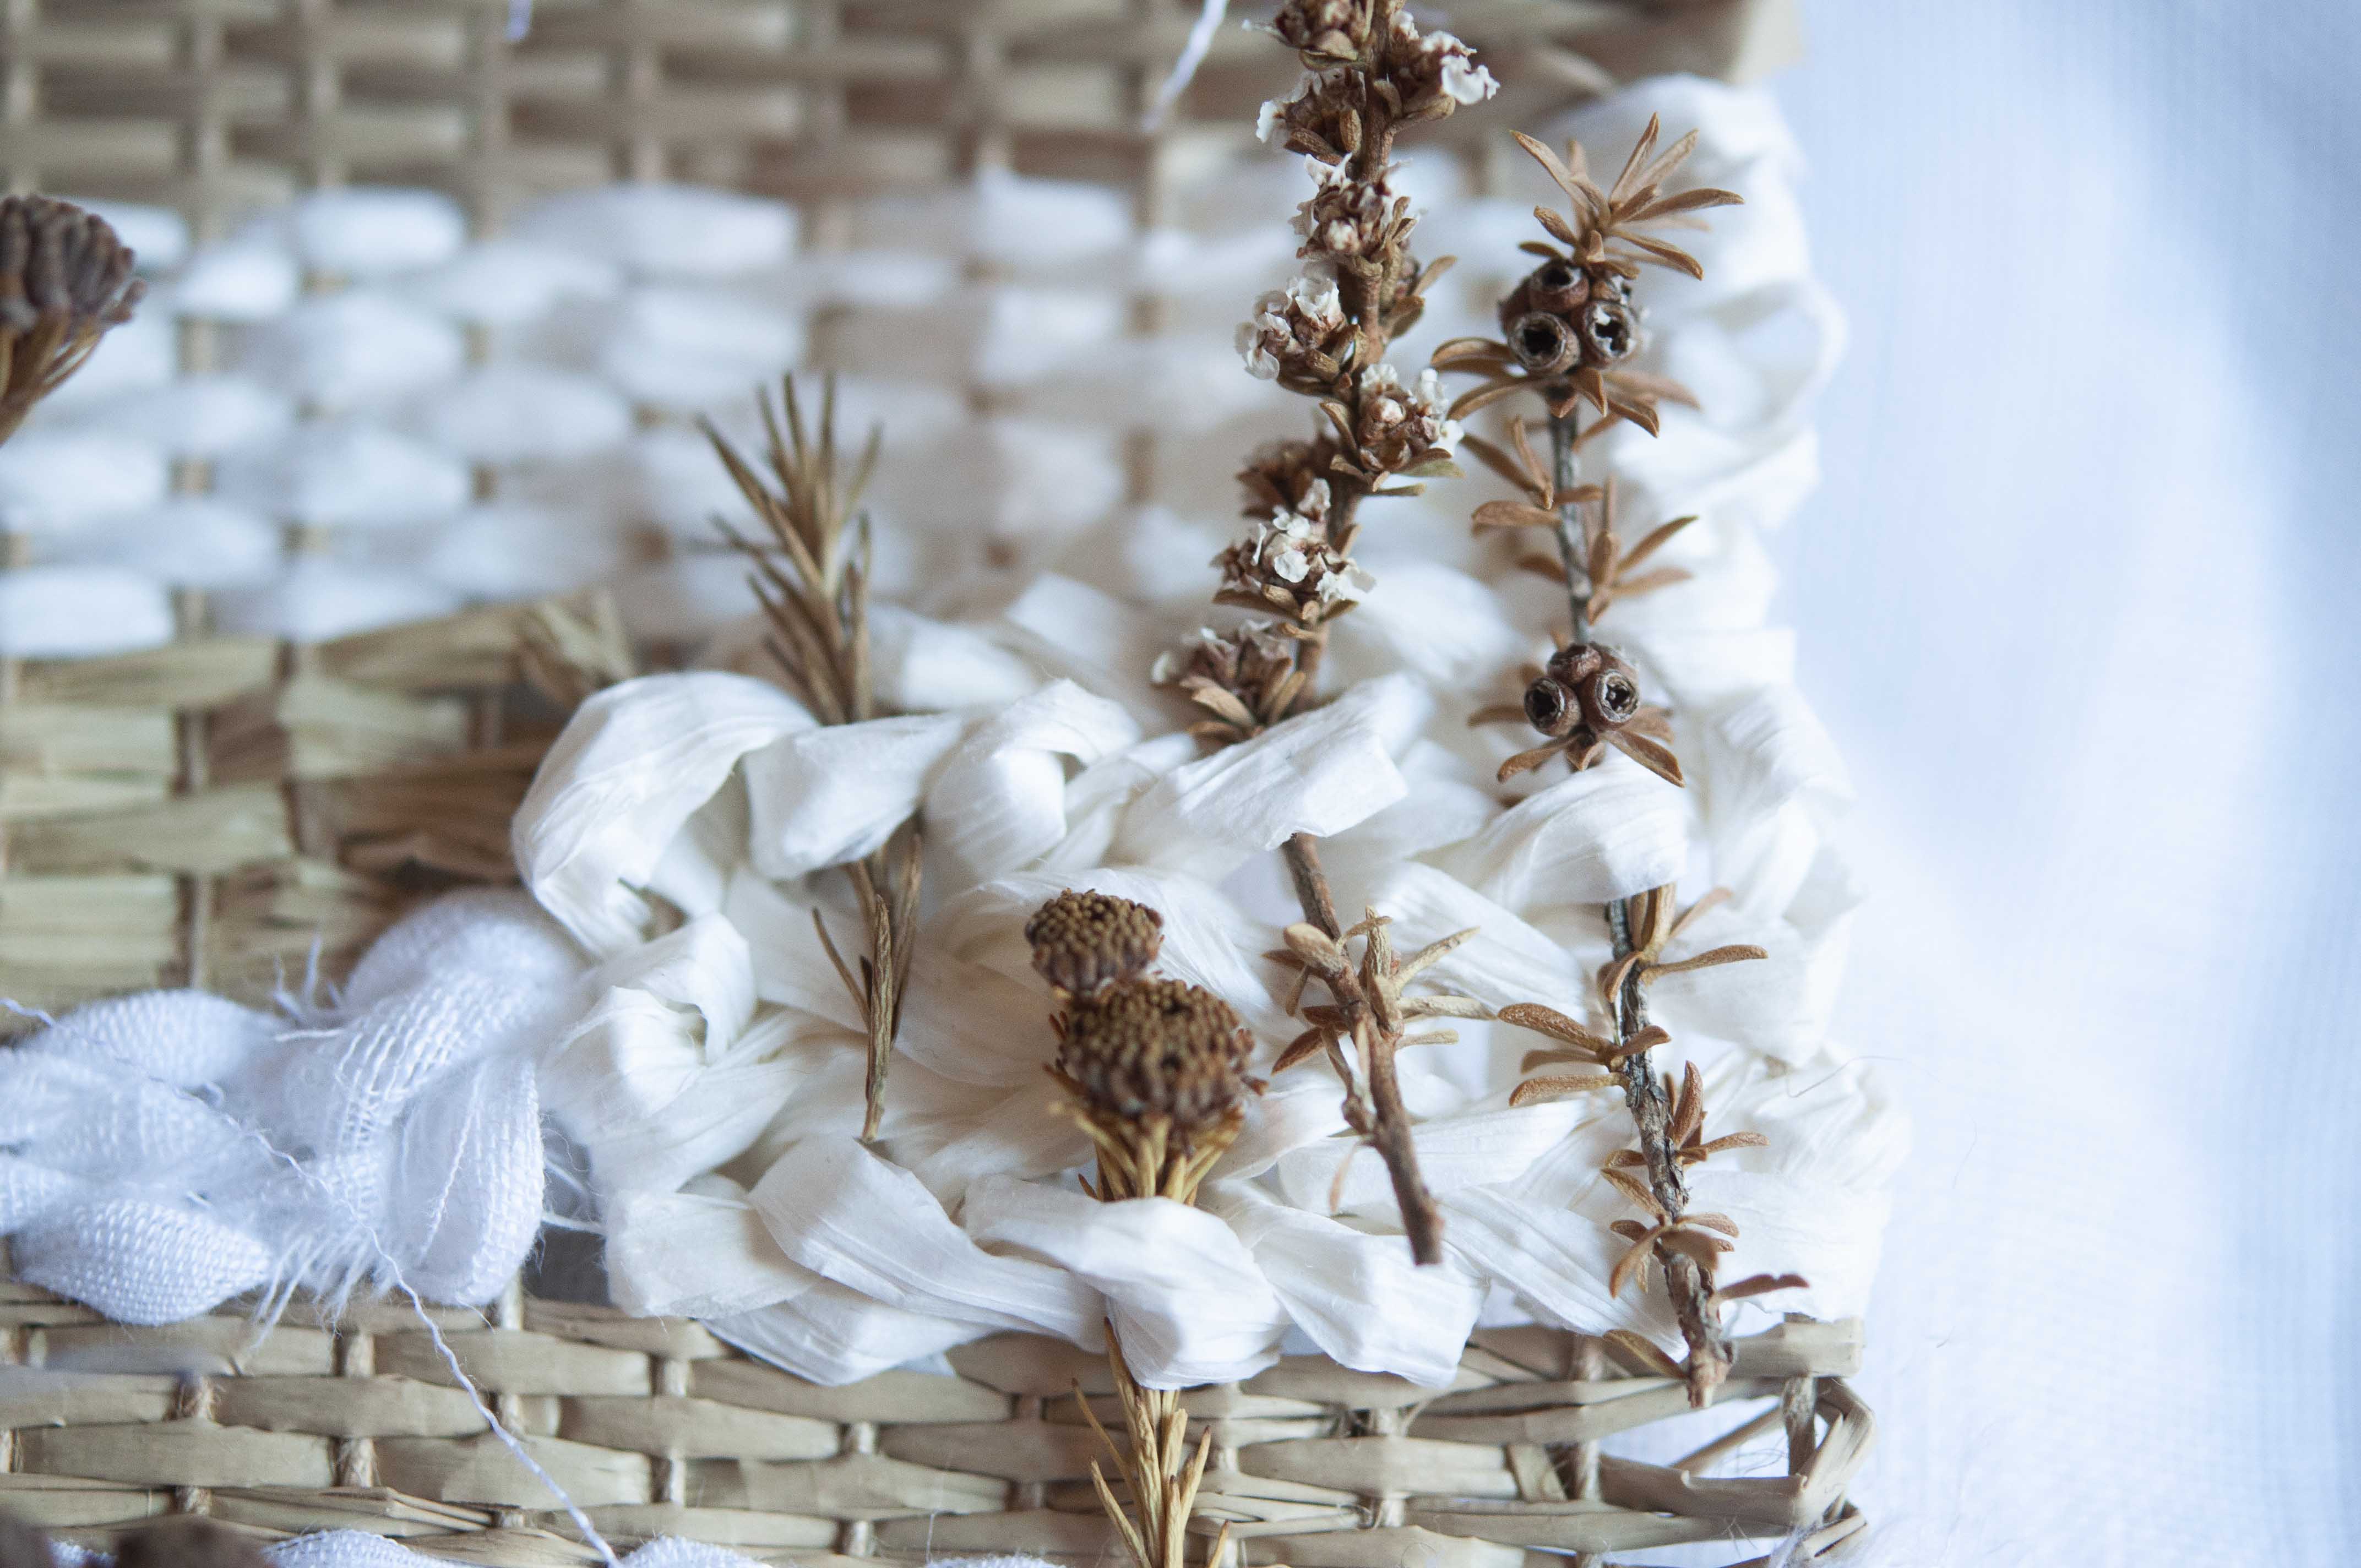
A simpler way too attach dried plants is by placing a piece of flora over the top of a plain section of weaving and simply stitching it on.
All that is required for this application is for you to thread in a piece of raffia or any other fibre through from the back of the weaving to the front and pass it over the plant to the other side and through to the back of the weaving again. Leave a decent length tail out the back, then once you’ve finished a few more stitches, knot the ends together.
Soumak stitch…
The last technique I will teach you is the most complex but by no means unachievable. It creates a beautiful braided pillow that you can tuck dried plants into at the end.
You can start this stitch anywhere you like along your row as it doesn’t depend on the direction of the row below it.
Because there are a few steps to this stitch, I will show you the technique on an empty loom to make it extra clear.
I wanted my first row to go from left to right which, in this case, meant I started with a tail hanging out the right side of the first warp thread and I then folded the long end of the raffia over the thread and to the right.
I then tucked the long end of the raffia back under the second warp thread towards the left and made sure it sat on top of the first warp thread, not underneath.
Next, I took the long thread which is facing towards the left and brought it over to the right
I did the same as I did around the last warp thread, tucking the raffia under and up and sitting it on top of the previous warp.
Continue this technique along the row as many times as you please in an upwards direction to achieve the establishing row of your Soumak section.
Once you have as many stitches as you like, push them all down until they are completely horizontal.
You can turn around to come back in the other direction at any time. You don’t have to go right to the end of the row. All you need to do is wrap the raffia, or whatever you are using, around the same warp thread twice instead of once and end up with the strand facing to the left.
Continue with the same stitch but work in the opposite direction, this time working diagonally up to the left-hand corner.
Once you’ve gone as far as you want to, push the top row down to meet the bottom row.
And that’s all there is to it! You can go back and forth as many time as you like using the same technique to build up a beautifully complex braided pillow to simply tuck your plants into later.
I like to tuck a collection of plants that have delicate details into this section but you can also use this stitch on its own as it does create a beautiful textural pattern.
Finishing the weaving…
Once you are satisfied with your beautiful weaving, you can begin the process of taking it off the loom and turning it into a wall hanging
I only made my weaving go two-thirds of the way up the warp threads so I could use the rest of the warp threads to wrap around the bamboo that it hangs from.
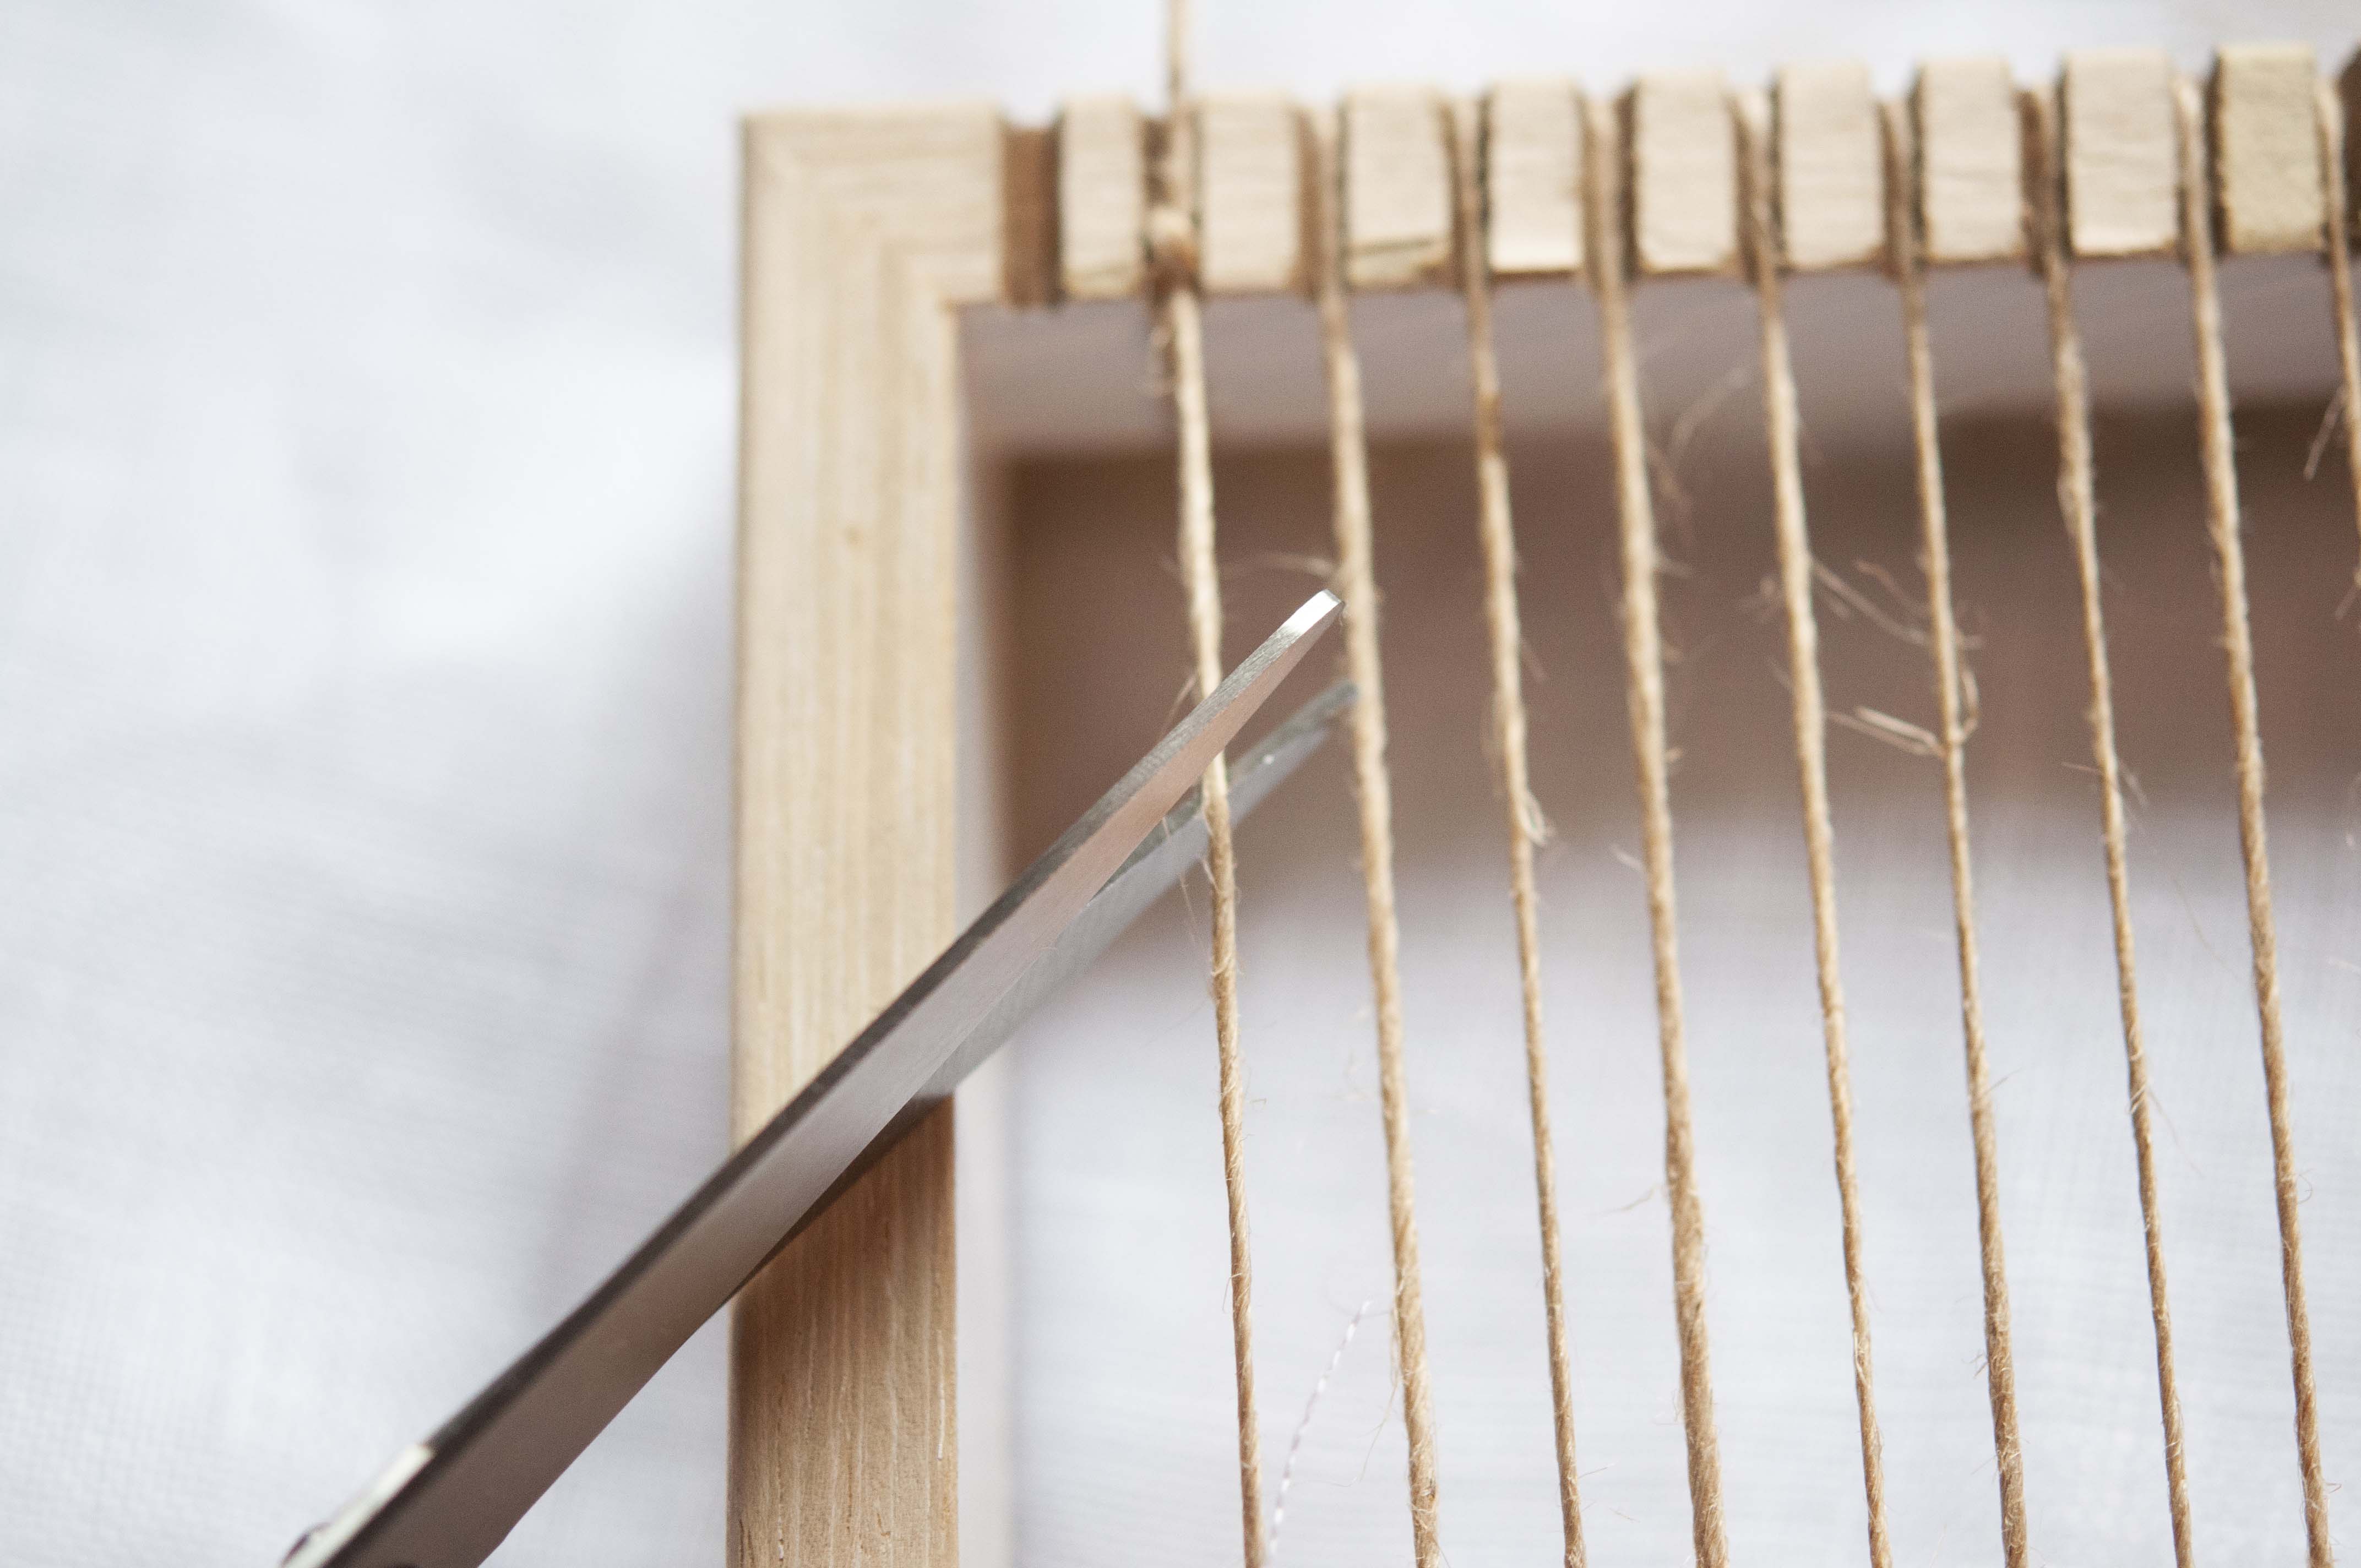
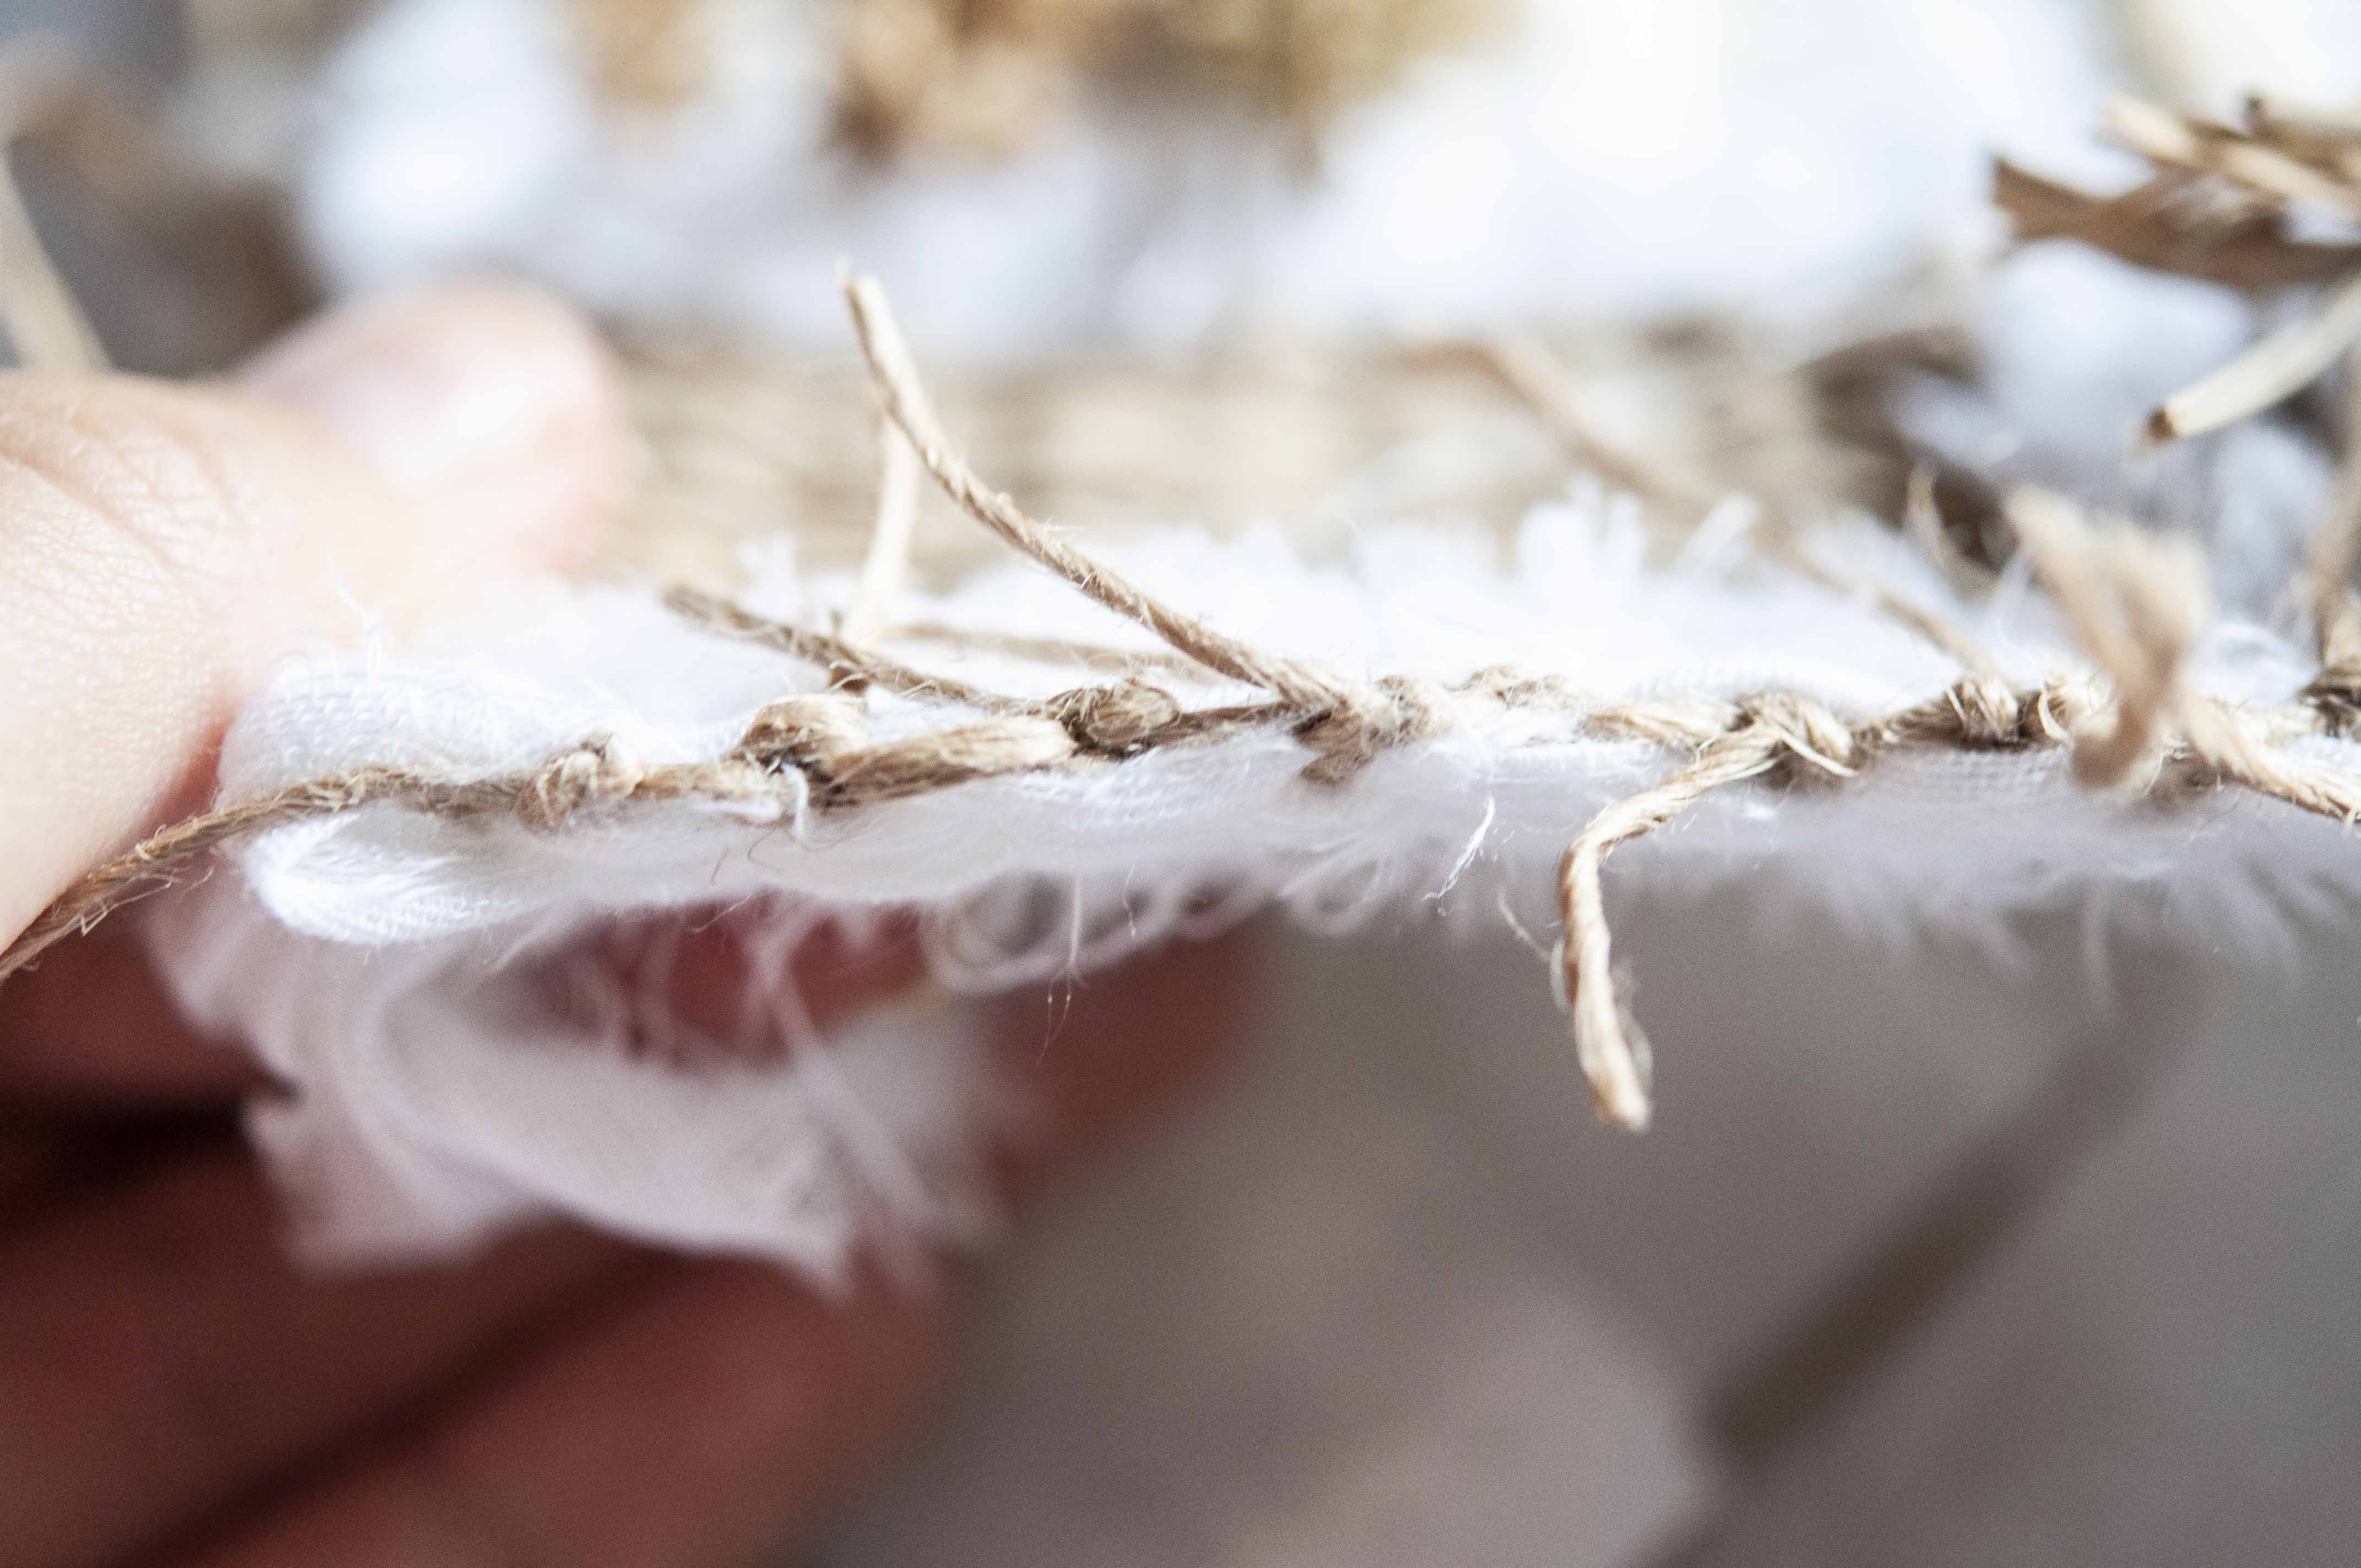
The first thing to do is to snip off the warp threads one by one and begin to secure the ends of your weaving. To do this, cut the first warp thread as close to the top of the loom as possible, leaving yourself the maximum amount of thread to start your knotting. Once you have snipped the first thread, doubleknot it securely to the second thread that is still attached to the loom. Once knotted, snip the second thread and knot it to the third and so on until you reach the end and the weaving is completely detached from the top of the loom.
If you have tied all your knots the same, the warp threads should want to lie flat down the back of your weaving and it should look like the picture above from the front. Don’t trim the threads, as you will use these to secure your weaving to a piece of bamboo.
Complete the same steps at the bottom of your loom to secure the ends, making sure to cut your warp threads with the maximum length possible for ease of knotting.
You can trim these ones right down and hand stitch over them with the same string as you used for your warp to cover up any threads that are still sticking out.
Finishing the loose fibre ends…
You will see that you still have all the loose ends from where you started and finished rows along the way. The best thing to do, although time-consuming, is to secure these ends by stitching them in and out of the back of your weaving so that you don’t see them from the front.
This part is not so much fun but is satisfying to watch the sides of your weaving come together neatly.
Mounting the wall hanging…
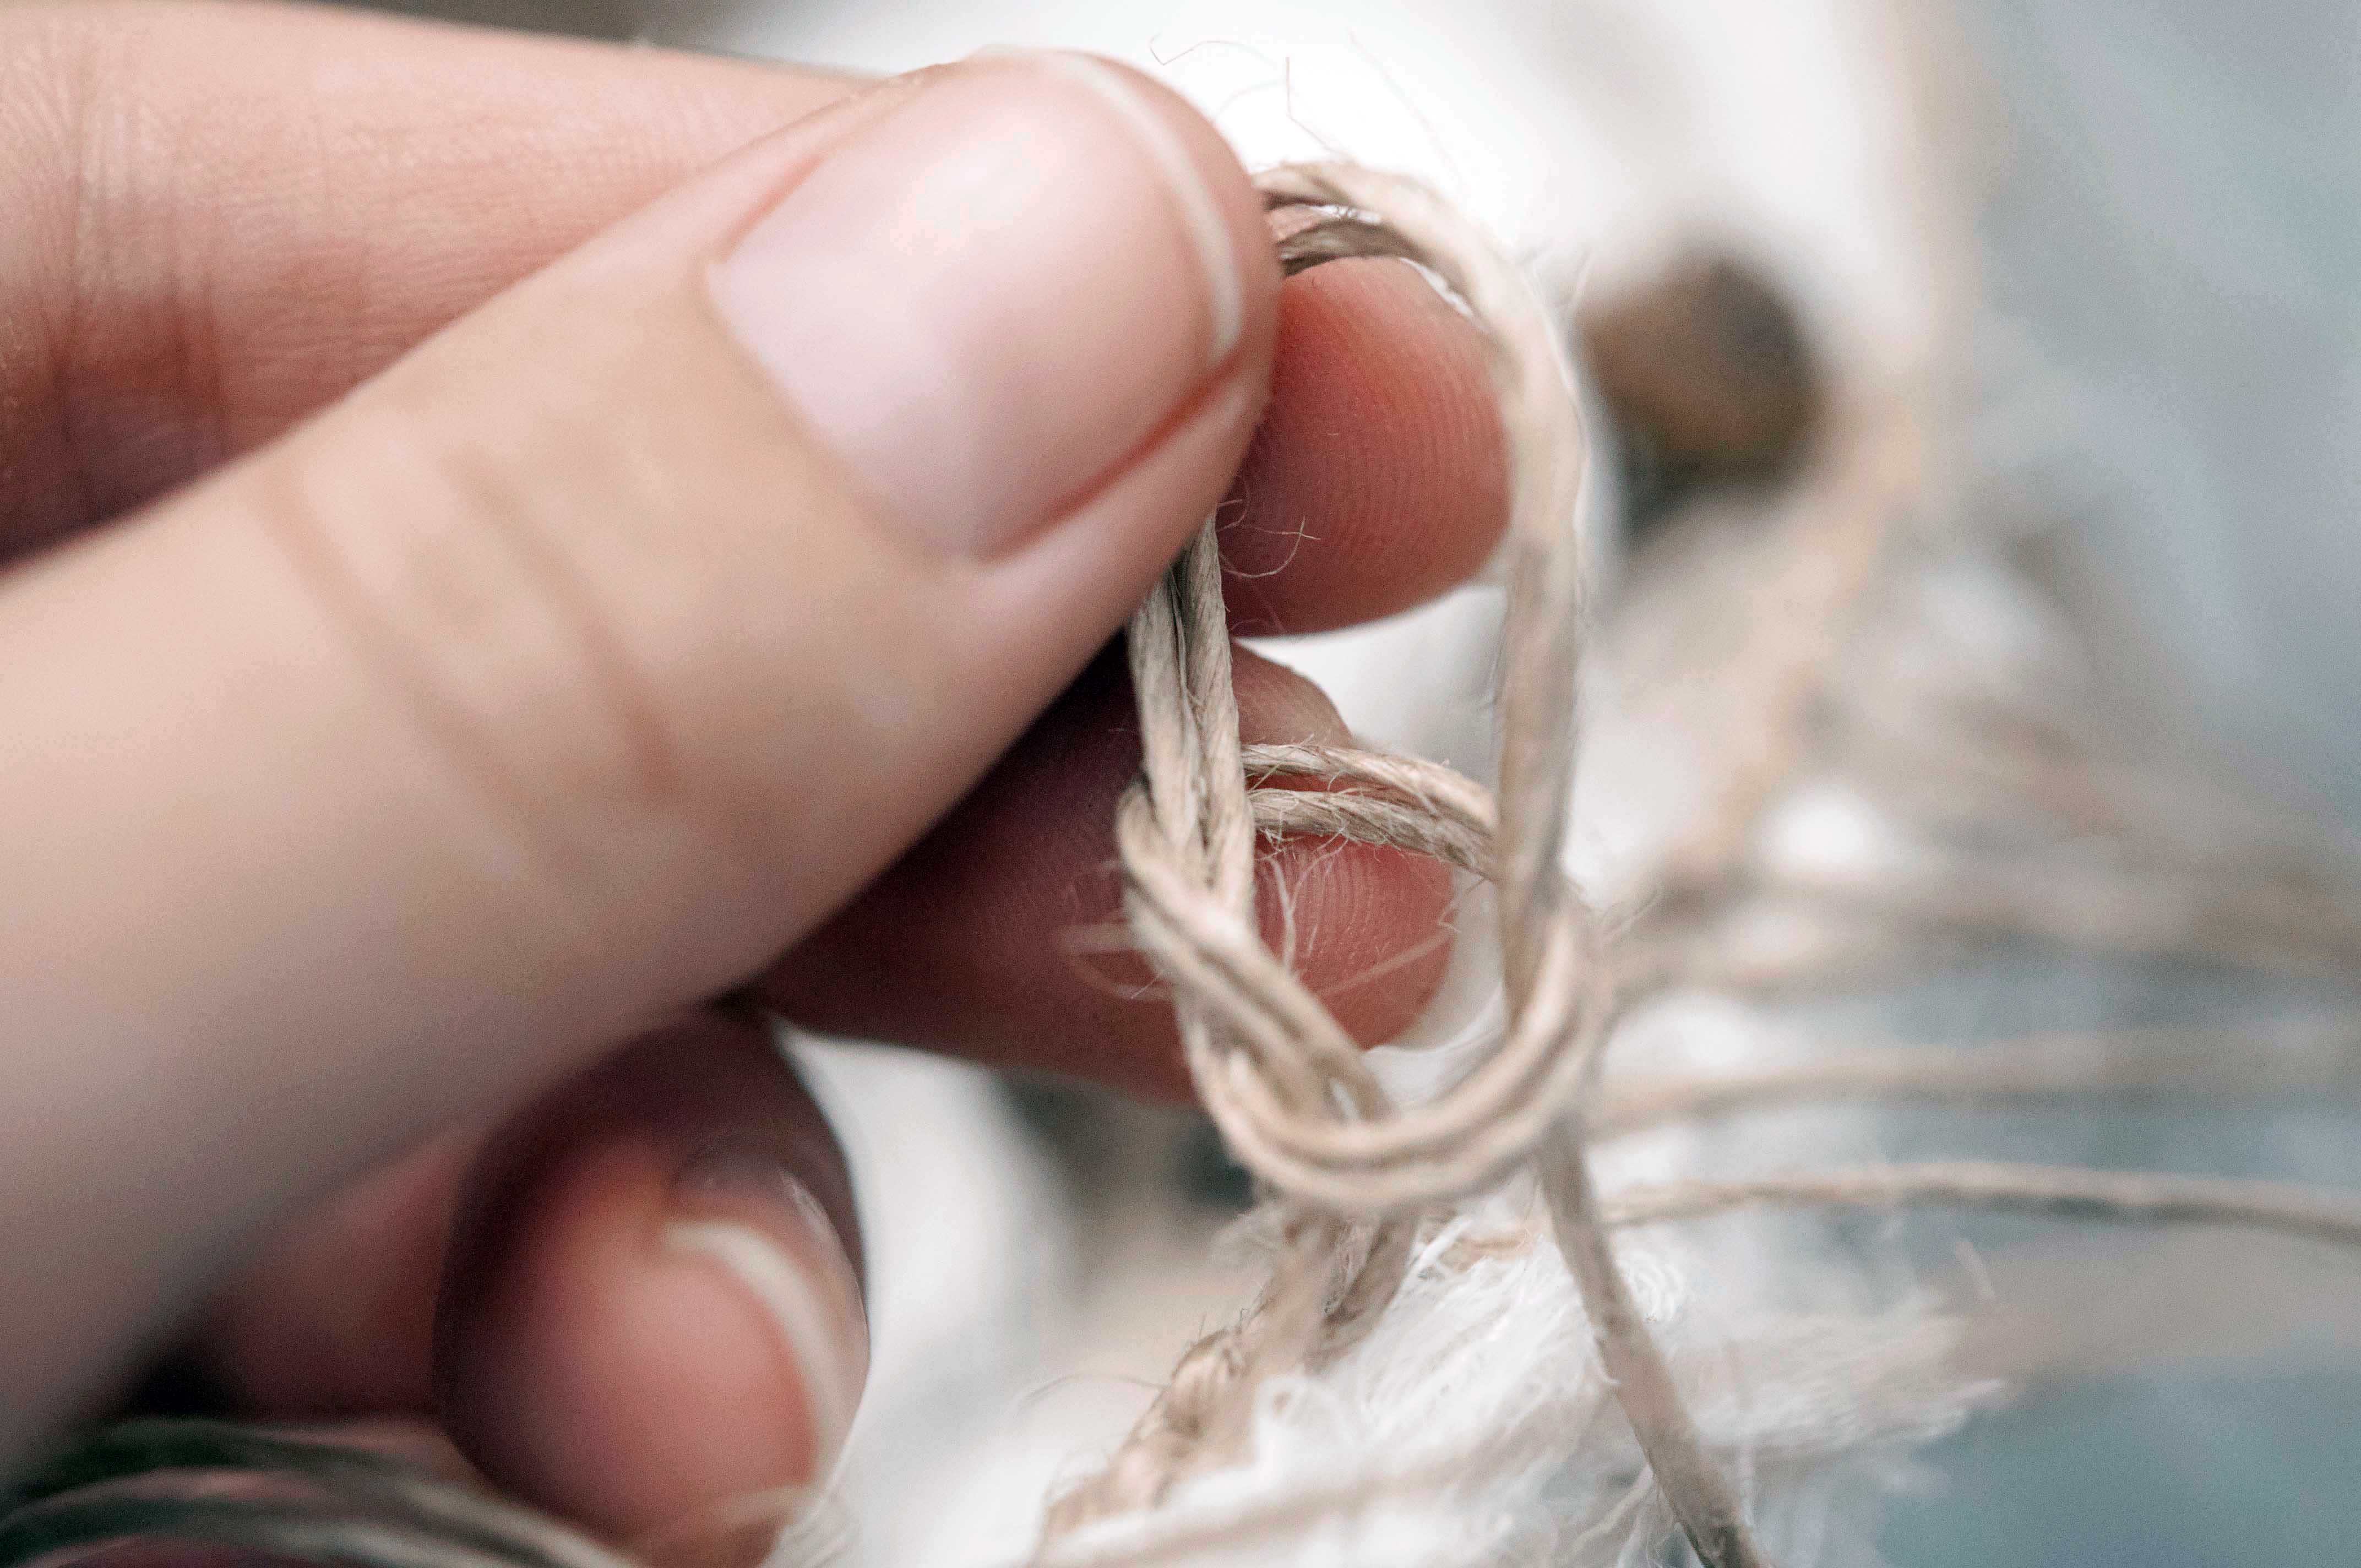
Returning to the top of your weaving, now that it is completely detached, bring together pairs of warp threads.
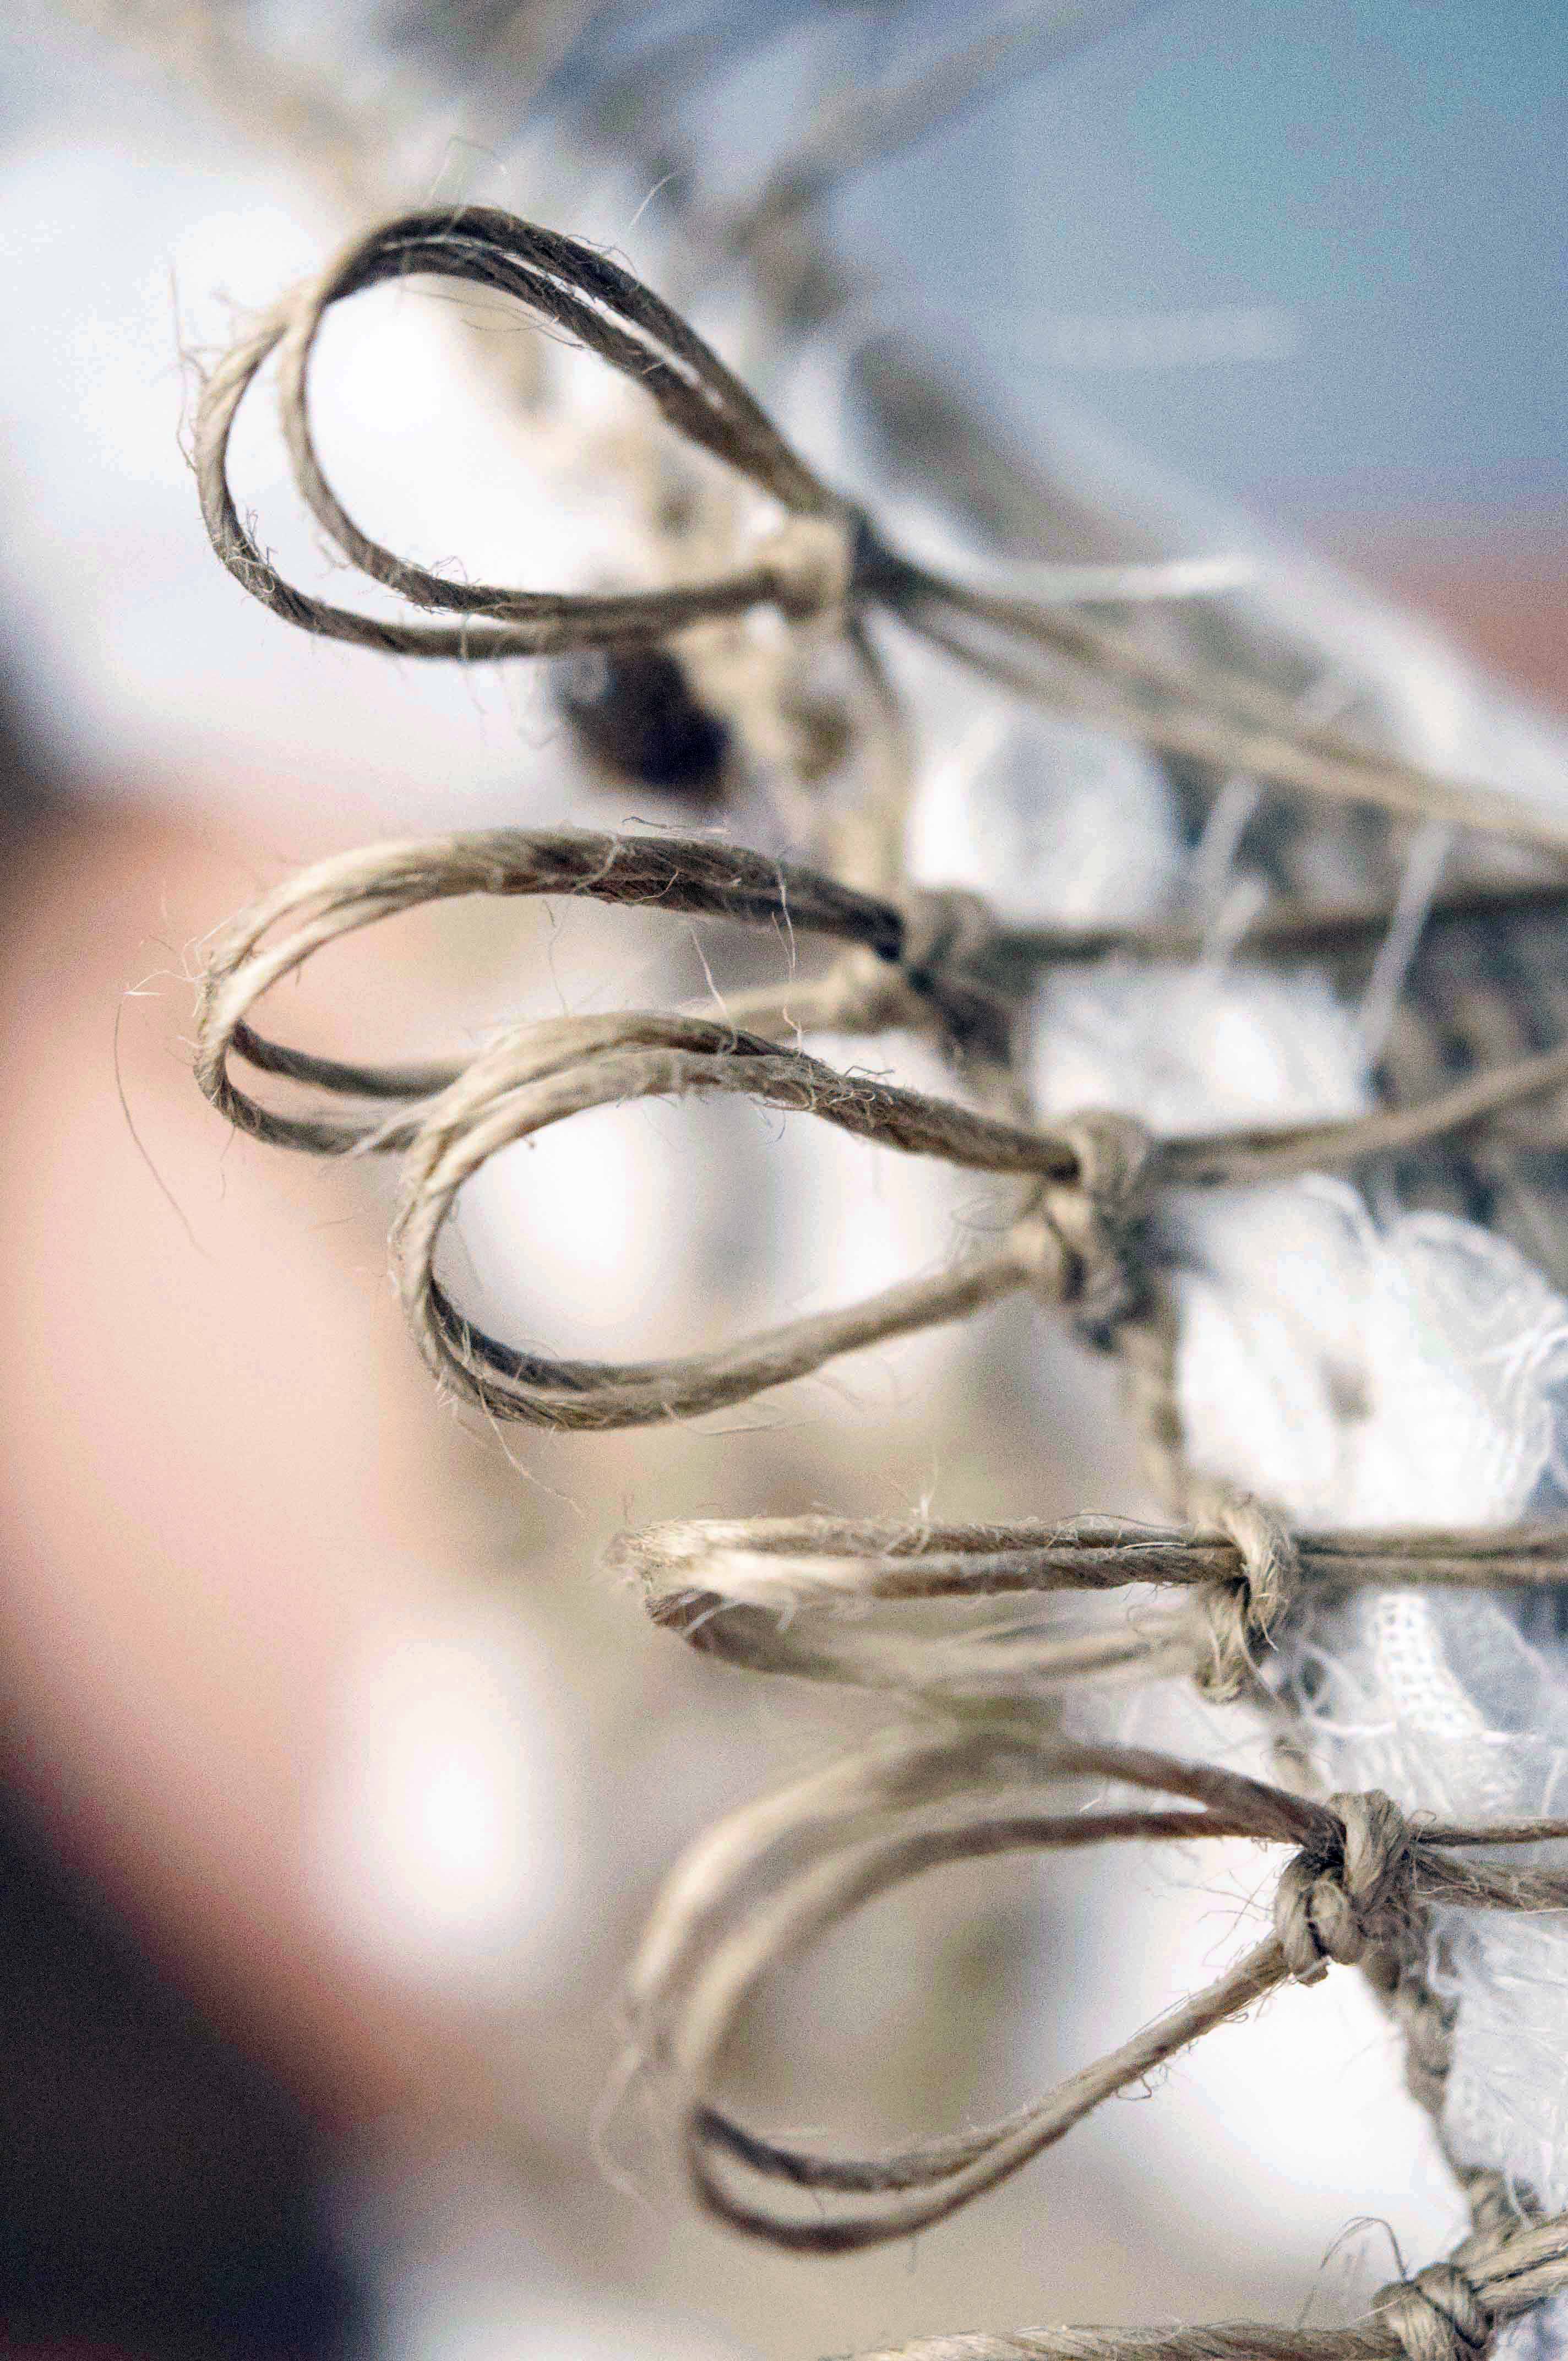
Knot these threads using a simple slip knot with space for the bamboo stake to go through, and position the ends of the threads down the back of the wall hanging.
You can then slip any piece of wood you like through these loops to hang your weaving from.
I used bamboo for this piece, but driftwood or any other dry piece of wood from your back yard will do!
FrontBack
The final product!
You are now finished and ready to hang your wall hanging! When I have mine up on the wall I like to rest the bamboo stake on a hook or a pin so that the pin is sticking out between the bamboo and the top of the weaving. Another way to do it is to attach a piece of string to either end of the bamboo and hang the weaving from that piece of string.
Thank you for making it to the end of my tutorial!
I hope you’ve enjoyed making your natural fibre wall hanging as much as I did!
If you have any questions, send me a message here or on my Instagram and I’d be happy to help you.
If you want to see any of my designs that are for sale, including this wall hanging, head to my Instagram @kate_alderton_design


You must be logged in to post a comment.